It’s now October. I continue to procrastinate on that tablecloth on my Big AVL. I don’t quite know what’s wrong with me because I was on fire to get it on the loom. I was 7/8’s done with the threading in August, and now it’s October and it hasn’t been touched in more than a month. Maybe I’m worried that after all this work it won’t weave well. Yep, definitely worried about that.
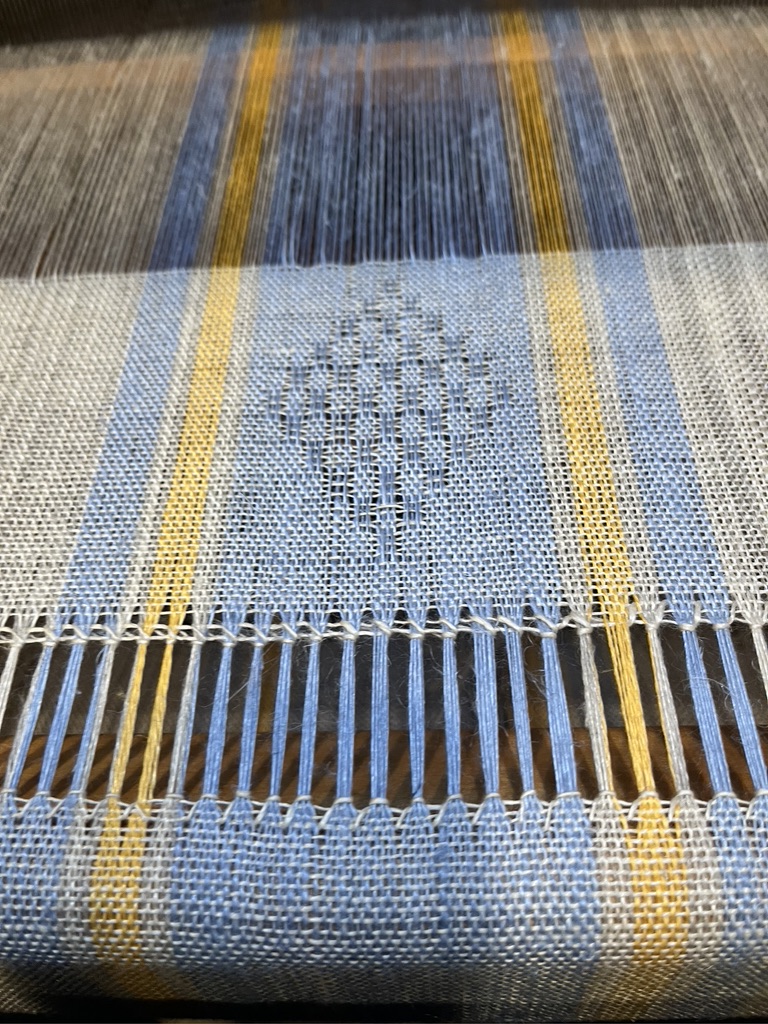
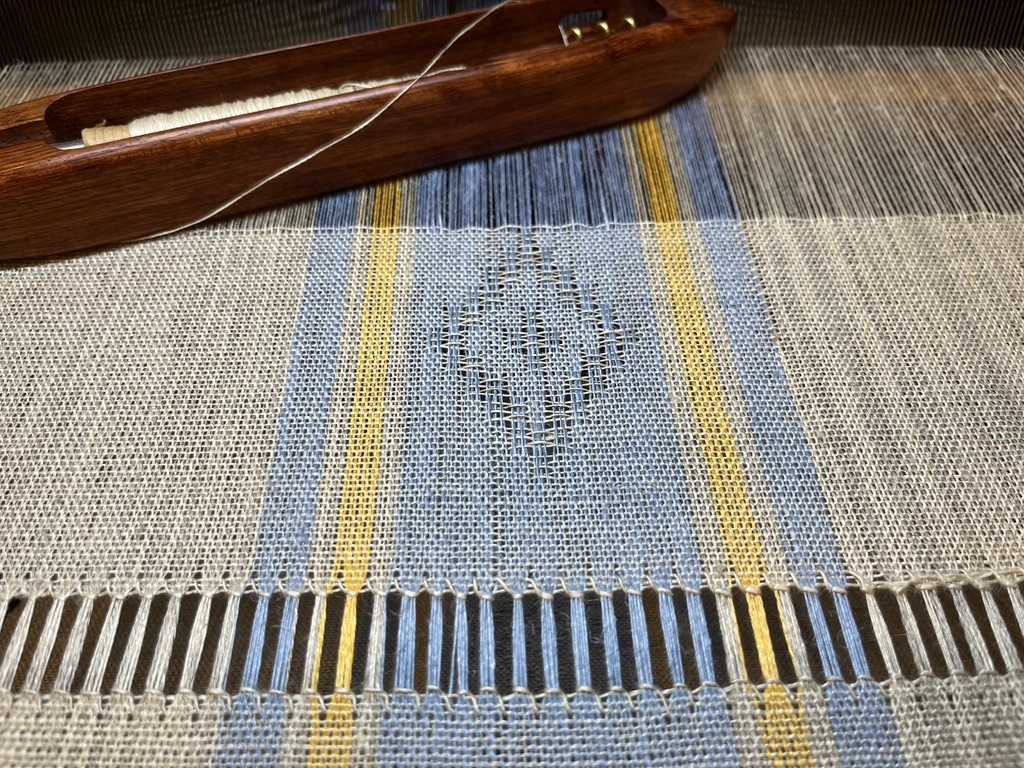
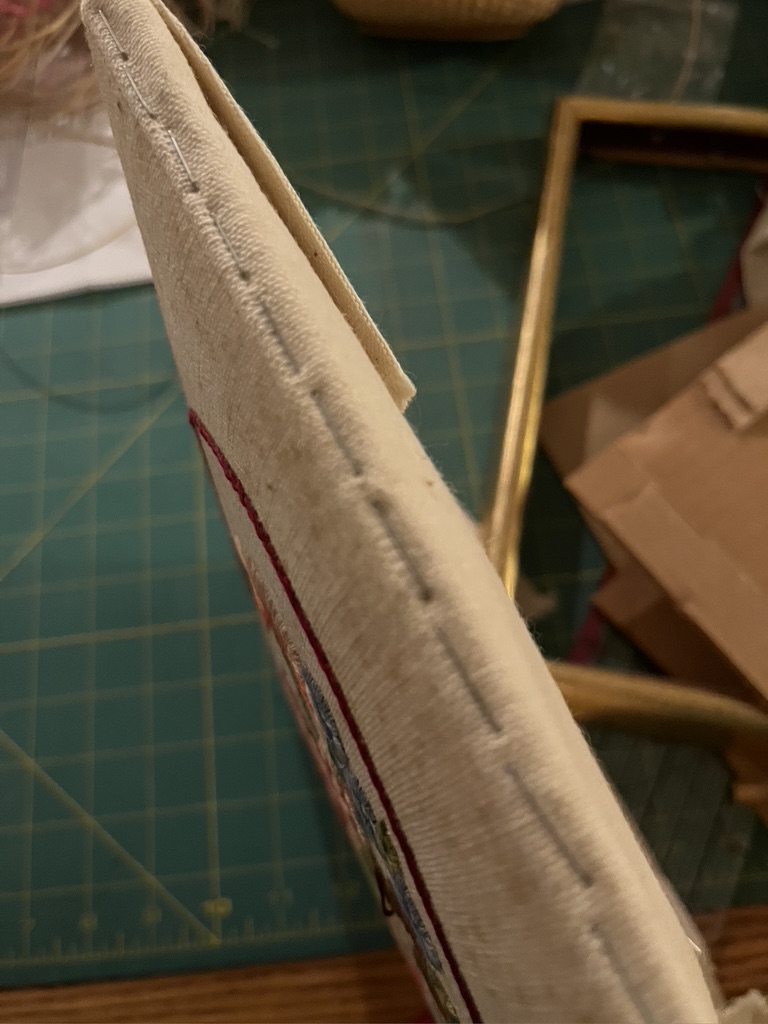
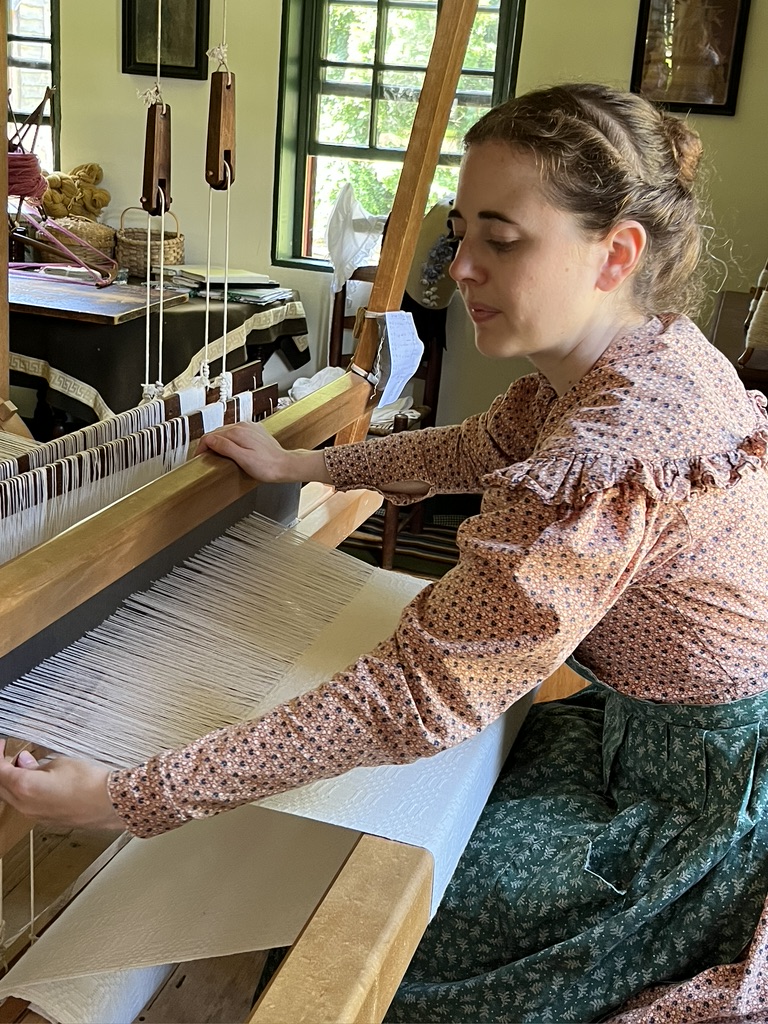
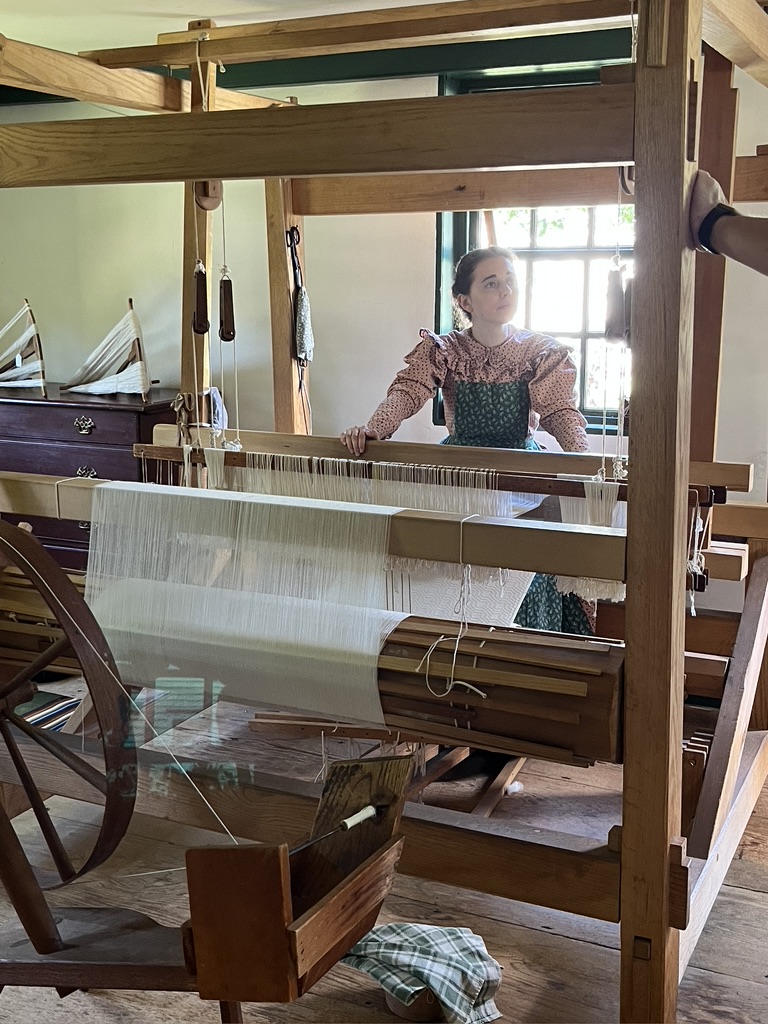
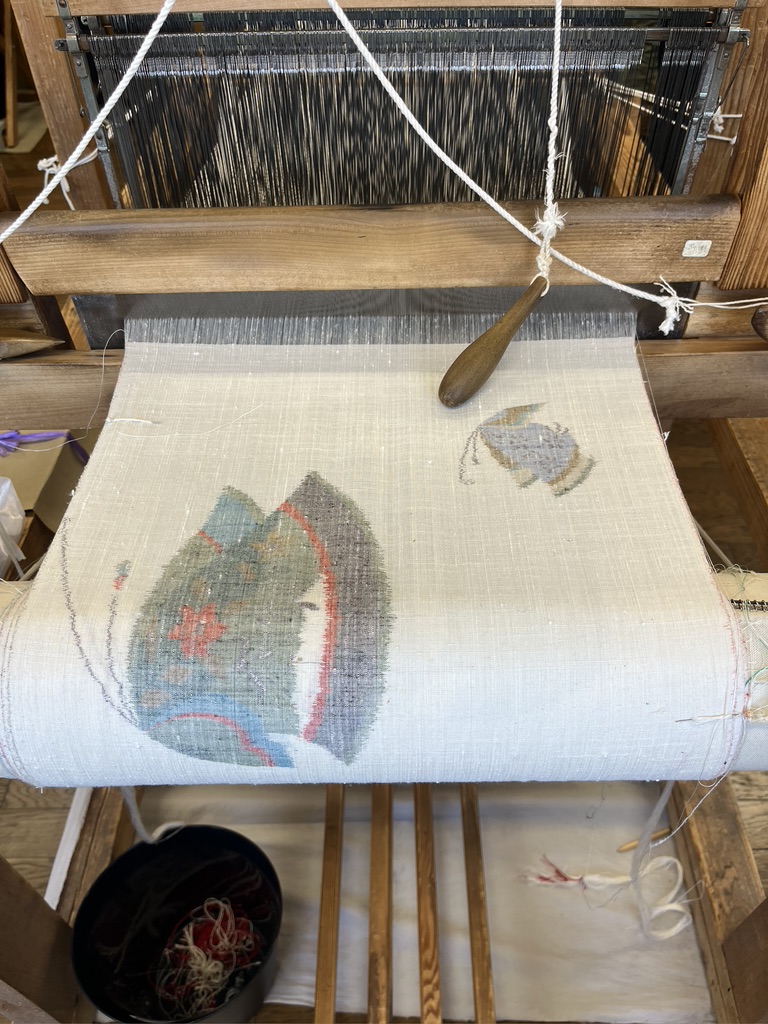
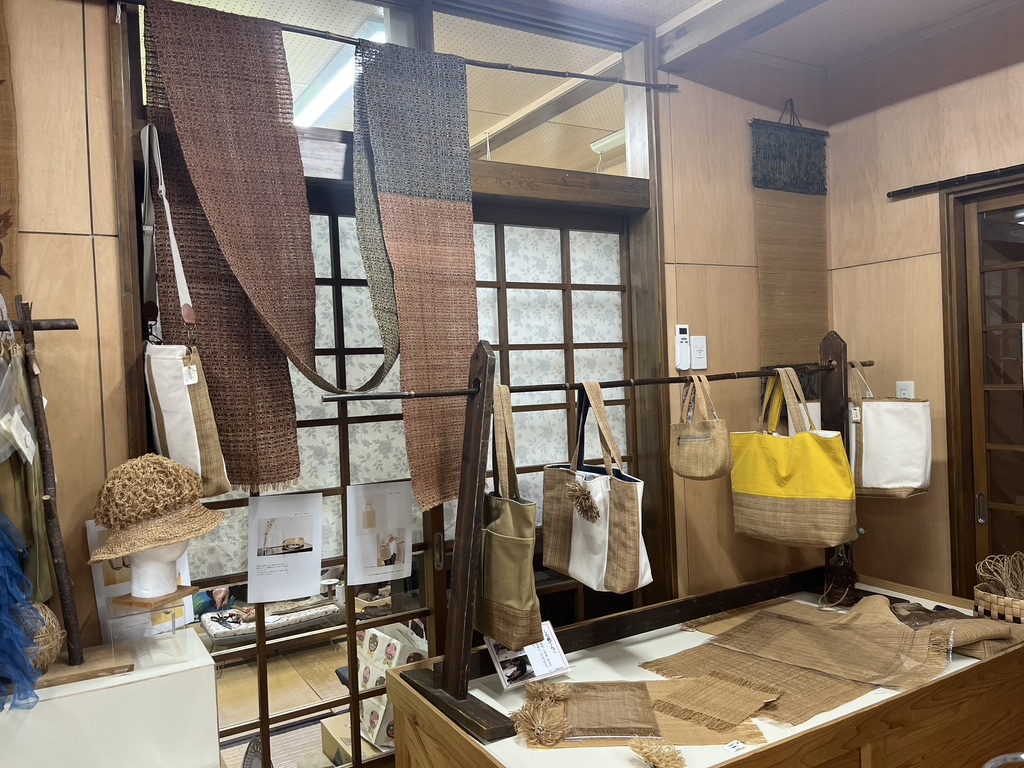
On a better subject, I have been weaving my linen project for the class with Fran Curran. I’m more than half done with the 2nd bread bag, and I’ve started the braid for the drawstring. Here is the first design, showing the hemstitching which will be the casing for the drawstring. I designed a diamond with warp-only floats so the blue warp would show up strongly on the surface of the huck lace.
The 2nd bread bag has warp and weft floats. It will be interesting to me to see how they differ after I wash the fabric.
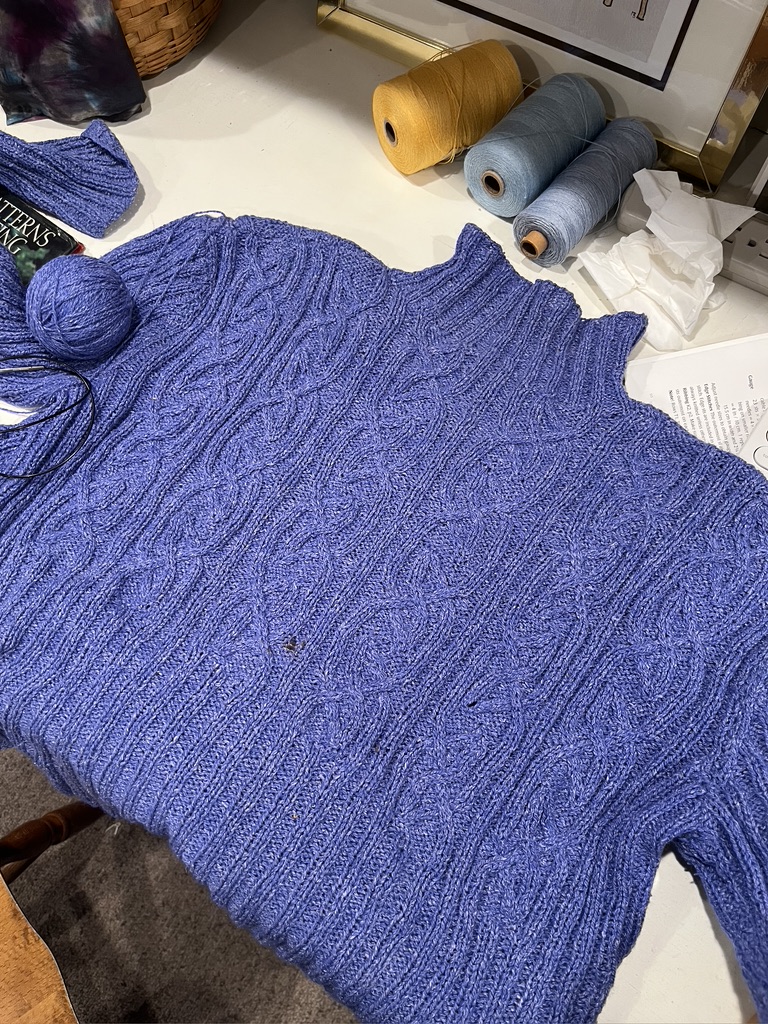
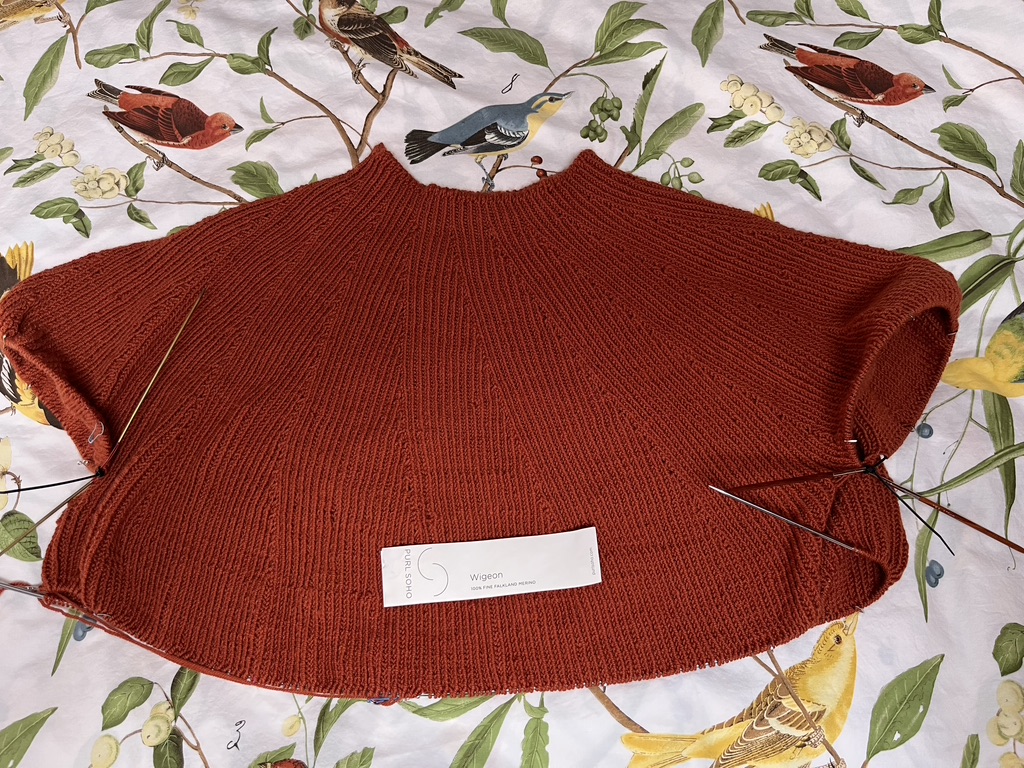
Of the two sweaters I found that I’d like to a) alter, and b) finish, I have started on the blue cabled sweater that was designed by Elsbeth Lavold. I am adding a gusset to each underarm that will continue down the side seam, which I have opened, to create an A-line silhouette. I’m not happy with how the gusset looks. It’s messy. I’ve started over again and am still not happy. Part of me thinks, well, it’s the underarm, so it will rarely show. But…. I know it’s messy! This nagging disappointment keeps me from working on it. It’s not worth a photo at this point.
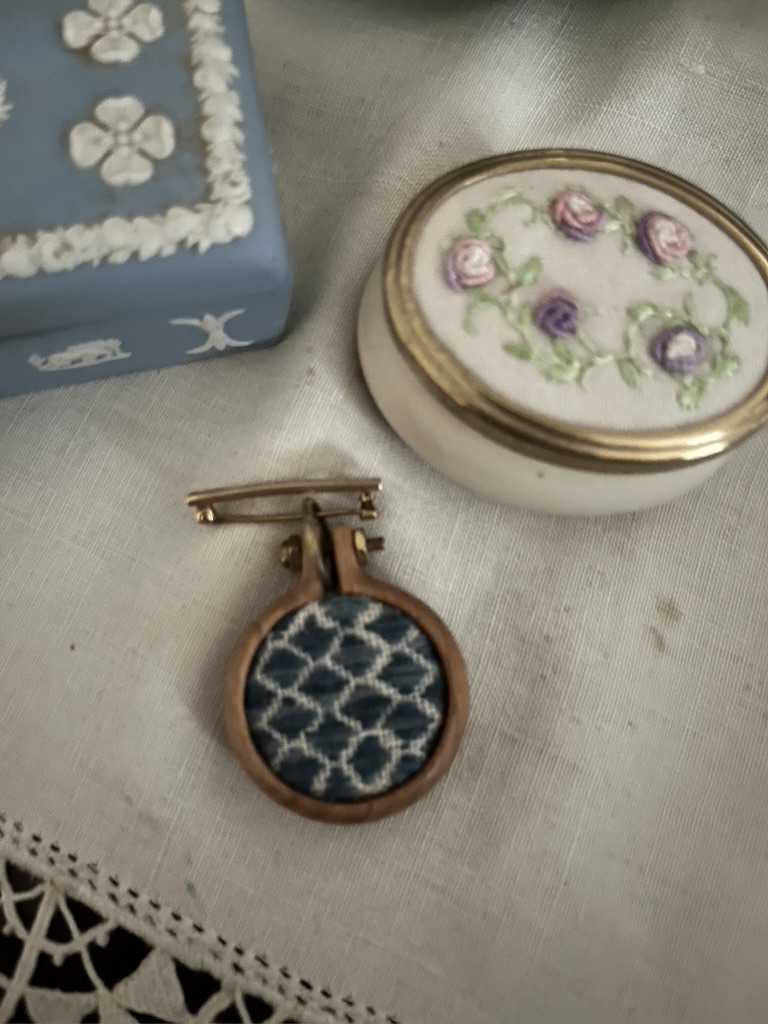
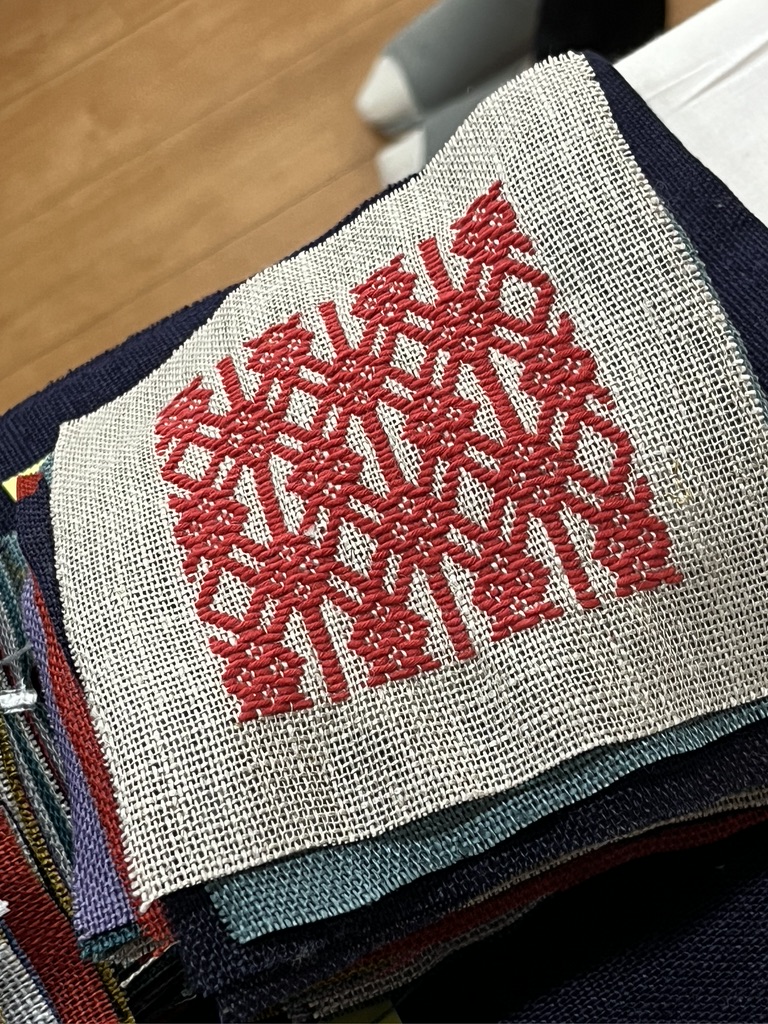
I tried a tiny bit of Japanese Hogin embroidery and loved it. The fabric I had on hand was finer than what was called for, and I felt I was going blind trying to do these tiny stitches. I love the technique, which is counted running stitches that create simple designs that can become quite complicated in appearance when they are done on a larger scale. I saw so many tiny bits of textile mounted in wooden frames while I was Japan. I bought a tiny temari pin cushion at the Cohana store in Tokyo. There are wonderful sashiko pin cushions mounted in wooden bowls, and there are embroidered brooches mounted in wooden frames to be worn. I was smitten with those. I found someone on Etsy (Artbase) making some pretty brooch frames in cherry.
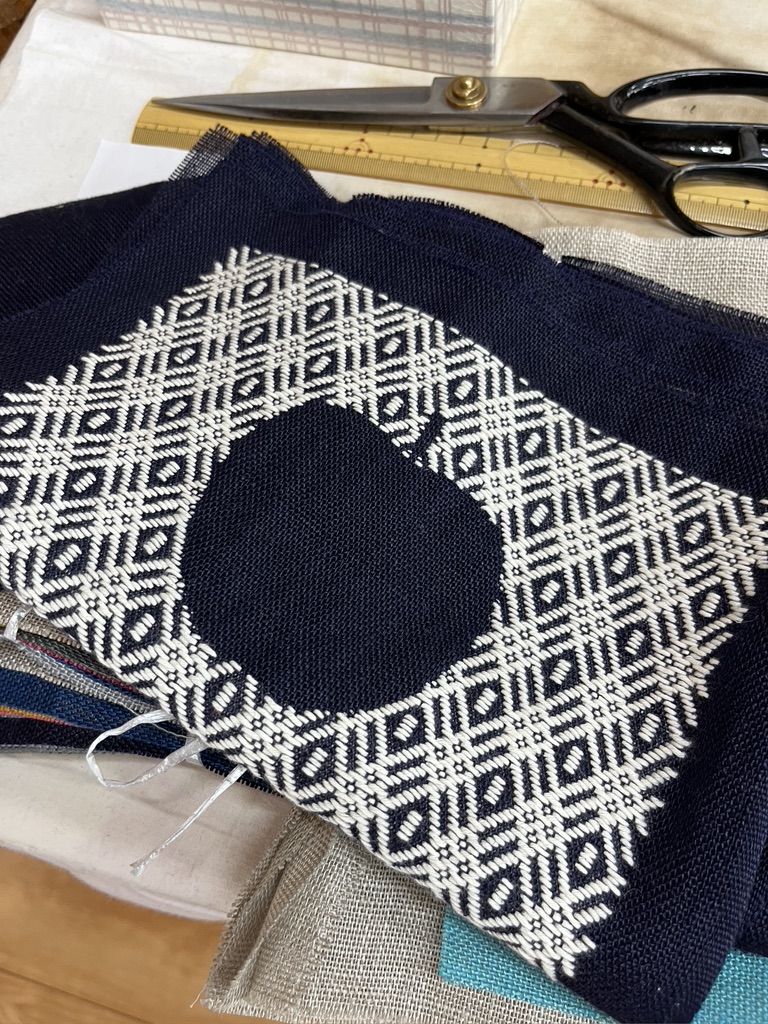
I’ve already ordered a larger brooch frame for my next embroidery, and I’ve visited my not-so-local needlework shop to buy a slightly coarser woven linen. The one above was embroidered on 32-count linen. Next time I’ll try 28-count. I enjoy doing this!
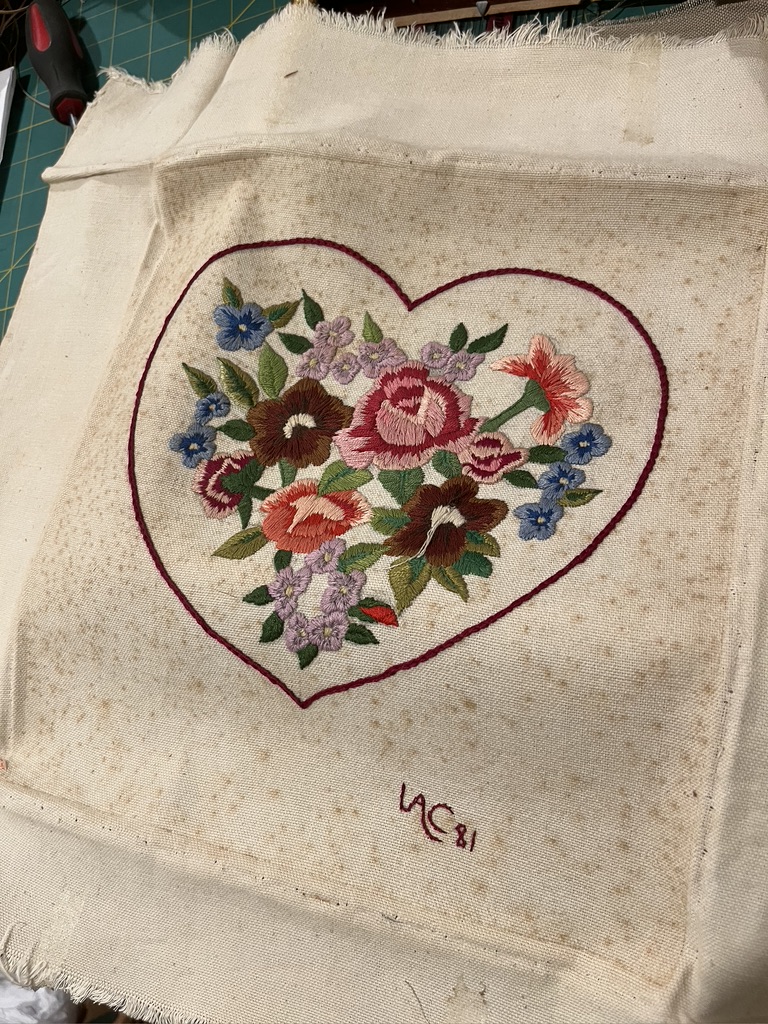
My next project, which feels both big and small, is cleaning and re-framing a beautiful crewelwork embroidery made by my oldest friend, back in 1981. This gem of a piece is over 40 years old now. It got lost for several years when we made our last move, so when I finally found it in a box in the attic, wrapped in tissue and packing paper, it had suffered some. I don’t know if these brown blotches are mildew, but I hope I can get them out. I am using Orvus paste, recommended by the women at Thistle Needleworks, my not-so-local shop. I was anxious removing this gem from its frame. It’s heartbreaking to see the stains on the fabric.
It looks like the framer used double stick tape to stretch the fabric on the backing. I hope to sew it in place when I re-frame it.
I took out about 50 staples on the sides. I hope I can make this as beautiful as it originally was. Then I’ll feel like a pro and I’ll tackle some other things from my stash.
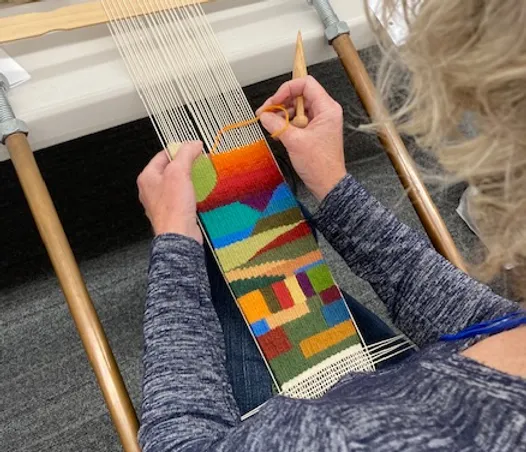
My new tapestry students are doing a great job. Every class seems to show me new ways that a class can have a group personality and an interesting trajectory. This class is moving quickly, so I think they’ll be doing some of their own designs soon, when we are barely at the half-way point of the semester. I love seeing the colors that students choose. It’s always a visual feast to see all these colors become something real. Students keep me endlessly excited!
I hope I get most of my big and small projects done. There is energy in the air. I just need to harness it!
For the past several weeks I’ve been deep into some interesting rabbit holes. There are so many compelling things to learn, tips to explore, and amazing images to see. That means I have not touched my tablecloth warp in three weeks. I do feel a little guilty. I am at the point of threading the final border, and it’s the hard part, considering whatever I thought I was doing 12 years ago that I now cannot remember or understand. I will tackle that final area of threading soon, but in the meantime I’m enjoying my rabbit holes.
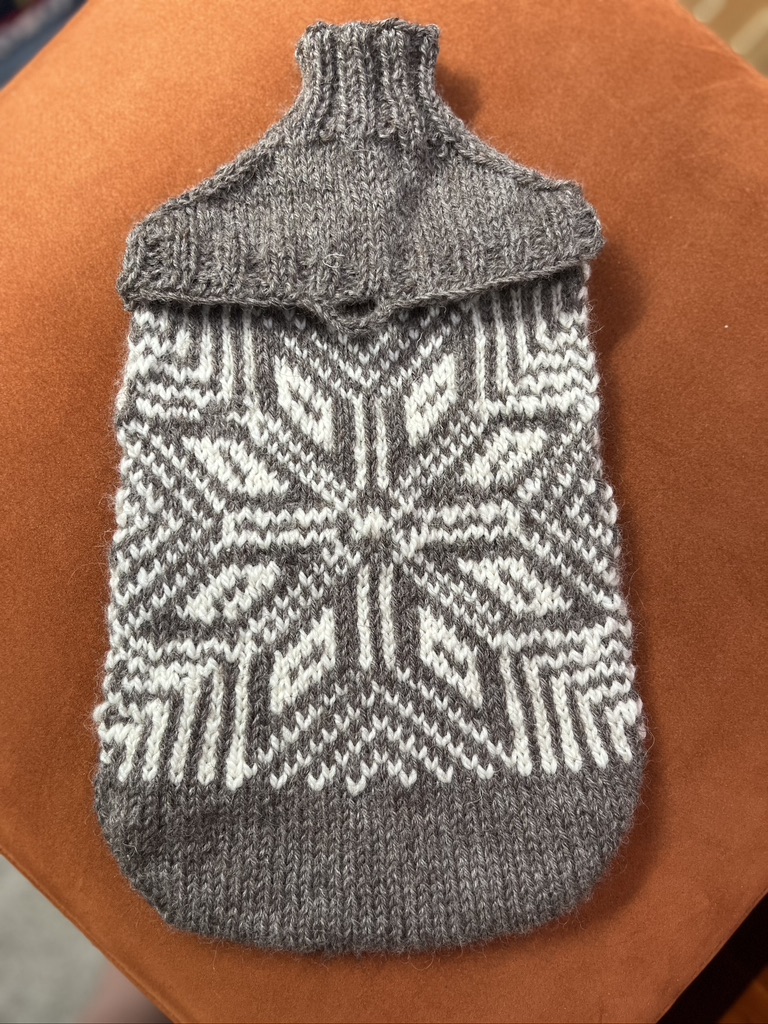
I went looking for a stranded sweater pattern that I started quite a few years ago. I did not find find it on the first or second go-round, but it finally turned up late last week when I was looking for something else. Isn’t that always the best way to find something? A few months ago I came across this sweater and decided I ‘needed’ to finish it. That’s when I learned I don’t seem to have the pattern! I searched through my Ravelry library, my emails, and even through the printed patterns I’ve collected in two huge notebooks. No luck.
Do you see why I want to finish this? The yarn is a Finnish brand called “Kauni Effect.” I am using two different colorways. One is called ‘rainbow’ and the other is something like ‘autumn.’ Sorry I’m not sure of the second colorway. I’m knitting with one yarn as color A and the other as color B, and the yarn does all the work to create this amazing, glowing, beautiful effect! I know, I’m gushing.
I could not figure out what happened to the pattern. I posted a photo on Facebook, and many people began responding to help me retrieve the pattern. After more than a hundred responses I began to remember a few things about this design. The sweater pattern was designed by Ruth Sorenson, but the stitch pattern was from Dale of Norway. Someone whose name I don’t know put the two together to create this stunning sweater. It was easy to find the stitch pattern on Ravelry. It’s in quite a few people’s stitch libraries…but the sweater is no longer available, and for some reason I have lost it.
When I started googling various ways to get in touch with Ruth Sorenson or to see all of her designs, one of the top hits in my search was my own blog. Seriously? It turns out I wrote about my plans for this sweater here. That was March of 2014. That sweater has been laying in a canvas bin in my wall unit for almost 10 years. Yikes!
One of the 100+ people who responded with help on Facebook contacted Ruth Sorenson and got permission to share the pattern with others. She sent it to me, and by now I’m sure others have it too. Thank you, Ruth! Between the sweater directions and my own notes I plan to get cracking on this sweater again. I won’t be wearing it this fall, but hopefully in fall of ’24.
In the sweater department, there is also this: “Hild” by Elsbeth Lavold, from her Desinger’s Choice, Book 9. I made this years ago and have worn it a few times. It no longer fits, but I still love it. Last week I un-sewed the side seams and am adding gusset to each side. I hope that gives it enough flair for me to enjoy wearing it again.
The sweater bug has definitely bitten me. I haven’t been knitting much over the past several years, but clearly I’m back in knitting mode now.
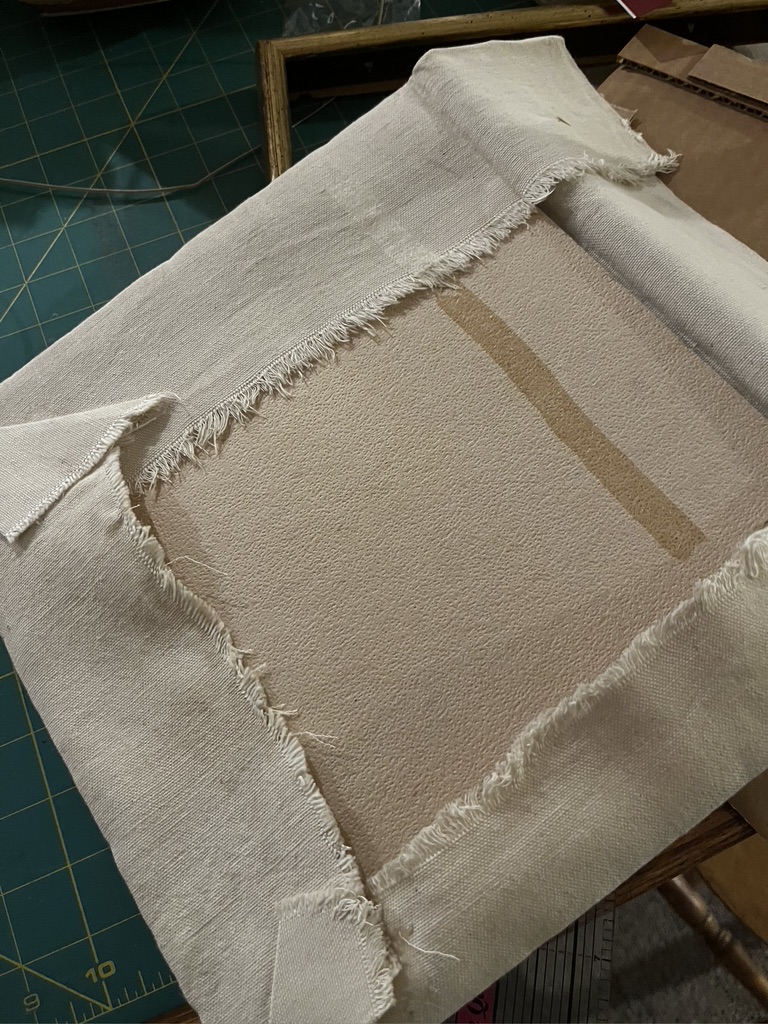
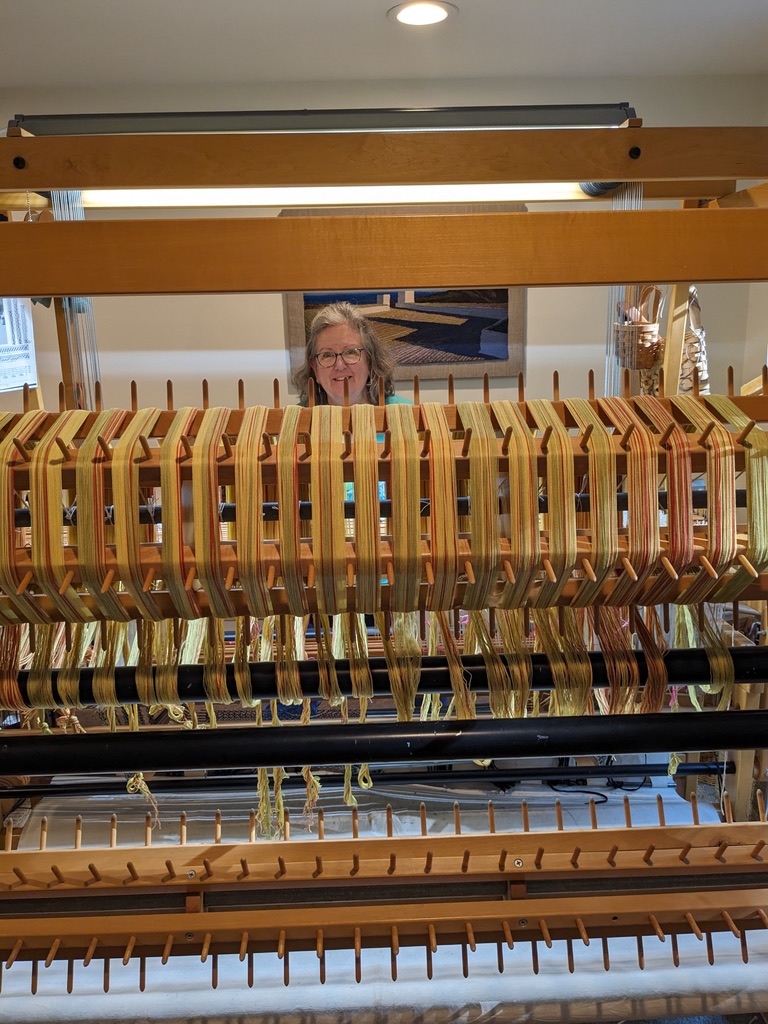
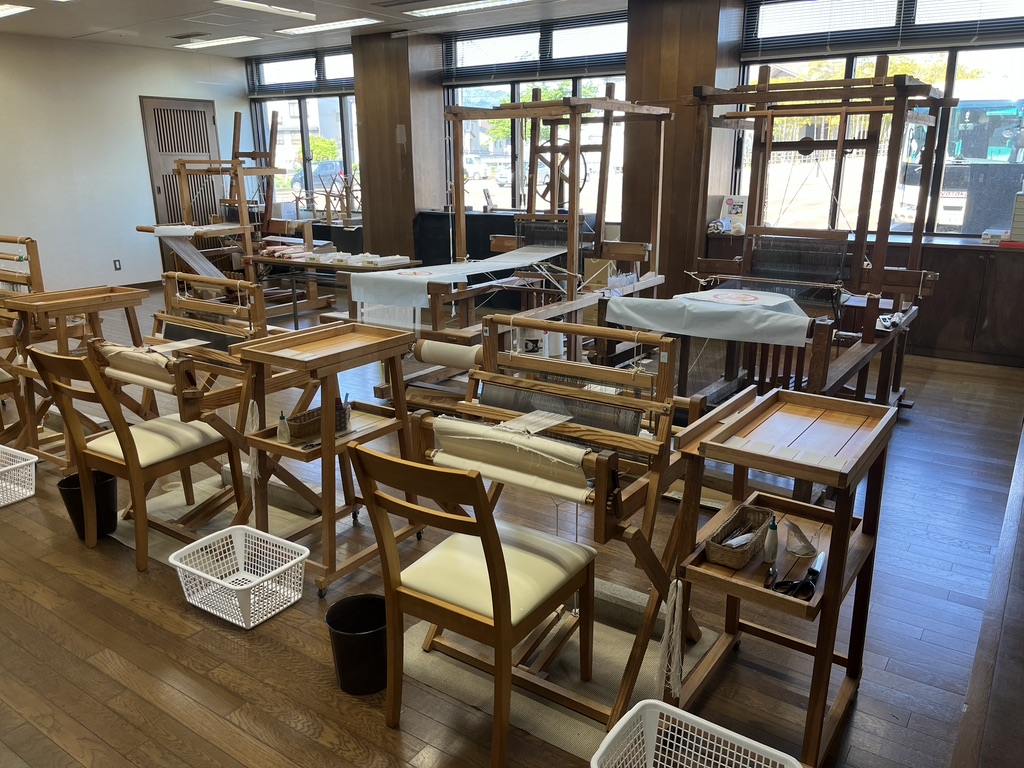
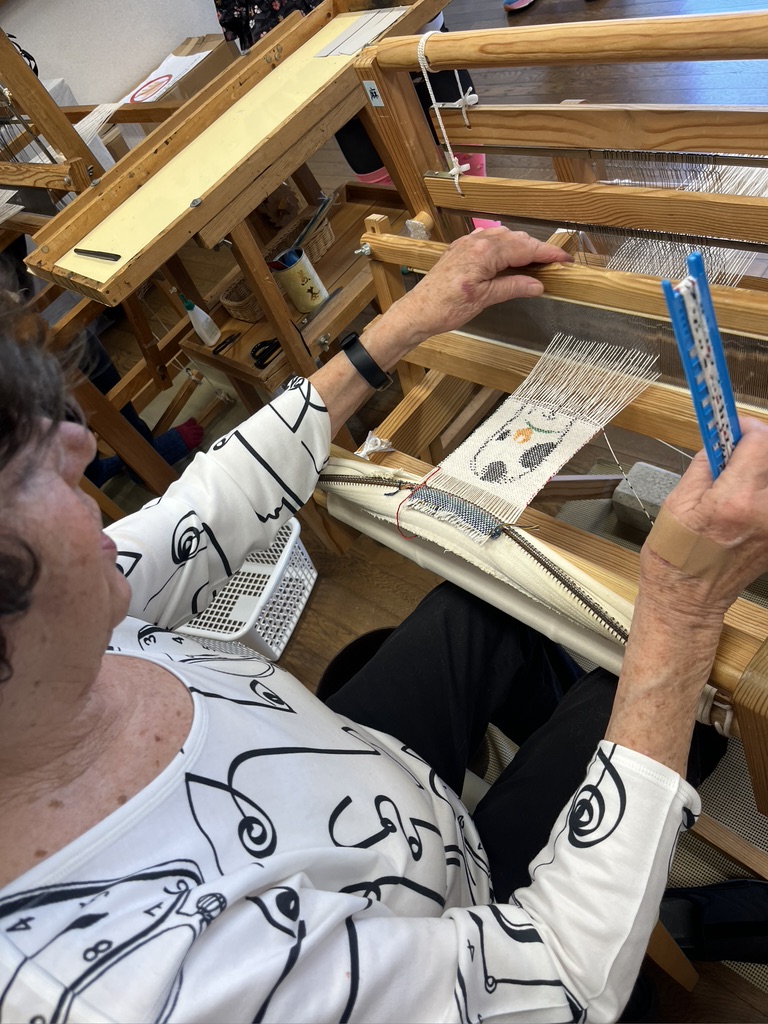
I’ve started a class with Fran Curran at the Weaving Center of Hartford Artisans. She is leading us in designing a project using linen. We had a short presentation on designing huck lace by Jill Staublitz, and I decided that would be the weave structure I’d use for my project. I’ve woven a lot of linen projects over the years, and a lot of huck lace too. It was hard to decide what my project would be since I have plenty of napkins, placemats, even a couple of linen tote bags with huck lace. Then one evening I remembered that I’ve wanted to make bread bags for a couple of years now, ever since Handwoven Magazine featured a linen bread bag pattern. I fear my bread bag may be a bit over-designed, but I will have fun with it.
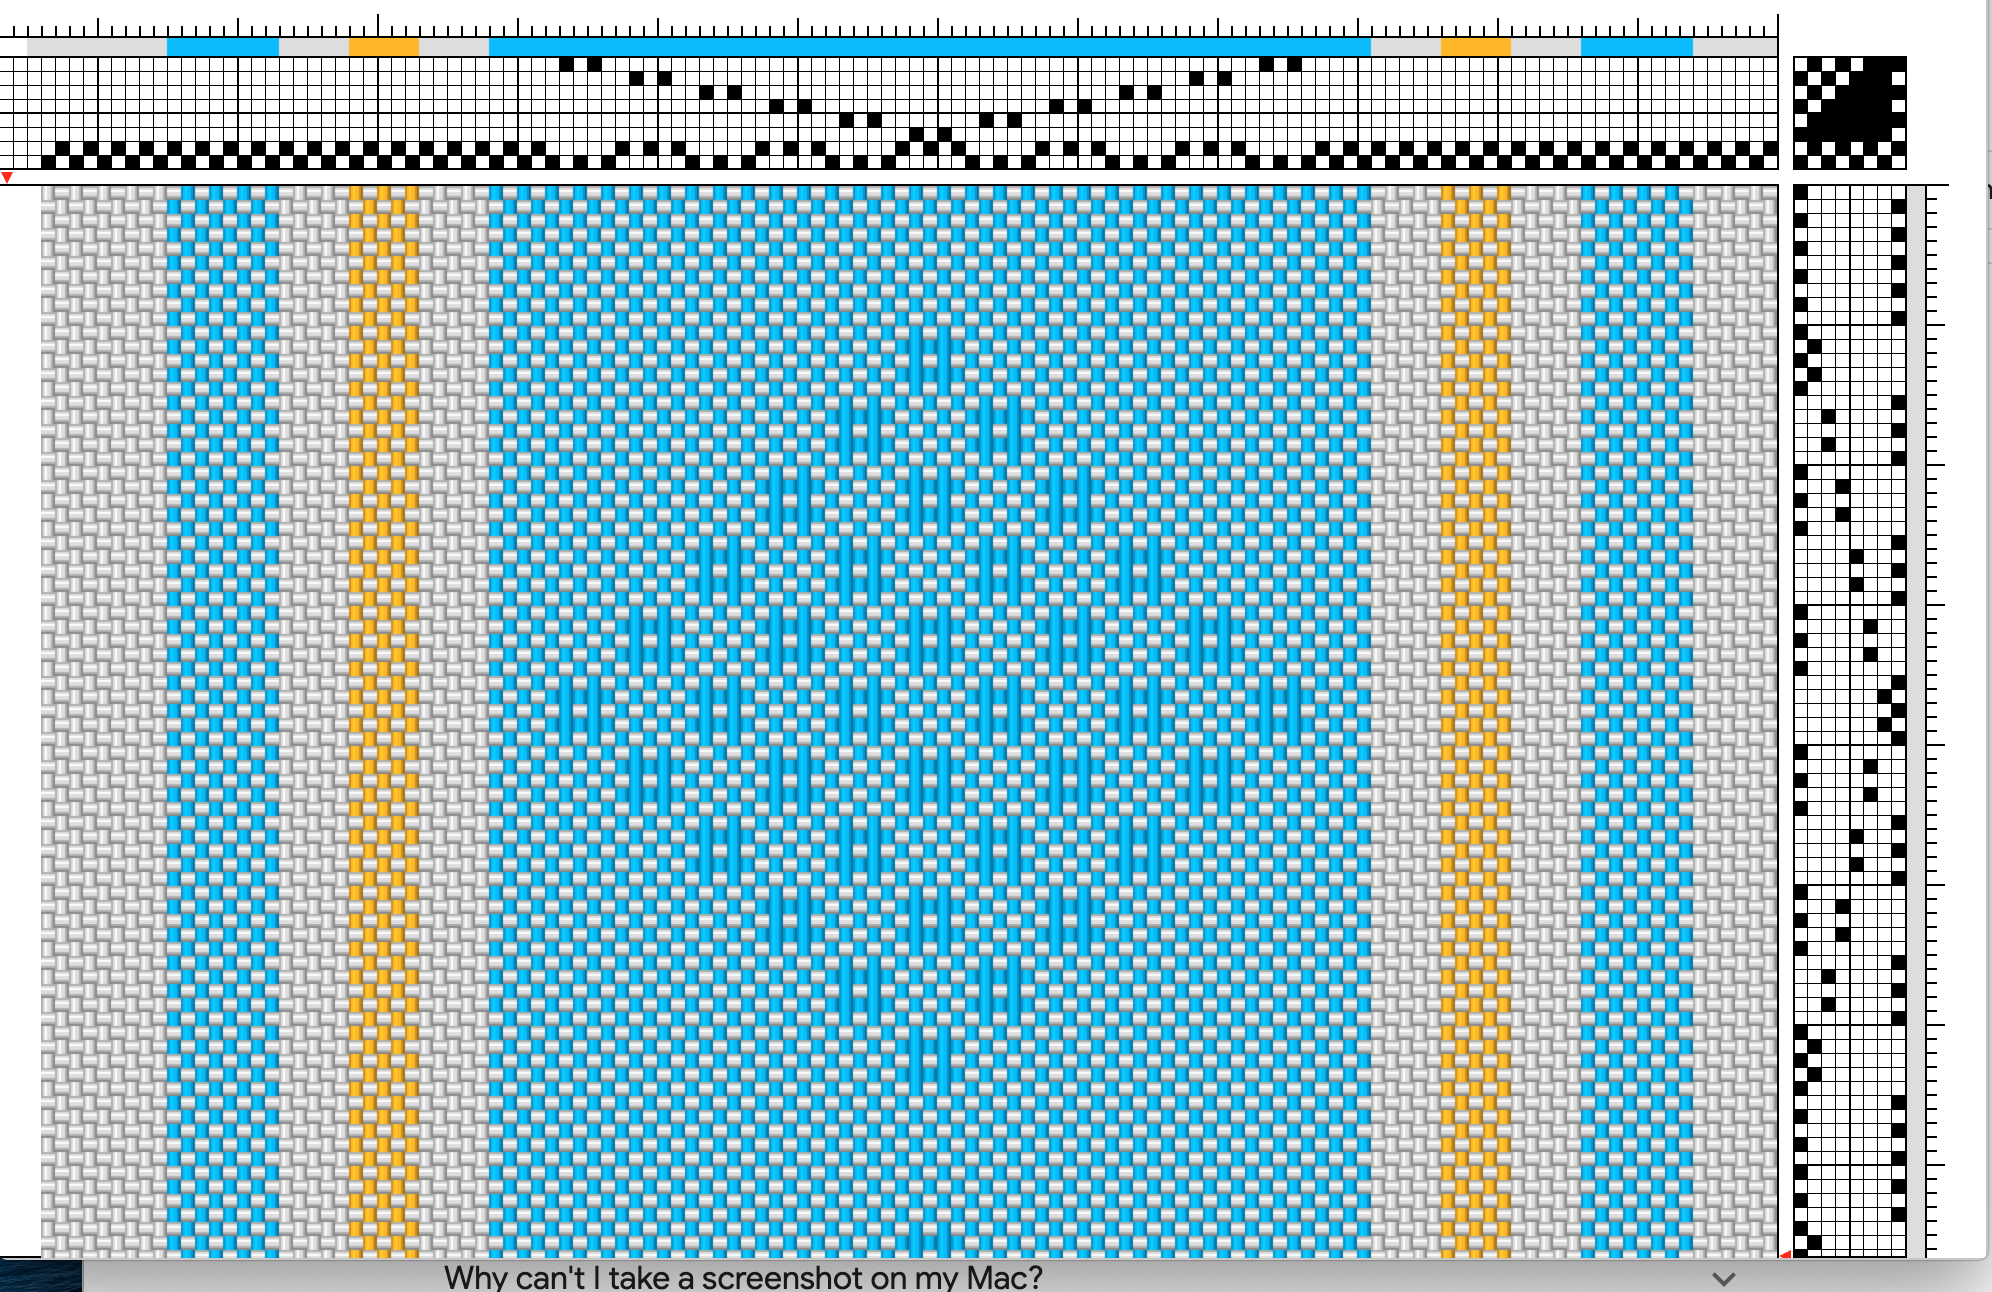
I will have a center diamond motif on the bag fabric, surrounded by plain weave stripes and a mix of natural and half bleached linen for the background fabric. The stripe colors are in the photo of the sweater above. They happened to be laying on the counter in my studio where I took the photo. I wanted the huck diamond look particularly blue, so I’ve made sure the huck floats are in the warp, which will be blue in that section. I’m looking forward to this!
Lastly, I have started teaching another 9-week tapestry class, also at Hartford Artisans. I’m intrigued by this new batch of students and hope they will enjoy tapestry weaving enough to continue to pursue it.
My son Chris calls this kind of distracting activity “bike shedding.” He says this phrase came about when a group of engineers were ‘stumped’ on a building design. They decided to design a bike shed for the building before working on the building itself. Who knows if this is true, but it seems to be something I’m rather good at…bike shedding, procrastinating, and going down rabbit holes. I could do worse!
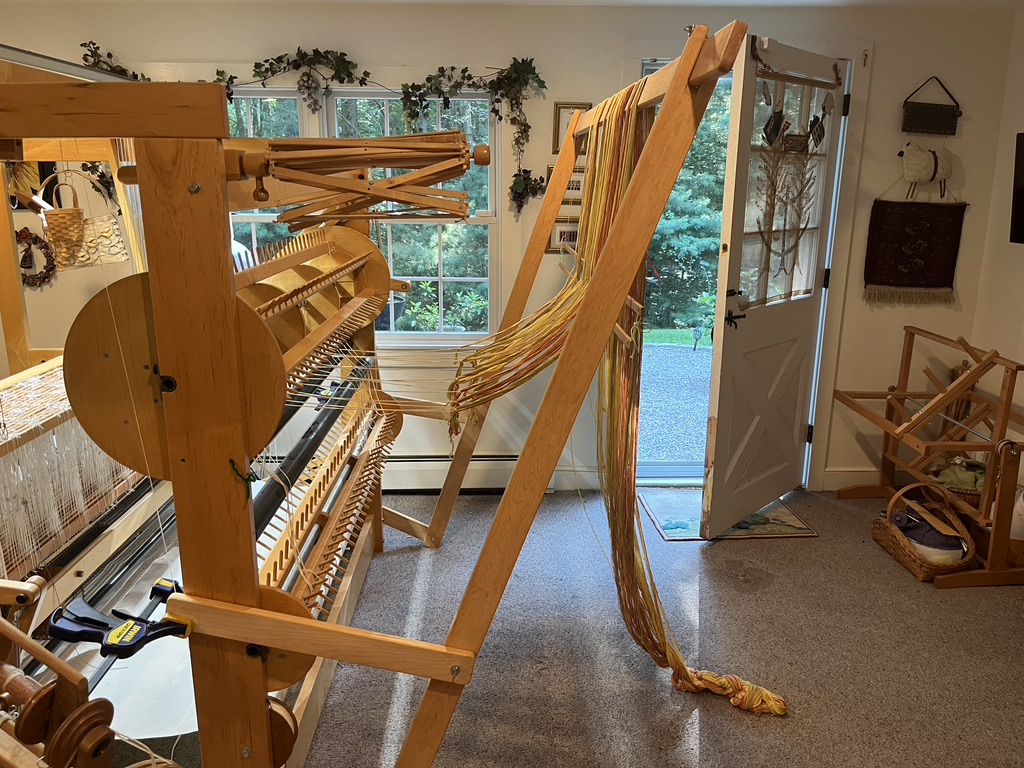
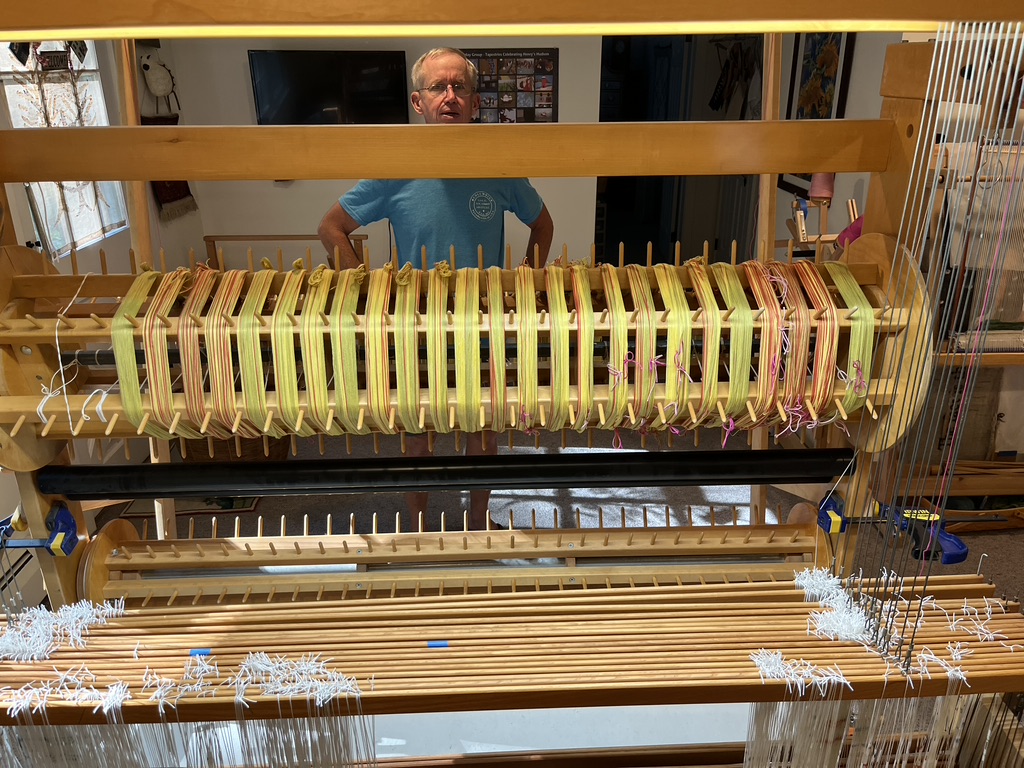
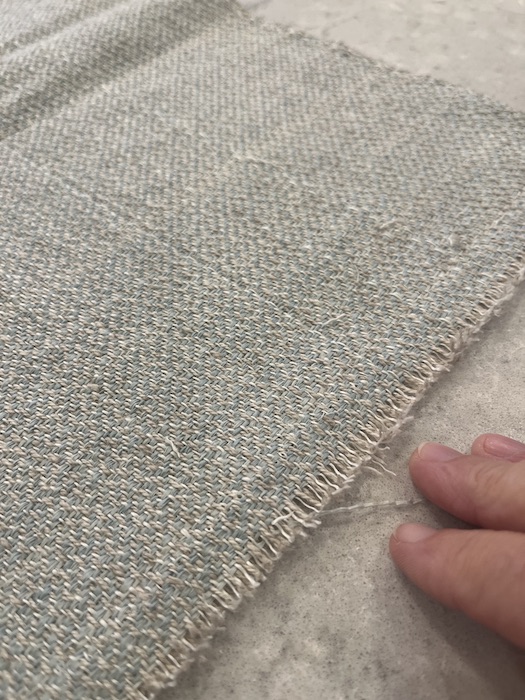
Early last week I spent the better part of three days determined to get a standard warp onto the sectional beam of my BIG AVL (aka BIG ALVIN). The warp is 12 years old! You must be thinking why on earth would I save a warp for that long, and why, oh why, would I then try to put that warp on a loom not meant for it.
A conservative guess on the time I’ve spent so far on this might be 12 hours. And, if you consider that I needed an extra set of hands for some of this (i.e., patient husband) the total hands-on hours is probably 15 or 16. That is just to get the warp onto the beam.
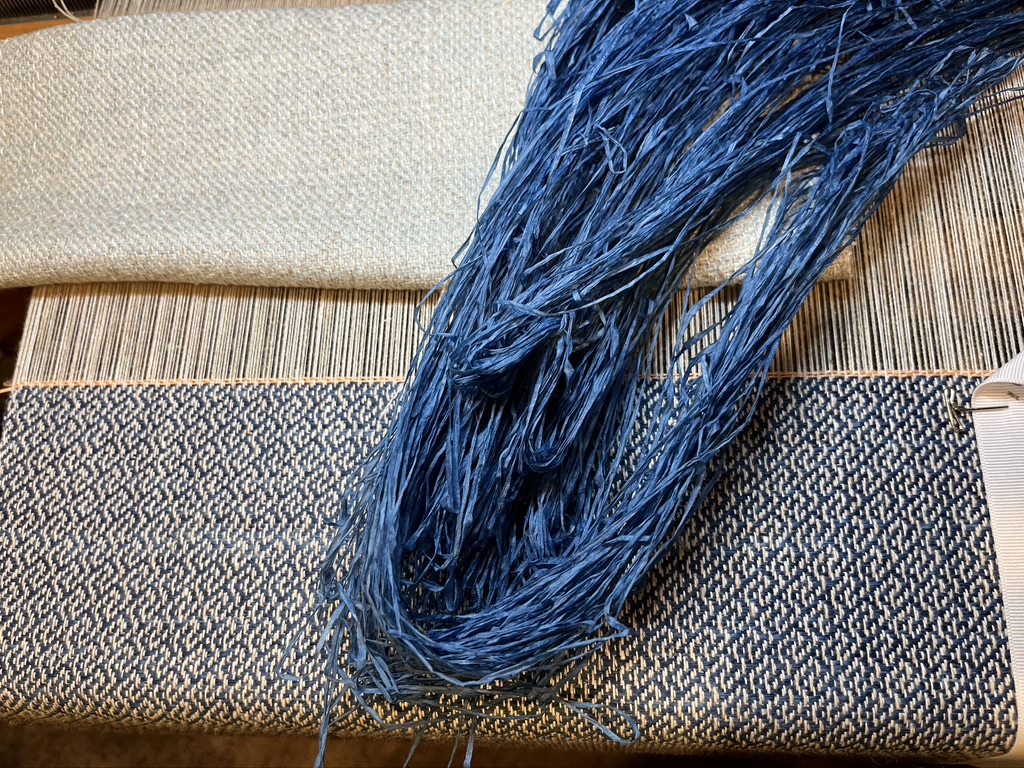
My first attempt involved winding on one of the two warps, using my trapeze (made by my husband). Bob helped with this process, and we had to stop at every set of section dividers to get each section of warp into the proper divisions on the beam. It was slow going, but luckily it’s short warp.
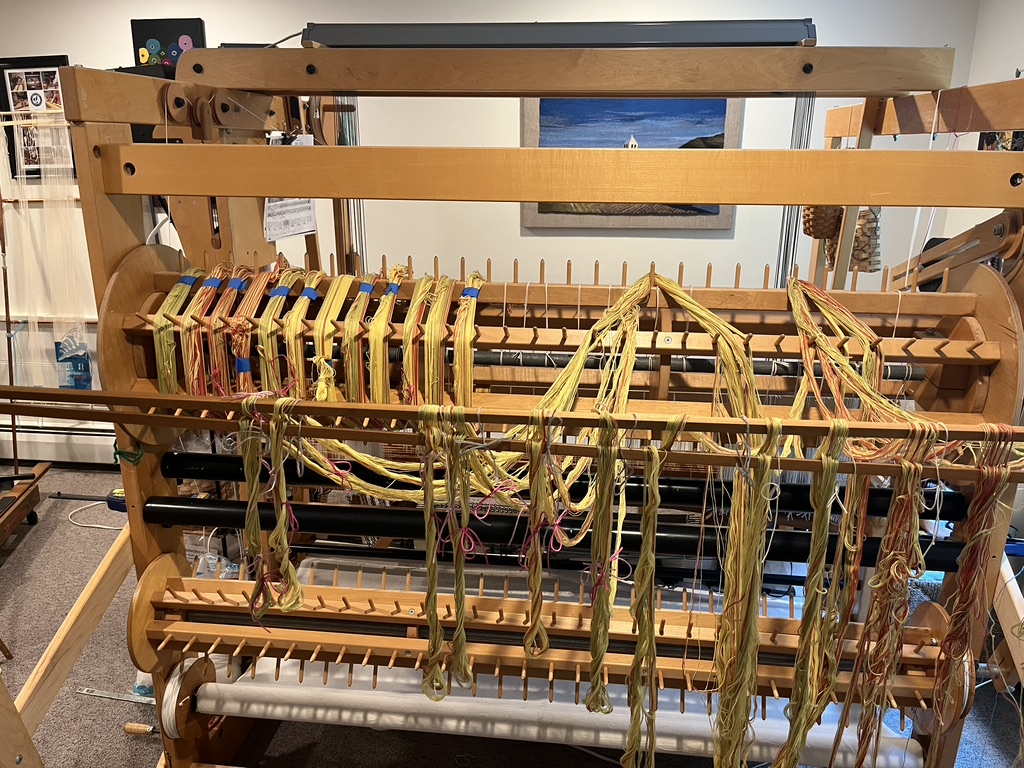
But doing this a second time seemed more challenging for the 2nd warp, so we undid everything and took the two warps together. I divided the whole warp into 2″ sections in order to wind them on one at a time. This horrible sight would give most weavers the heebie jeebies. It certainly felt Herculean to me. It’s two 30″ wide warps that needed to be separated into 2″ sections for the sectional beam.
Why am I doing this? Twelve years ago in May I had a most unique experience–both good and not so good. Some months earlier I had signed up for Vav Stuga’s basic class. I envisioned May as the most perfect time of year for seeing the Bridge of Flowers in Shelburne Falls, Massachusetts, while immersing myself in full days of weaving all week long at Vav Stuga. It should have been one of the most fulfilling experiences. But just a short time before my class began, my father died. It was not expected. It left my mother, who needed full time care, alone. The entire family showed up to be with my father as he was removed from life support, and then we gathered around my mother to care for her and make decisions about her future. I called to cancel my class at Vav Stuga, but it was too late to get a refund. We worked hard to get my mother moved back to New England, where she stayed with me for two weeks before we found a comfortable and safe place for her to live. I took off to Shelburne Falls! During my week in class my mother called me between five and six times a day. She was bereft. She was angry. She was somewhat unhinged. Over time I began fully understand her mental state, but at this time, so early in the process, I was overwhelmed. I could not concentrate.
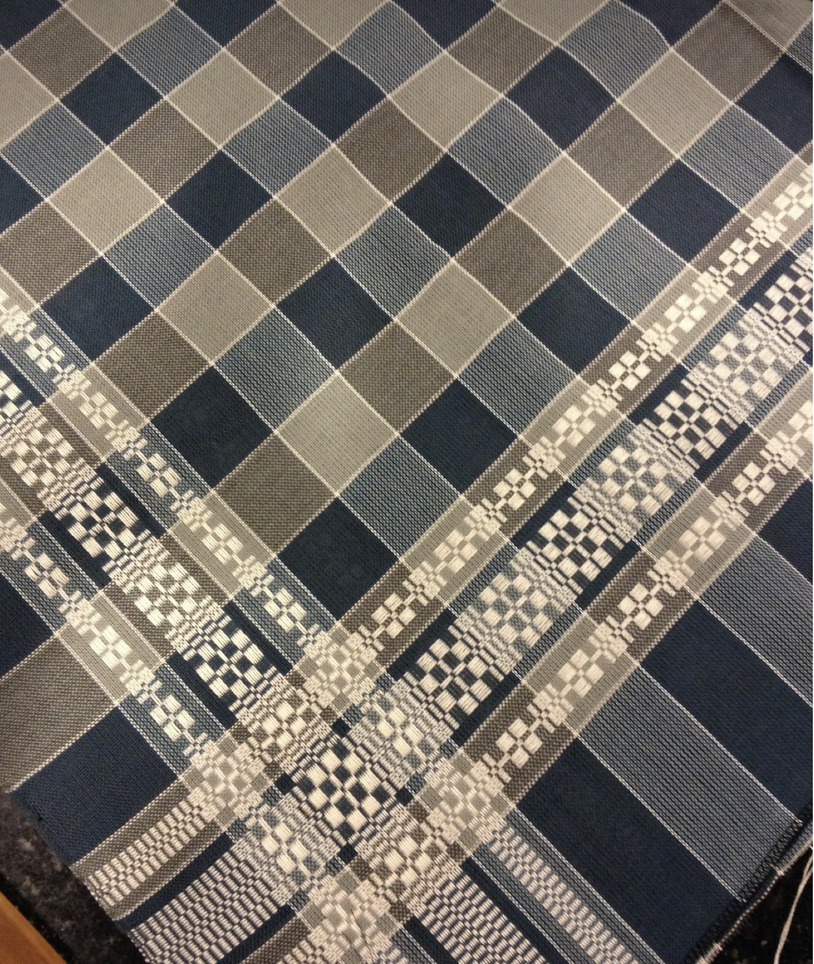
And yet… I was an experienced weaver of 40 years by the time I attended the basic class, and I had benefitted from some amazing teachers along the way. I completed the various projects in the class in time to be offered the ability to make a warp to take home. My sights were set pretty high! I had seen a tablecloth project in one of the Vava med Hemslojden issues in the Vav Stuga library, and of course, I didn’t want a medium sized, 45″ table square. I wanted a tablecloth to fit my dining table. After all, I had a big 60″ wide Toika that was calling me to make a tablecloth!
I love monk’s belt, and the idea of it running both weftwise and warpwise was a thrill. In the book the colors were all in shades of red and rose with cream monk’s belt, while this photograph shows it in blues and cream. I had big plans for a spring colorway in pale green and soft yellow, with coral monk’s belt and fine stripes between the squares. Sometime in the last decade I sold that Toika and replaced it with big BIG ALVIN, hence the dilemma about how to get the warp on my loom.
All I can say is when I get an idea in my head it is hard to let it go. It was a lot of warp to make in the short time I had left at Vav Stuga, back in 2011. I wasn’t at my best mentally, so I have now discovered that I made a few mistakes in the part of the warp that has the monk’s belt supplemental warp threads. I added those in during my beaming process.
I am quite sentimental about this project. It was a difficult time of my life, and yet this escape to an idyllic location, spending a week with like minded weavers in a wonderful setting, is a memory I cherish. This tablecloth warp is a significant part of that memory. My roommate from that week is someone whose friendship has deepened over the past 12 years. And she is somehow also tied up in my need to make this project a reality. It’s complicated, for sure–both emotionally and technically.
Here are Bob and I, feeling somewhat relieved that the winding-on is done. However, I am now faced with the not-insignificant worry that those sections do not have consistent tension.
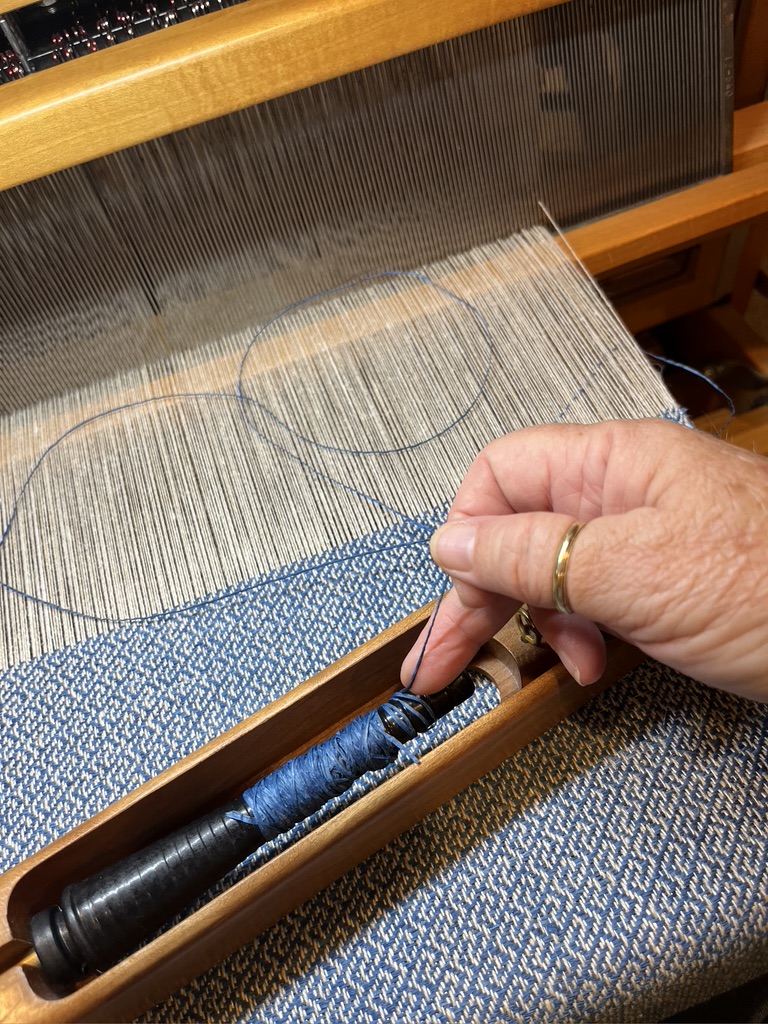
At the end of last week, before leaving for a long weekend in Maryland with our grandkids and kids, I began threading. There are 1300+ warp threads. I have made it past the right hand border and the right hand monk’s belt pattern in the warp. I now have a long stretch of the stripes in the middle threaded with monk’s belt as well, but not the double warp threads required in the warp patterned area. Whew!
But other things are now demanding my attention. At the end of the month I will begin teaching two tapestry classes each week through early November. I need to get organized for that. In my own work, I want to try my hand at Helena Hernmarck’s tapestry techniques on a twill ground. I am trying to wrap my head around the instructions she sent me, and I’ve decided to tackle this on a floor loom. Since BIG ALVIN and Baby Wolf have other projects on them, I have rented a small Dorset floor loom from my guild.
To balance the chaos I’m feeling in these projects, I try walk several times a week. My smarty-pants watch keeps reminding me to ‘take time for mindfulness.’ That only makes me feel more frantic! It’s not helpful at all. I feel like a woman with her hair on fire, and that may be why I noticed a sign for a hair salon recently: “Hairdresser on Fire” Would someone, other than me, really go inside that place?
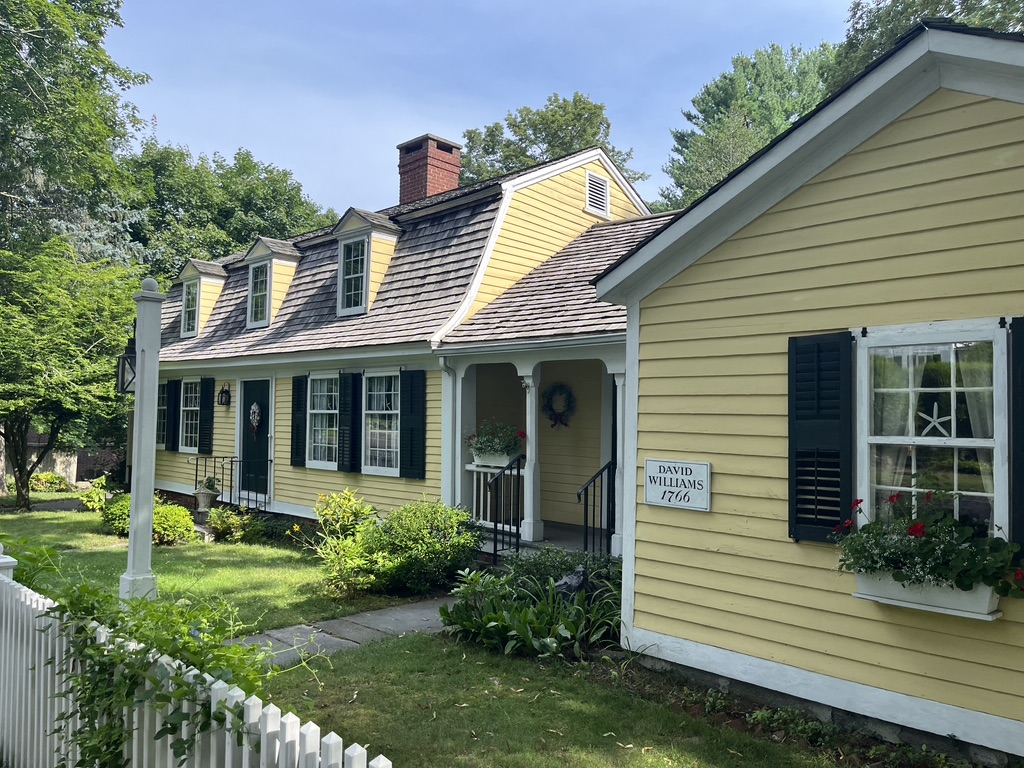
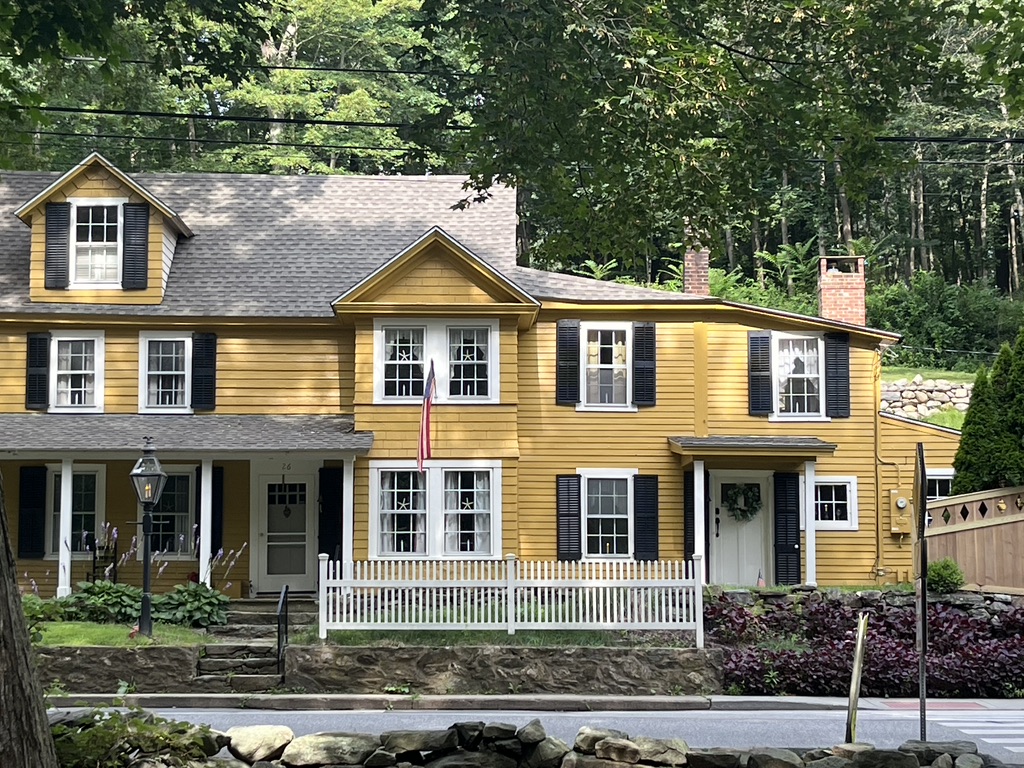
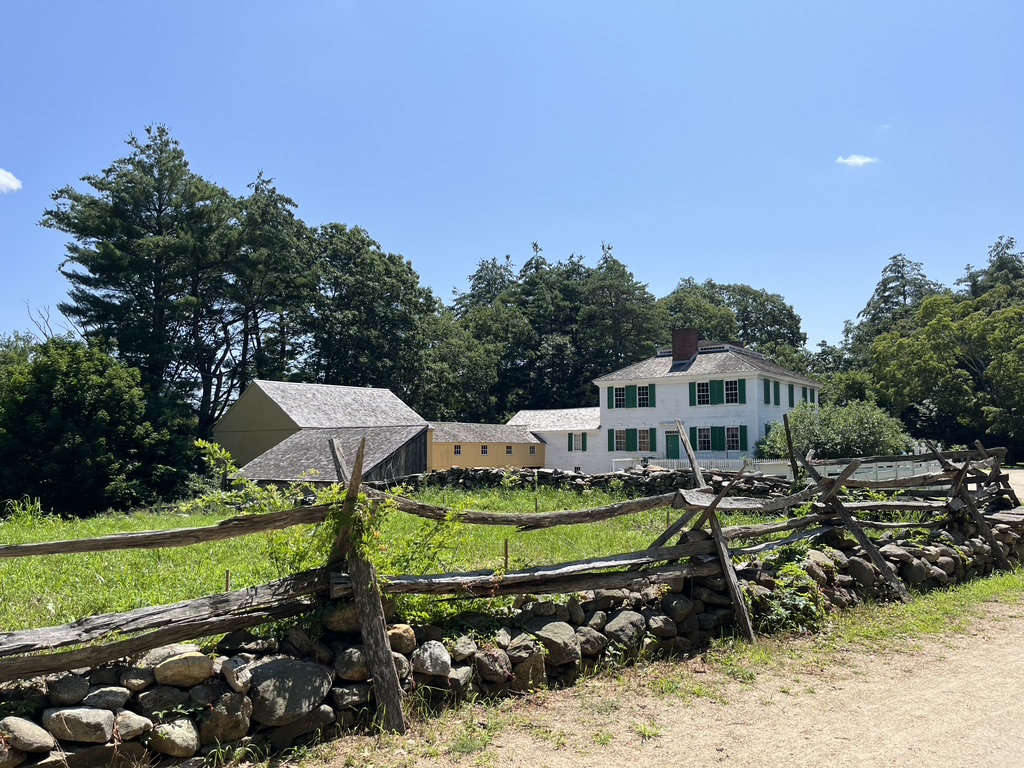
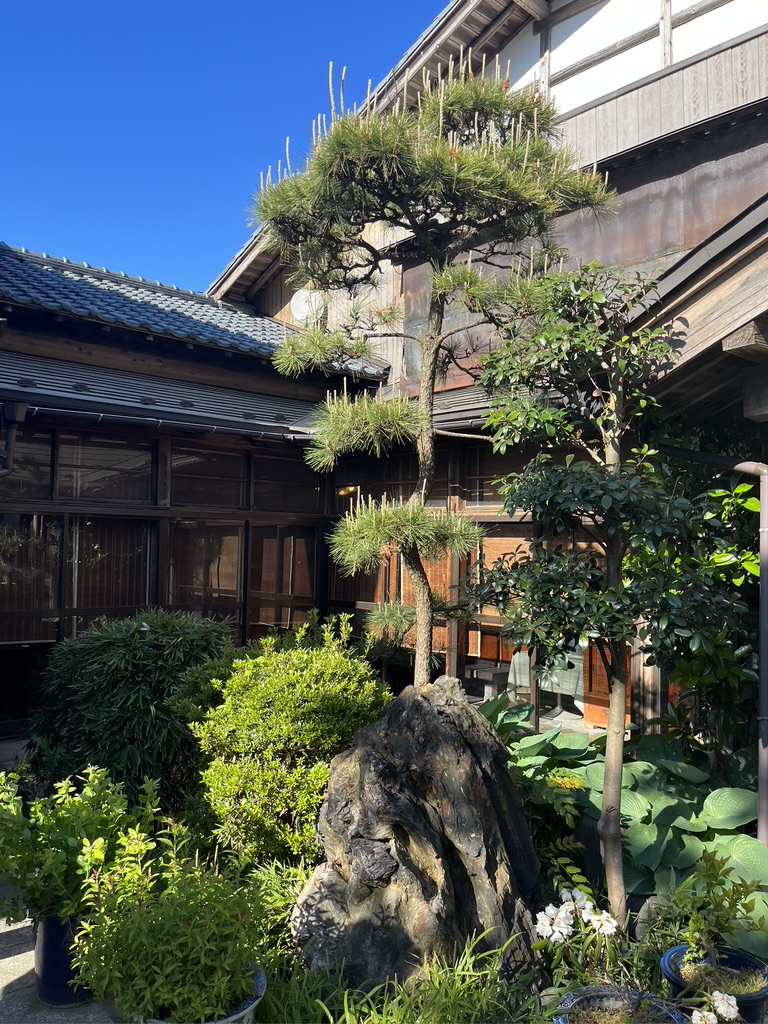
There is a local walk that does seem to take me down a notch in anxiety. I love passing by this house, and think of it as the ancestor of my house. My house is a Dutch colonial with a cedar roof like this one, and lucky for me, better porch railings. My house has a room, our den, that is really the ‘breezeway’ between the house and the garage. I don’t think this house has a garage in that area to the right in the photo, like my house does. My house is also yellow, but with green shutters and door. Anyway, this housenfeels like the more perfect version of my house (aside from those railings, easily fixed). And why not? It was built in 1766. My house was built in 1976, 210 years later with some very nice reproduction touches to make it feel like an 18th c. house. I have sea stars in my windows too! My house is a wannabe of this house. And this house has a beautiful barn in the back and less property to maintain.
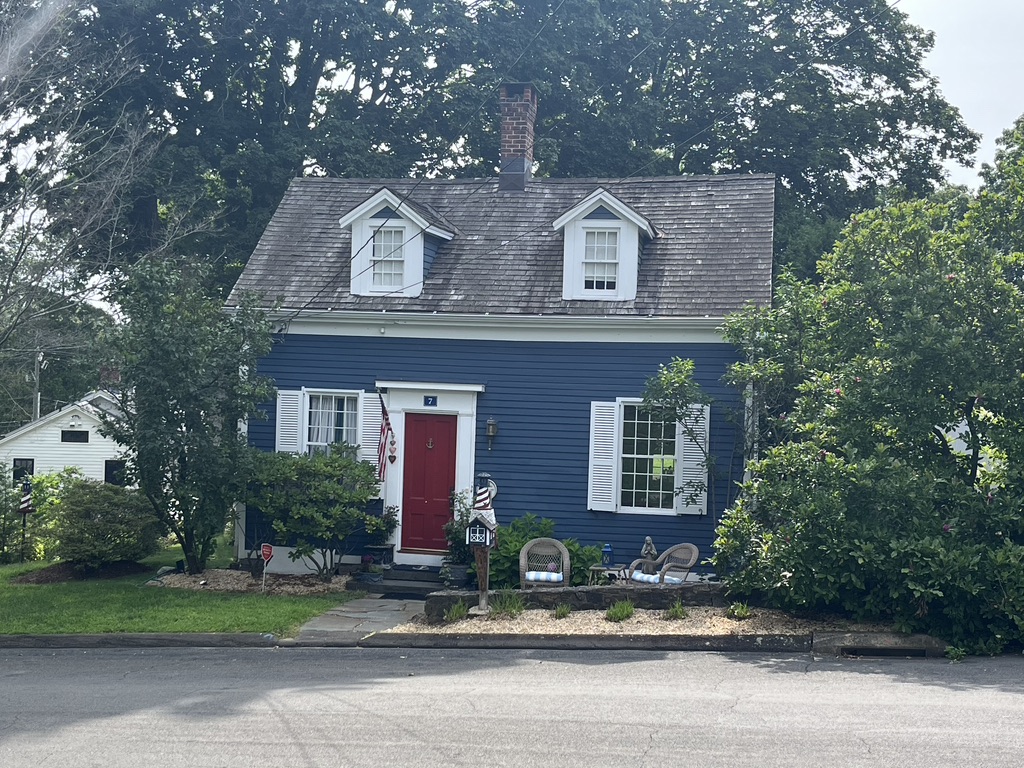
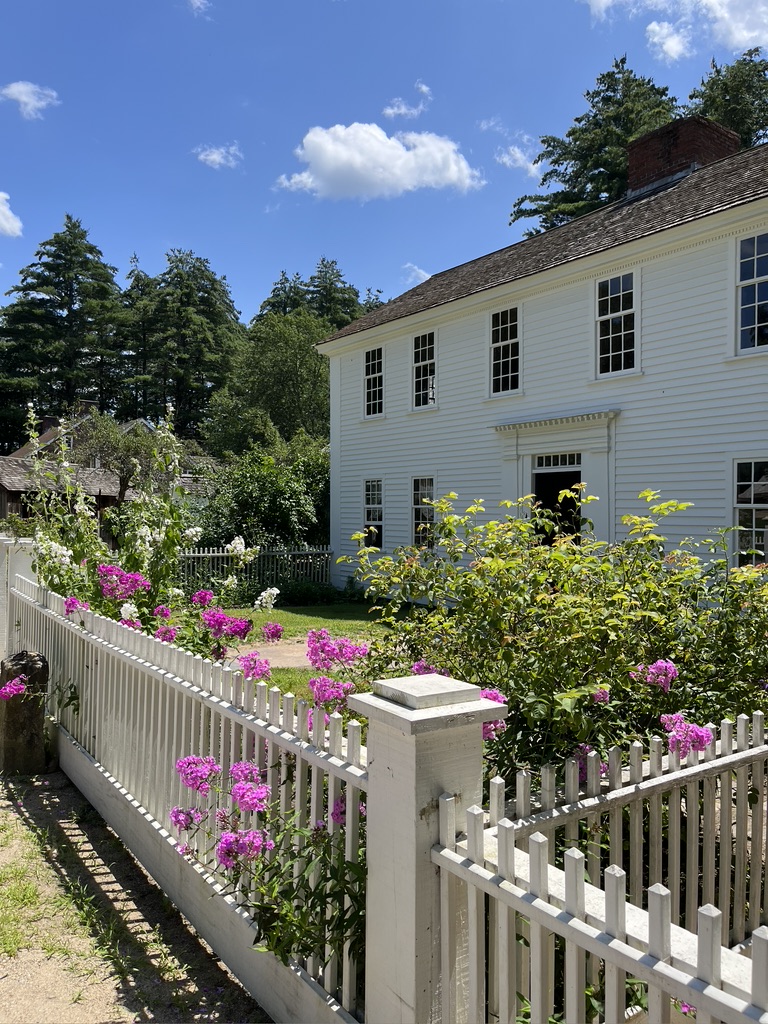
This house may be the smallest house in town. Isn’t it sweet? When I pass by I think of sitting in those wicker chairs myself sometime, maybe with a glass of lemonade and my knitting.
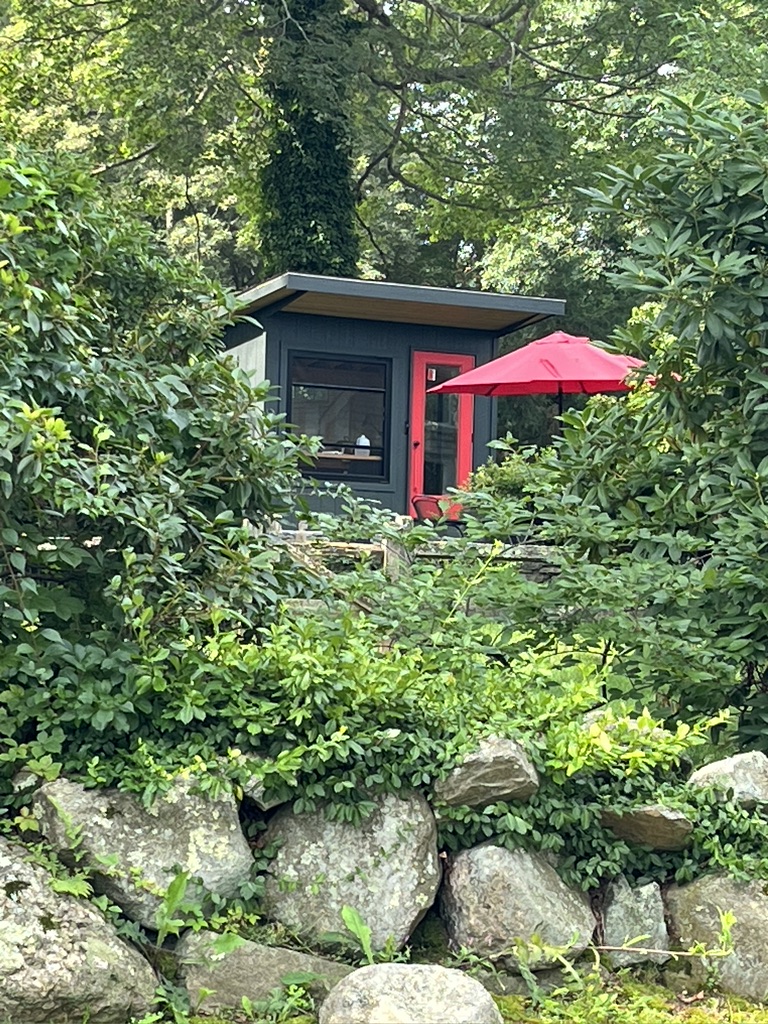
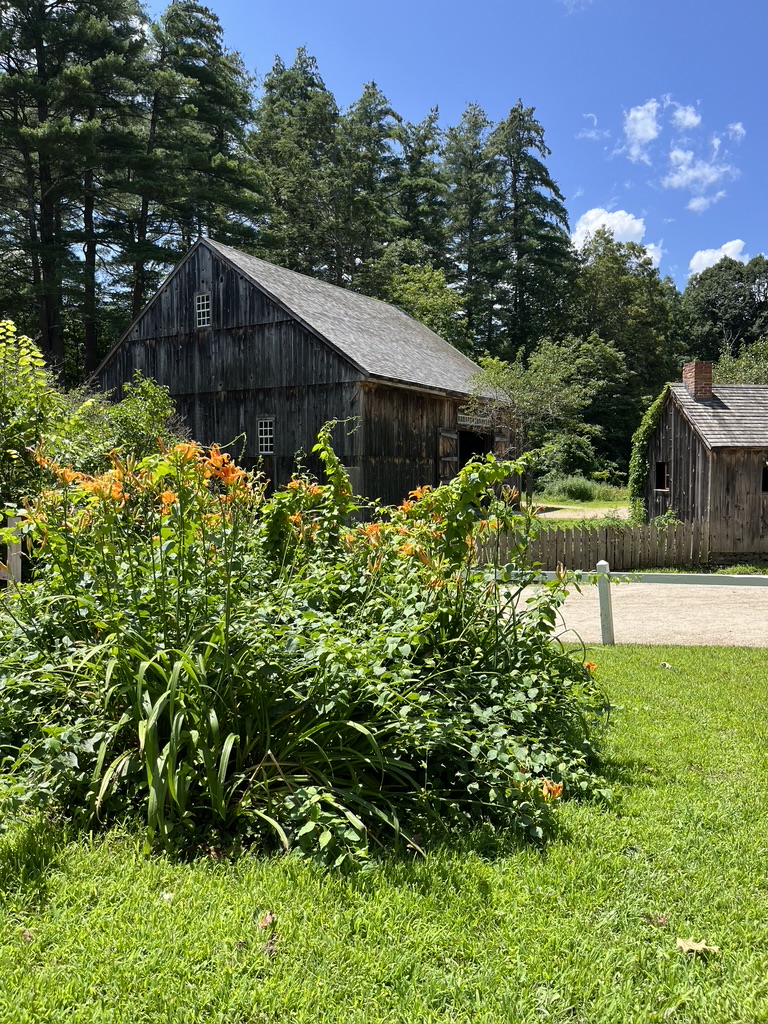
And this shed! Whoa! It’s not big enough to be my weaving studio, but I do daydream of spending time in there, doing something creative. It must be that jolt of red in a such a lush green environment that calls to me.
And then there is this big, rambling farm house….sans farm at this point. There is bound to be space in there for an amazing weaving studio. I’d love to get inside to find out where.
And so I’d better get myself downstairs to find the things I need for class and maybe get another inch or so threaded on my tablecloth. I feel the summer starting to wane, and I have much left to accomplish. Soon I’ll know if I’ve successfully bent the rules in putting a standard warp on a sectional beam, or if I’m just hopelessly stubborn. I am hoping for the prior!
It’s summer in New England in an odd numbered year, which means that regional weaving conferences are taking place throughout the US. NEWS is an acronym for New England Weavers’ Seminar. I haven’t attended this conference since 2017. Can you imagine how much I regret not going in 2019, since 2021 was canceled? I could not have predicted what would happen so soon after that 2019 summer conference that I missed.
It was invigorating to reconnect with weavers throughout New England after a six year hiatus. I had five wonderful days of inspiration from other weavers and teachers and vendors! The conference took place at a new location this year. The conference has long been held at Smith College, but this year it moved to Worcester State University. It was a bit longer drive for me, but it had so many pluses. All venues have their pluses and minuses, but I think the pluses at WSU outnumbered the minuses, and I cannot say that about Smith College.
The campus was easy to navigate, even when toting a floor loom with equipment; the food was quite good, and the weather was simply perfect–warm days with breezes and low humidity, cool nights. It was a stellar five days!
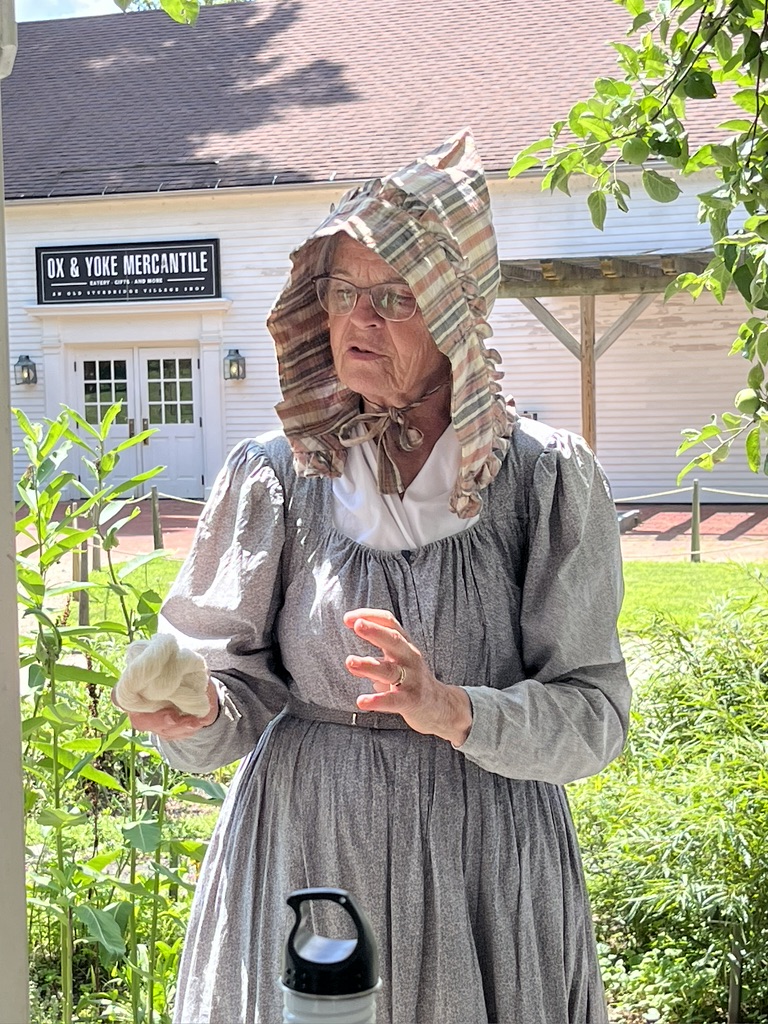
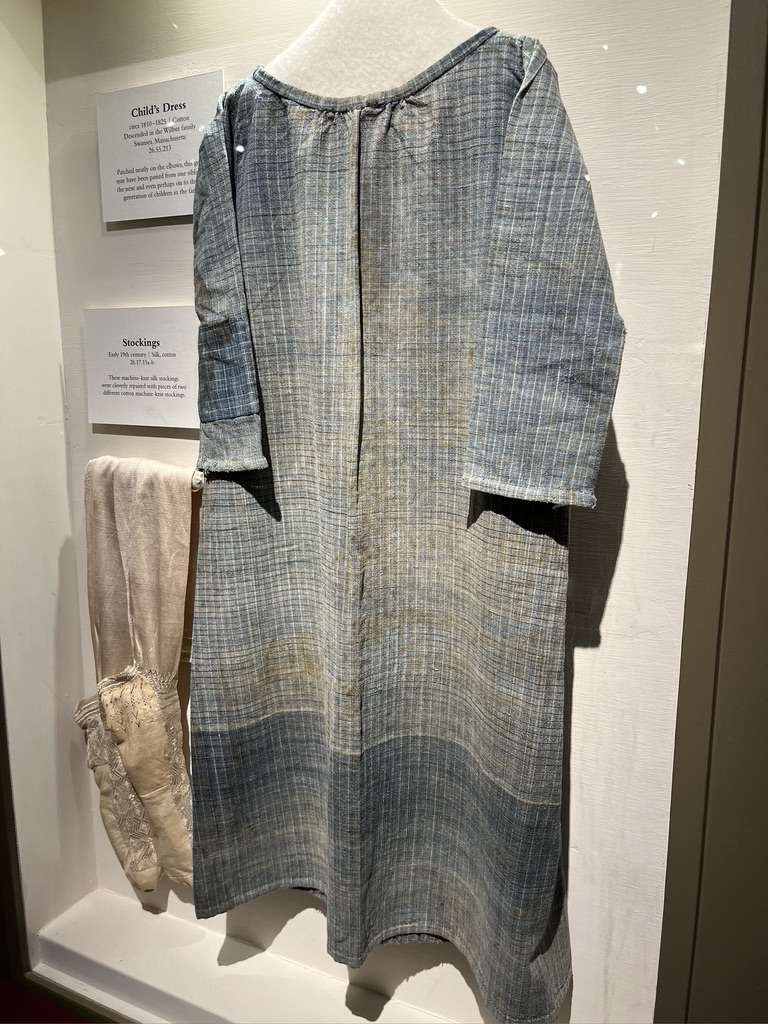
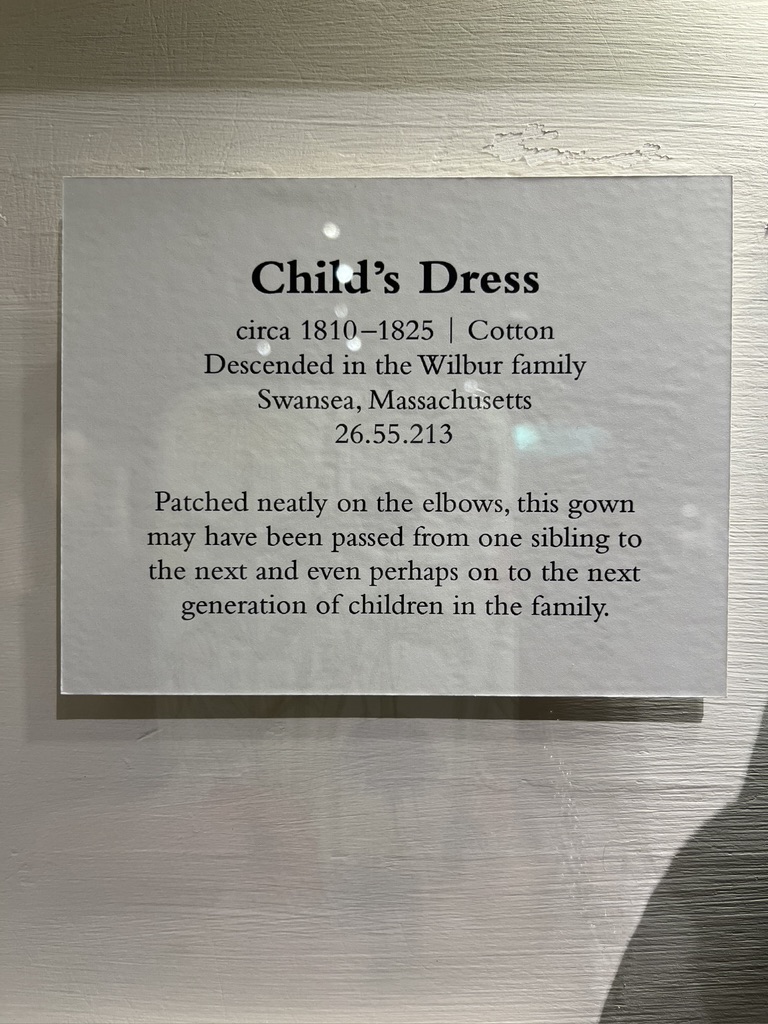
The coordinators arranged for a tour of Old Sturbridge Village for those of us not in classes on Thursday. I took advantage of that. We first had a tour of the stored collection of historic textiles. They have a trove of handwoven household items from well known New England weavers, such as Peace and Patience, a mother and daughter whose last names I neglected to learn! There were items from other early colonists as well, but I was too busy gazing at the beautiful fabrics to retain any names. Clearly, I cannot be trusted to listen when in the presence of handwoven goods.
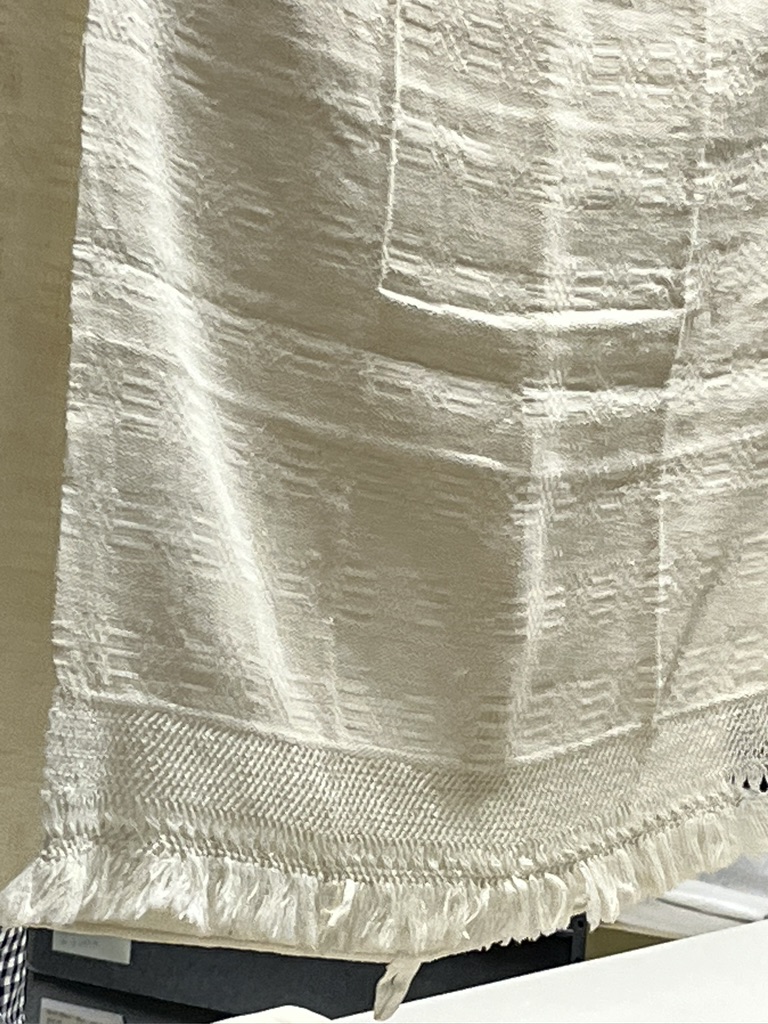
The linen towel on top is woven in twill which was known as diaper cloth, and no!–this does not mean it was a diaper. This is the name given to utilitarian fabrics that were used in household situations, which does include diapers as we think of them today. They are hard wearing and absorbent, as well as beautiful. The wool blanket behind it is wool with natural dyes.
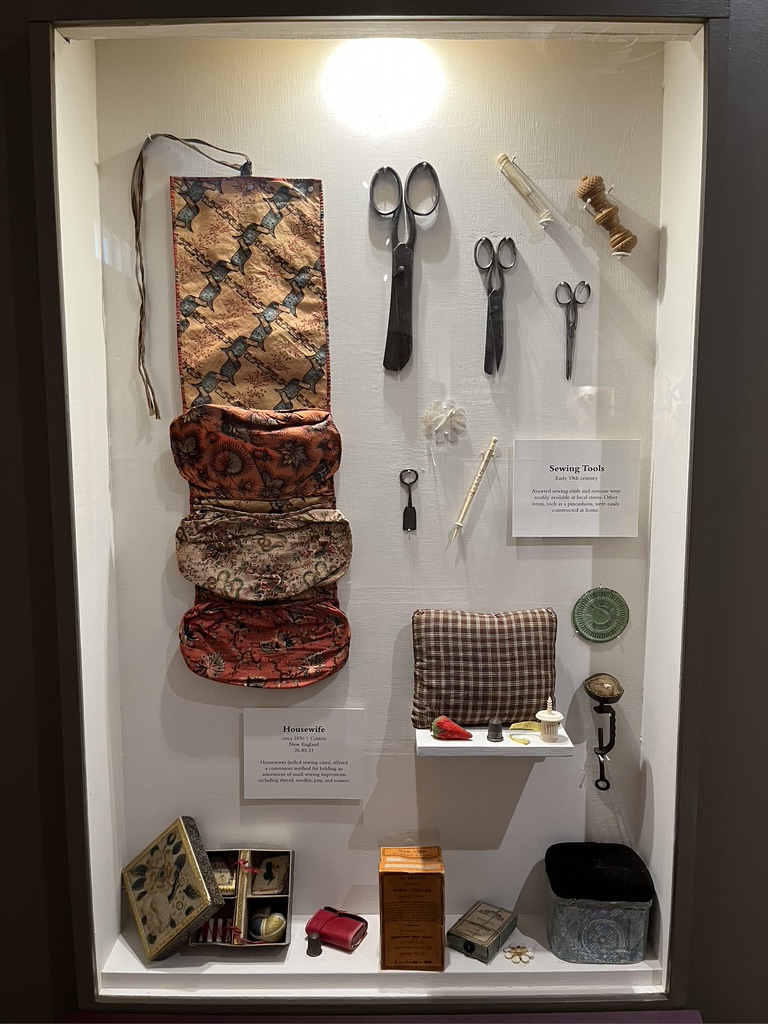
When first entering the storage facility at Sturbridge, we were confronted by high shelves loaded with historical weaving and spinning tools. Swoon!
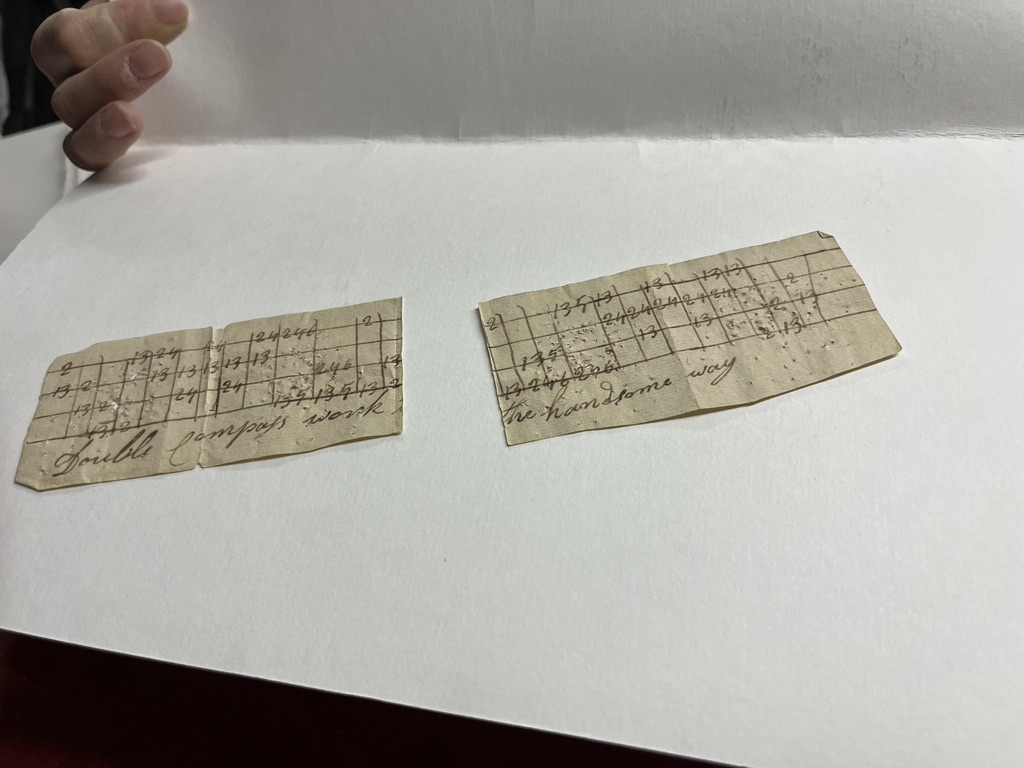
There are handwritten records of weaving drafts, often written on the backs of paper that had been first used for other purposes.
This towel has an attached fringe. Elaborately knotted fringes were quite popular in the mid-19th c, and they were added on rather than done with warp threads. Since they had been added, if the fringe began to deteriorate, it could be removed, leaving the hemmed towel in good condition.
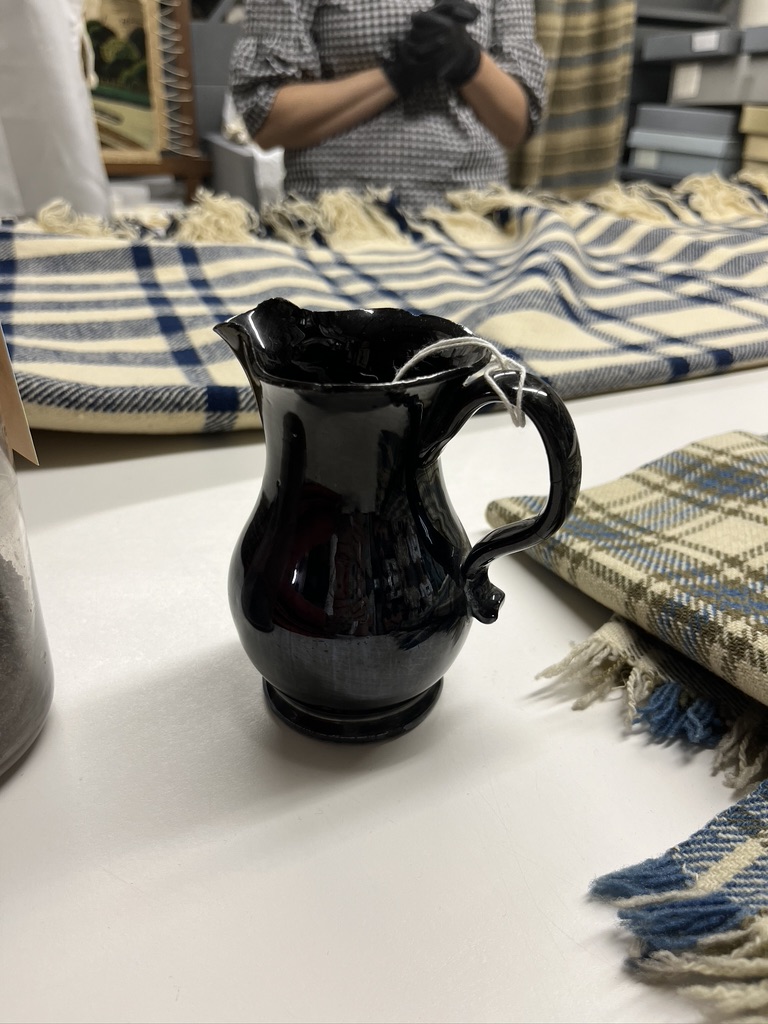
The museum has record books of payments for woven goods. The weavers were not always paid in currency at this time. This pitcher was payment for the blanket in the background, and there is a record that weaver was not happy with this outcome for her work. The blanket is all wool, with indigo dyed stripes. It is quite large, and pitcher is not!
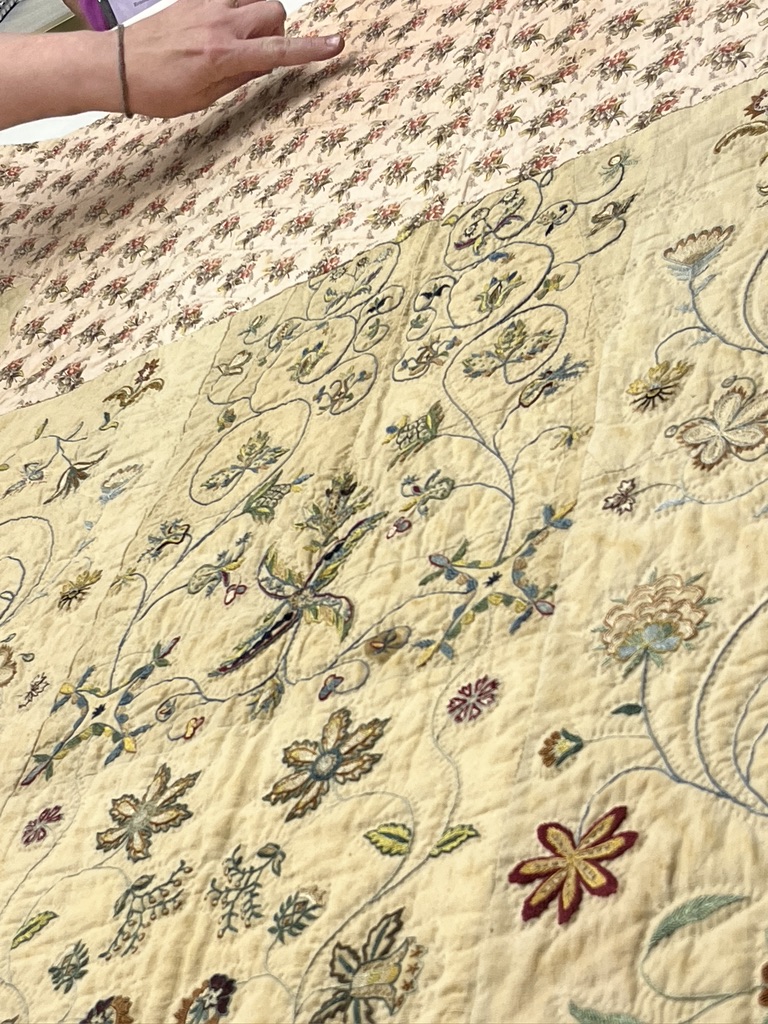
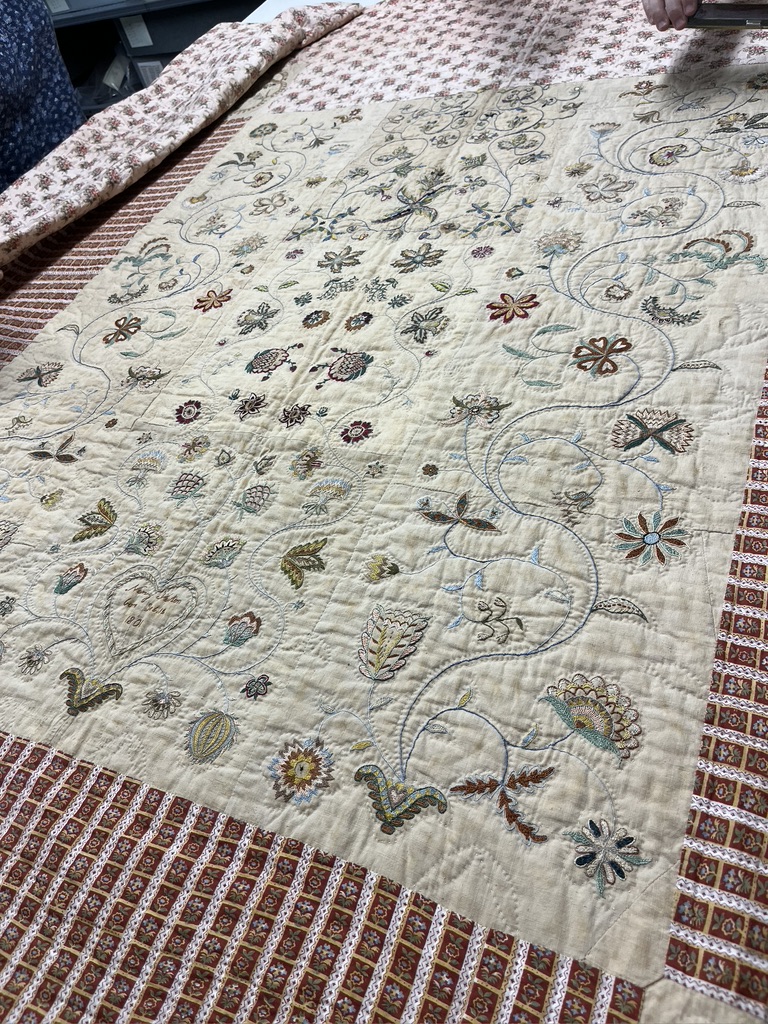
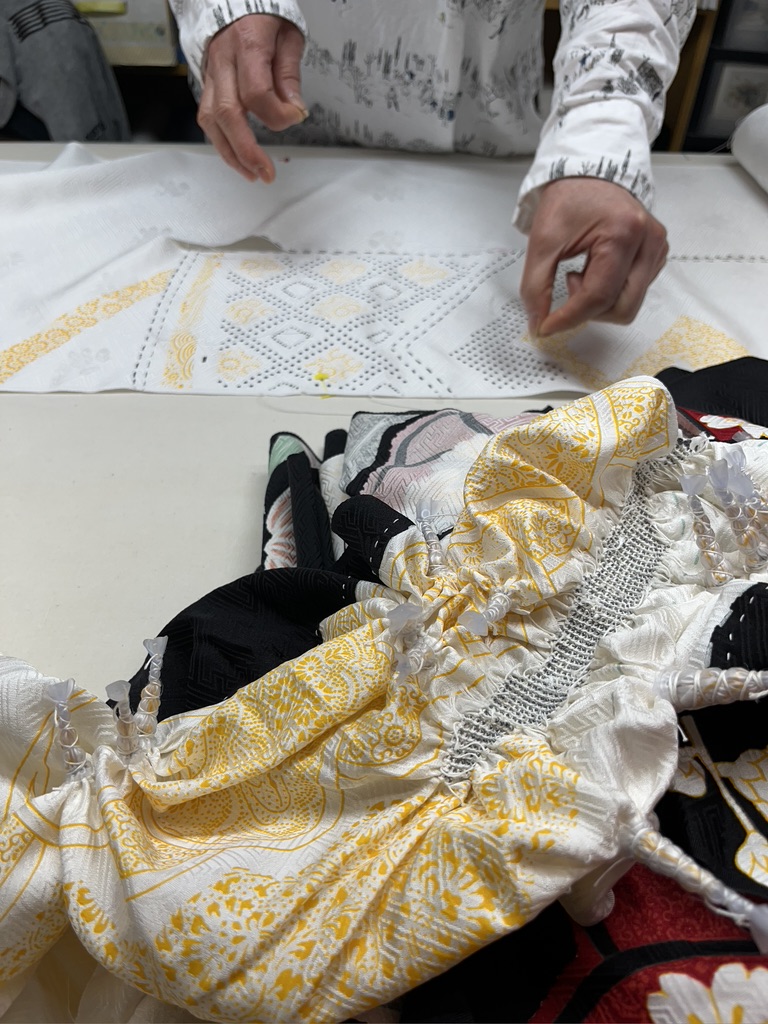
We also saw a marvelous quilt made to accentuate a beautifully embroidered purse. Purses from this time period were usually drawstring bags that were worn inside a skirt with a slit that allowed access to the purse. Our guide explained that this particular purse may have been a treasured memento to the woman who designed an entire quilt around the purse.
The purse is the slightly more discolored rectangle in the center of my photograph. The quilter has matched the embroidery for the center of the quilt and added borders. I don’t remember the date of this quilt (mid to late 19th c), but it is in terrific condition. It was definitely treasured.
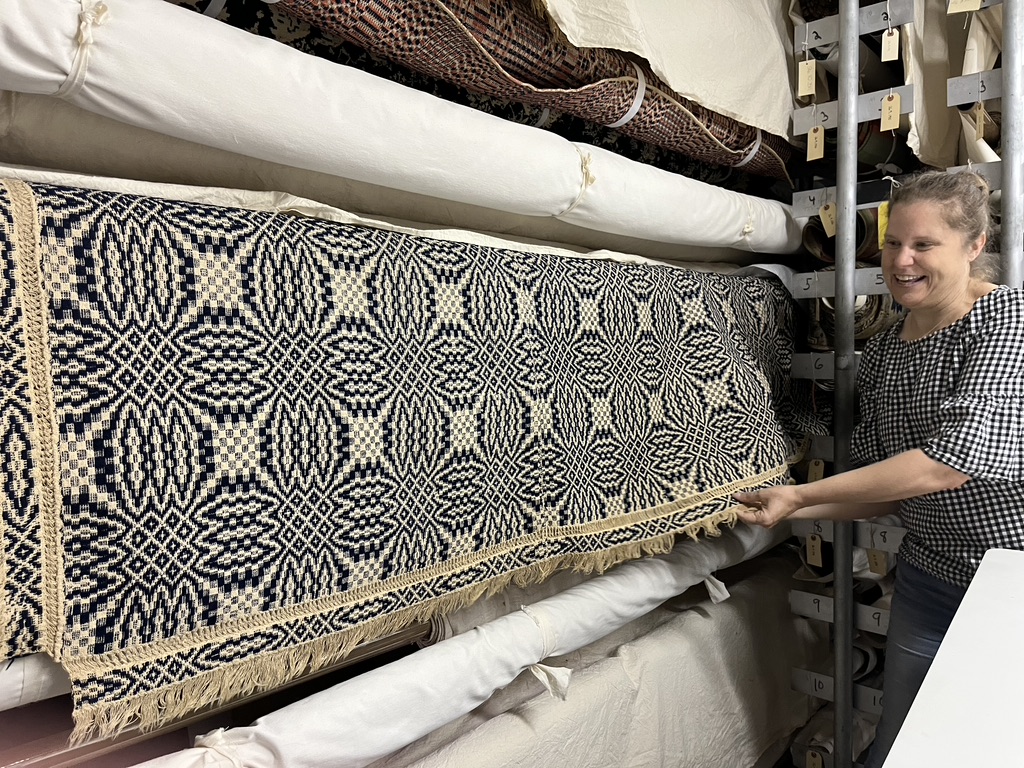
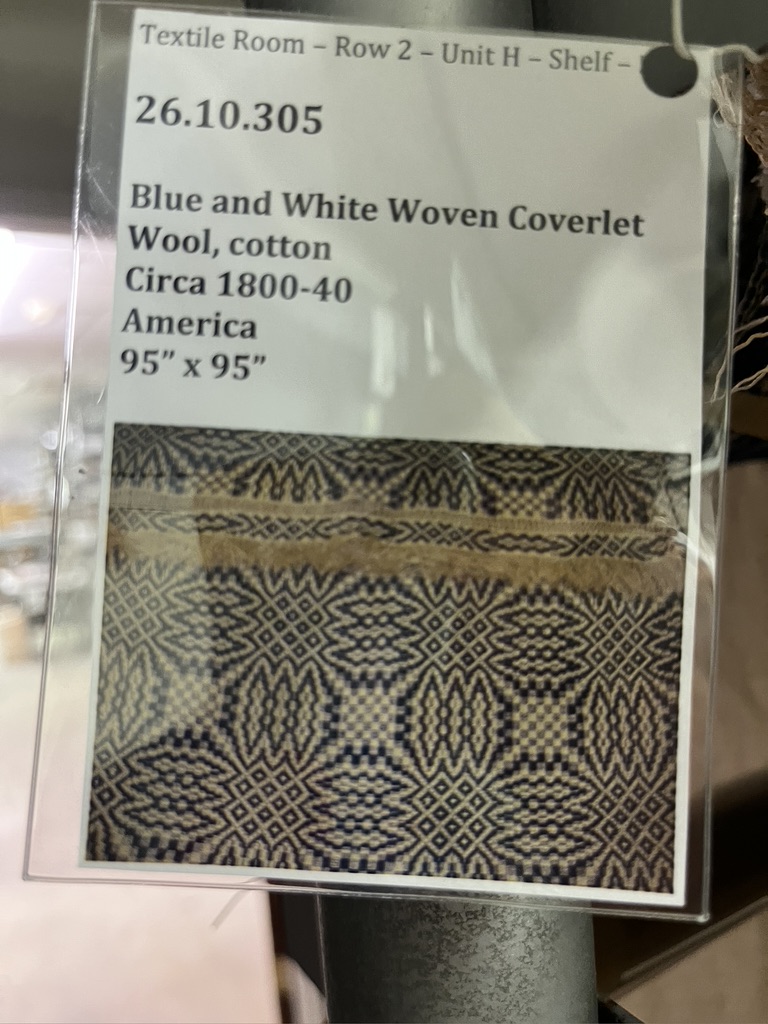
And then there were all the handwoven coverlets, of which we only saw a few! They are stored on rolls on rolling shelving, and there are a lot of them.
For every coverlet and counterpane there is an identifying card.
Upstairs in the collections building were lots of spinning wheels, wool winders and other tools. Our guide was particularly enthusiastic about a flax spinning wheel made by a man named Higginbotham who was from Pomfret, Connecticut and Cranston, Rhode Island, born in the mid 18th c. It is a still a beauty!
A shelf of band looms and a yarn swift.
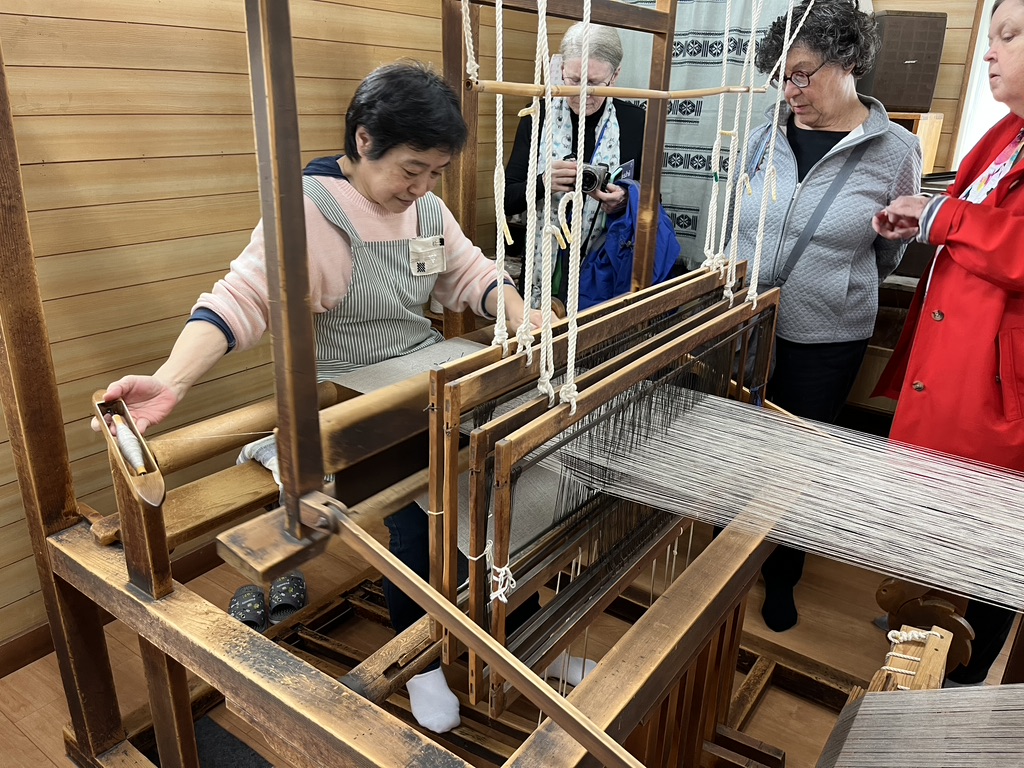
Our guide told us that most of the textiles seen in the museum are reproductions, not the actual historical pieces. This is due to the fragility of textiles. Many of the reproductions are woven by the weavers at the village. This woman is weaving a patterned linen cloth that can become serviettes (napkins) as well as being pieced together to make a tablecloth. It’s a brilliant idea to warp a loom for the napkins and then piece the tablecloth in three sections. With a warp 24″ wide you can hem for 20″ dinner napkins and then piece three longer lengths together to get a tablecloth in the 60-64″ width.
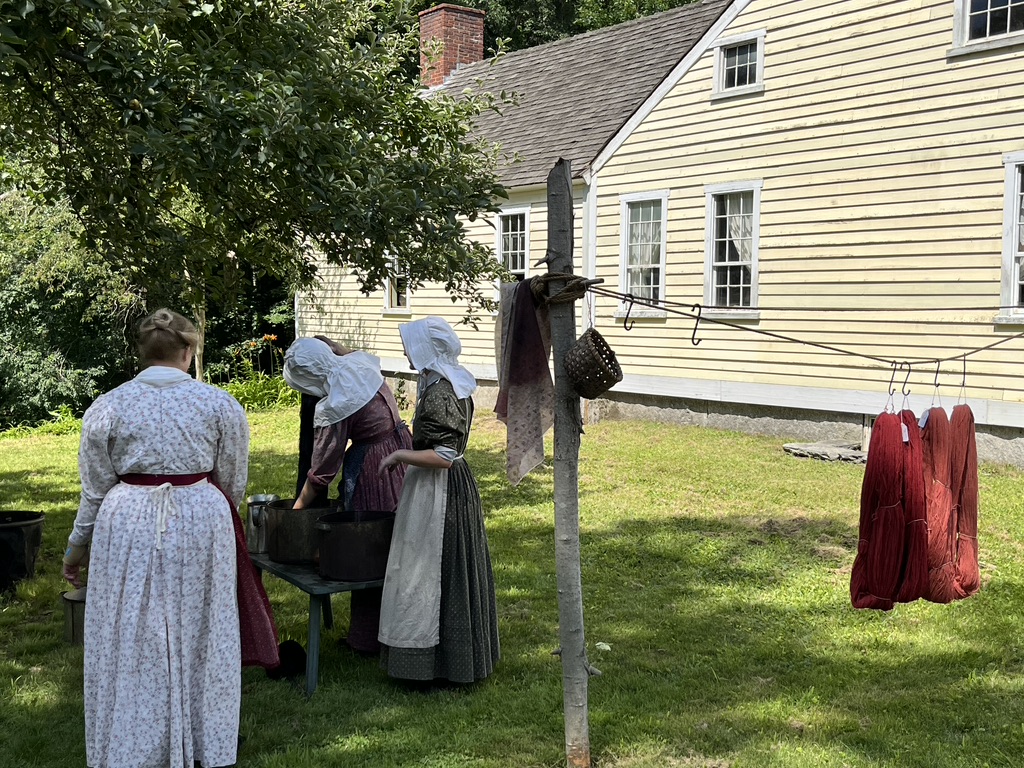
It was lucky that some of the enactors were also dyeing on the day I visited. Logwood and madder.
After lunch and a time for exploring on our own, we had a tour of the ‘herb’ garden, which is quite large on three terraced areas. The garden includes dye plants, as well as plants that were used in finishing clothing (teasels and soapwort), and plants to be made into cloth, like flax.
Our guide has been working in the gardens of Sturbridge Village for over 40 years. She has been instrumental in changes to the gardens during this period, and since she is also a spinner and dyer she is knowledgeable about gardening as well as how these plants were used. Her name happens to be Higginbotham, perhaps not spelled quite that way. I wish I had asked her if she was related to the man who made that flax spinning wheel.
One thing I saw in the museum that she later talked about was milkweed silk. During this time period women with the luxury of time, or who could sell this product, made elegant wraps out of the fibers found in the seed pod of milkweed. You had to use it before the pods opened so that the silky fibers were still neatly nestled in the pod. Our gardening guide is making one herself. The fibers are bound together with sewing thread in little bundles and then attached to handwoven fabric.
Here are some scenes from Sturbridge Village that captured my attention. It is a beautiful place.
And interior views of the exhibits.
And then the formal events at NEWS started. I took one class that covered the rest of the days at the conference. I had trouble finding enough time to visit the exhibit halls and the vendors. My class was so wonderful that I didn’t mind too much. It was Wedge Weave with Connie Lippert. More on that shortly.
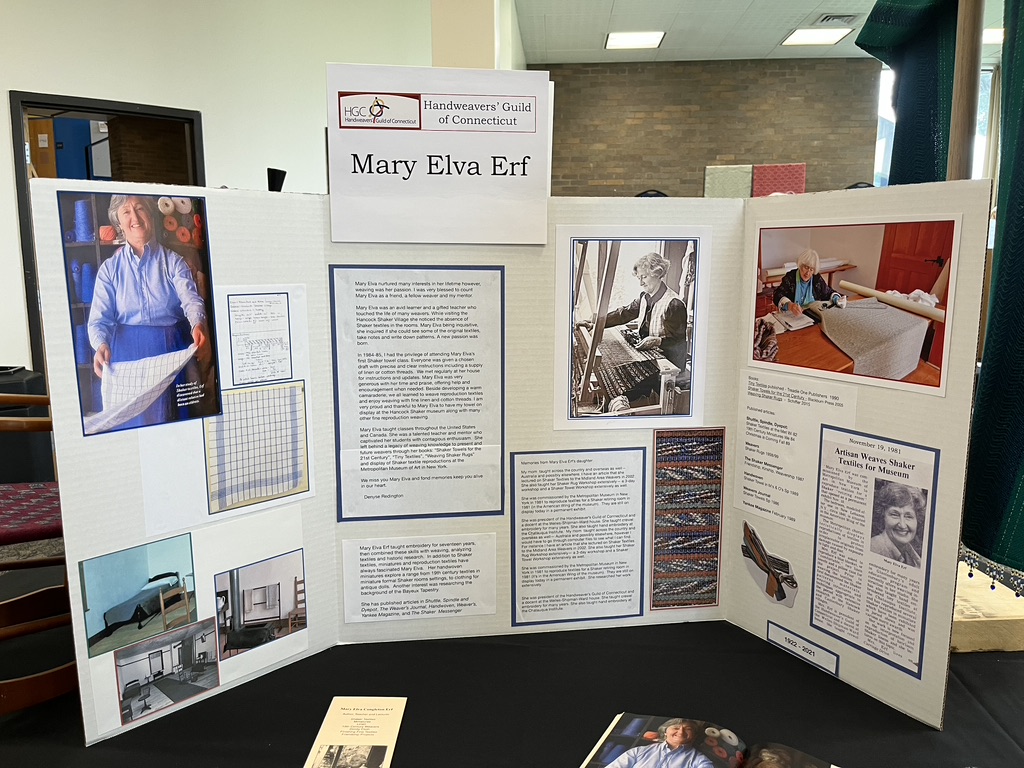
One of the memorable exhibits at this year’s conference was titled “Legacy Weavers,” and it honored the women of guilds in New England who have left us such a wonderful legacy of instruction, woven fabrics, and the memory of their unique personalities. Here is the tribute to Connecticut weaver, Mary Elva Erf. I remember being so thrilled that a member of my guild had published a book (Weaving Shaker Rugs). Now there are quite a few published weavers in the Connecticut guild, including me!
The most moving tribute (for me) was to Sarah Fortin. She passed away far too soon, and she left me marveling at many of the techniques she used. I didn’t know her well, but one workshop I took with her will always be a high spot in my weaving history. I regret that I don’t have a photograph of her tribute board. I guess I was too busy reacting to the loss of her. But here is one of her wonderful dimensional fabrics. She was also a talented sewist.
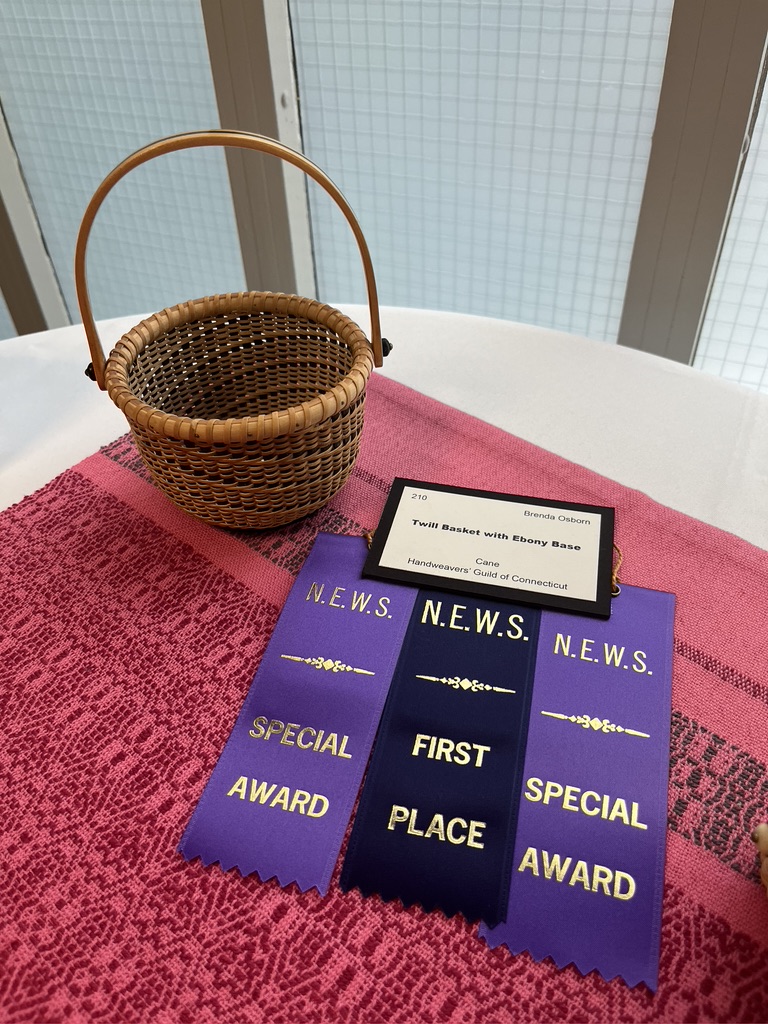
All the exhibits were well done. It’s been six years since I’ve been exposed to so many wonderful woven items. There were two handbags that I hope will lead me to some good ideas for making one of my own. One member of my Connecticut guild made a dress, handbag and shoes out of her handwoven fabric. It should have gotten an award! Another guild friend got first place in rugs for her rya knotted rug depicting flowers in a friend’s garden.
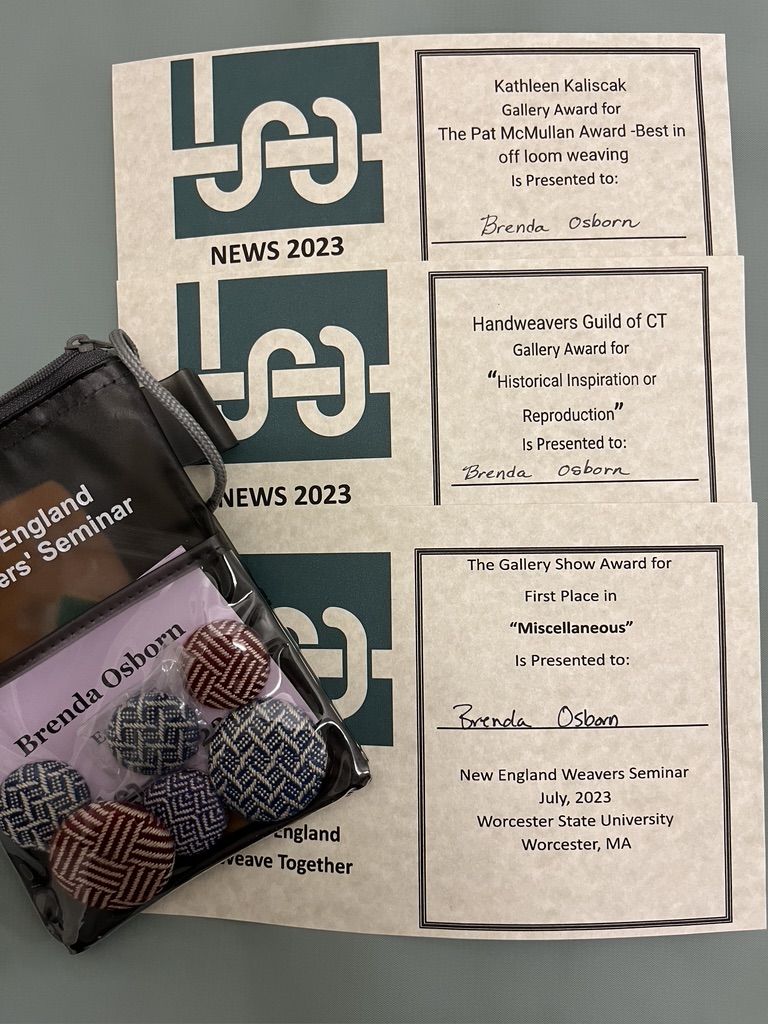
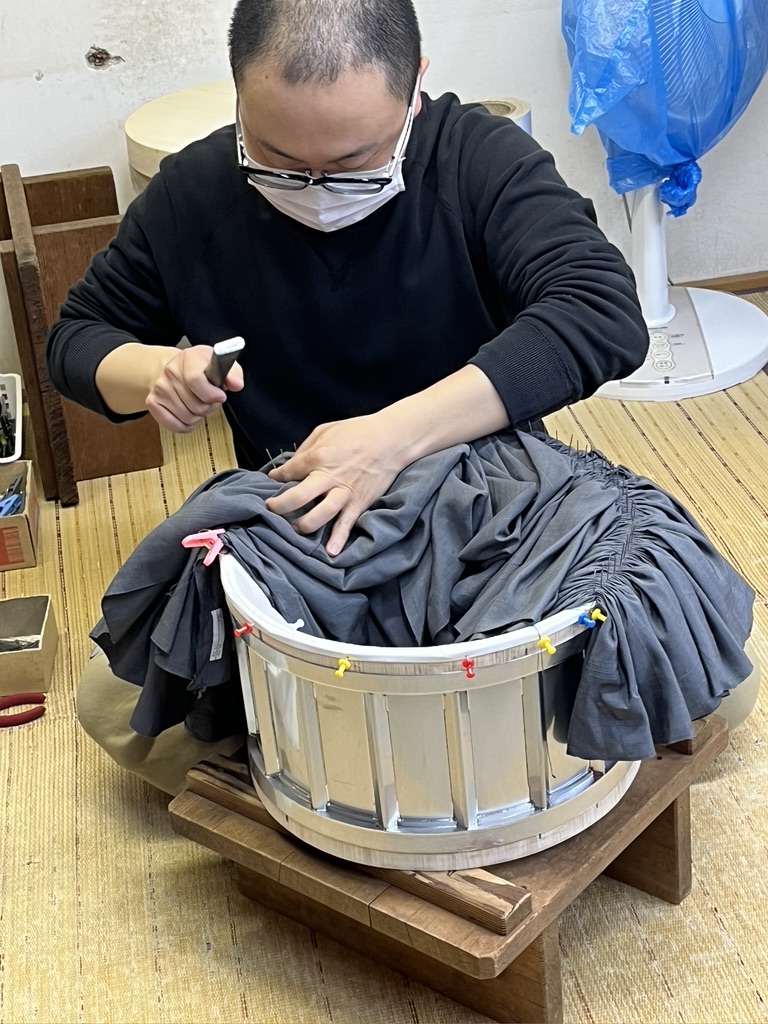
One of my baskets got three awards: 1st Place in Miscellaneous (I guess that’s the category for baskets!), and two special awards for ‘best historical inspiration’ and ‘best off-loom weaving.’ I am thrilled!
With the ribbons we each get buttons made from handwoven fabrics. It is such a wonderful memento to have.
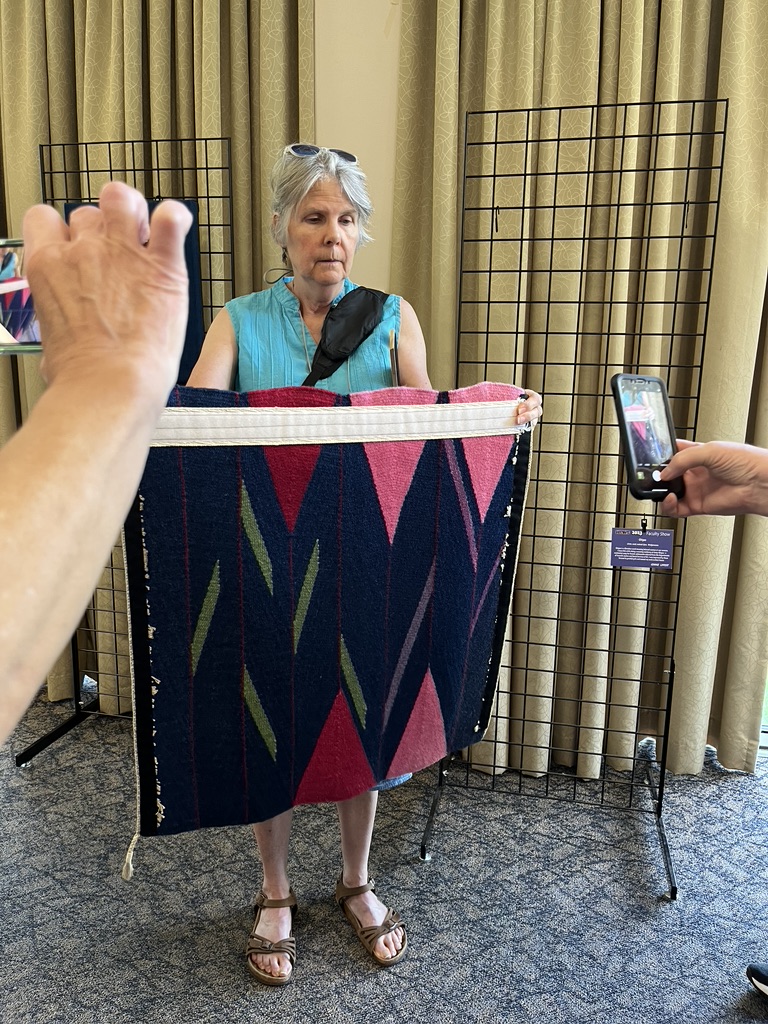
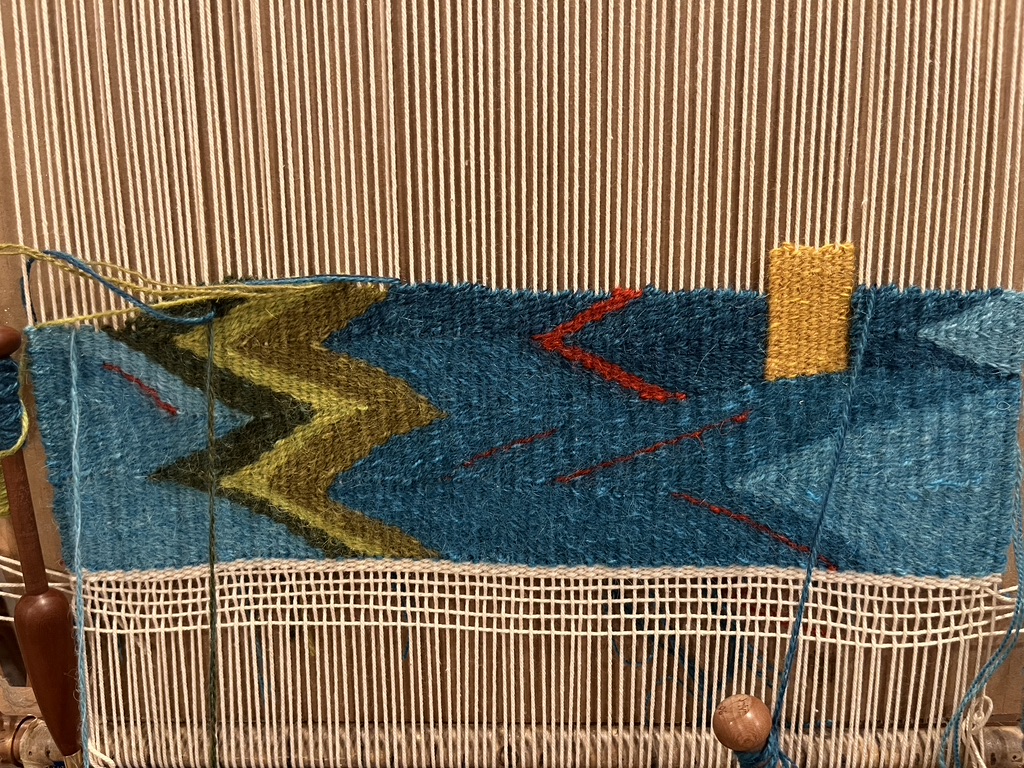
My wedge weave class with Connie Lippert was a great choice. I’ve got so many ideas swimming around in my head at this point. It is quite dizzying. Not only did we all learn wedge weave, but also how to insert some ‘normal’ tapestry weaving into a wedge weave design, along with a few other intriguing techniques. I now know I can spend the winter aboard Pandora trying out some of these ideas. I am indebted to Connie for her generosity in showing us so many techniques, and even delving into the details of finishing.
This is my piece in progress. It’s not a fast technique, but I’m impressed with how much I managed to do in 2 1/2 busy days. The warp is 12″ wide and I’ve woven about 6″ in height.
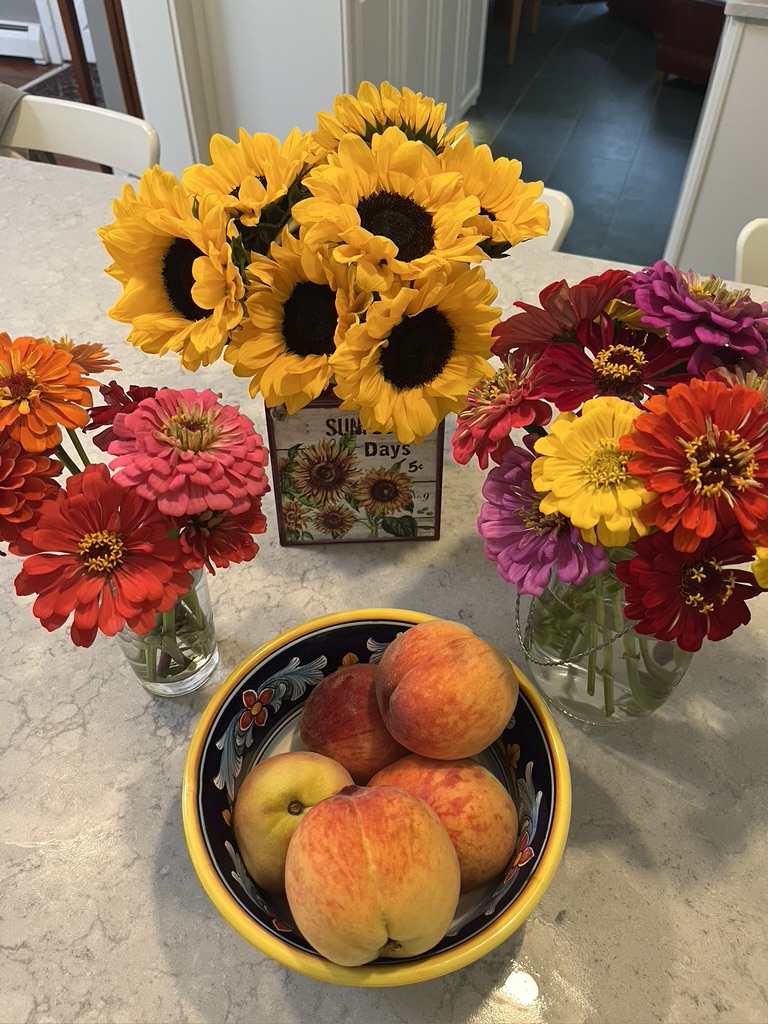
In the space of five days I visited airports three times. I’ve never gone to an airport so many times in such short period without taking flight myself! I dropped Bob at Bradley on Wednesday so he could fly to Florida to visit his brother. Later that day I picked up Connie Lippert at Logan. Then on Sunday, I picked up Bob from Bradley as I drove home. What a whirlwind! It was all great. And, returning home I am enjoying the bounty of July in New England. The sunflowers are from a friend and the zinnias and peaches came from our local farm stand that Bob visited this morning.
Now to make use of the many inspirations from NEWS. I hope I can be productive for the rest of my time on land.
It’s those placemats woven with Japanese paper yarn. I’ve hit yet another hurdle. It took me three different dye sessions to get all the paper yarn dyed to a color I like. That means there are three different dyelots, but since each batch was UNwoven from a single placemat I naively thought I would get a new woven placemat out of each batch. I did happen to notice that the yarn was compressed a bit when I unwove it. I didn’t really unweave it; as I showed in at least two previous posts, I cut it out of the warp since the placemats had already been cut off the loom.
It was such a pale, boring blue against the white/natural warp. I was very happy with the newly dyed indigo paper yarn. When I wet the yarn before dyeing it fluffed up again. I’d say it UNcompressed itself, or so I thought.
I began weaving and was zipping along nicely. I allow 1 1/2″ at the beginning and end of a placemat for a turned hem. That is 3″ total. Sometimes I weave the hems with a different weft, but not usually. I did give that a moment’s thought, but I was pretty sure the weft from each placemat would weave a full placemat. Well, it didn’t. And the worst part is that when I ran out of weft I was exactly 3″ short. Just the amount I could have woven as hems with a different weft! Poor me!
Now I’m faced with UNweaving this placemat and starting again with a different weft for the hems. It’s laborious. I think I am about 4 hours into it, and I have only UNwoven half the placemat. I’m treadling backwards, throwing a shuttle, and winding the yarn onto the pirn after every four picks. It’s the most efficient way I could think of, but if you know a better way, please give me a shout–soon! I hope to finish today. So that’s how I’m spending my day before Independence Day. Hmm…
I realize that I am stubborn and refuse to be defeated by this project! The kitchen (paper)towels were a cinch to weave, but that was because the paper yarn was a perfect color for what I wanted. This has been quite the opposite–a nightmare for sure!
But it’s summer and June offered so many pleasures to balance my weaving debacle! My hollyhocks are huge this year! They seem to have taken some kind of steroids over the winter. I don’t know how they got so big. They are same ones I replant every year. I just take the seeds from the current flowers.
The lamppost inside the hollyhocks is six feet tall. The hollyhocks must be nine feet tall! When the flowers began to open I had just discovered ‘the dogwood dyer’ on instagram. She uses flowers to create sharp images on cloth through eco-dyeing. I am intrigued. She suggests drying the flowers first to get sharp images. I have a flower press, but when I couldn’t find it I began to think I may have loaned it to someone–decades ago? So, Bob to the rescue. I now have a new flower press with several hollyhock leaves and flowers being dried. My vision is to have a line of flowers and leaves running up one side of the front of a t-shirt. I’ve got the t-shirt, and I used Botanical Colors no-heat aluminum triformate for a mordant–for the first time. I’m ready to try this technique! I sure hope it’s more successful than my placemats!
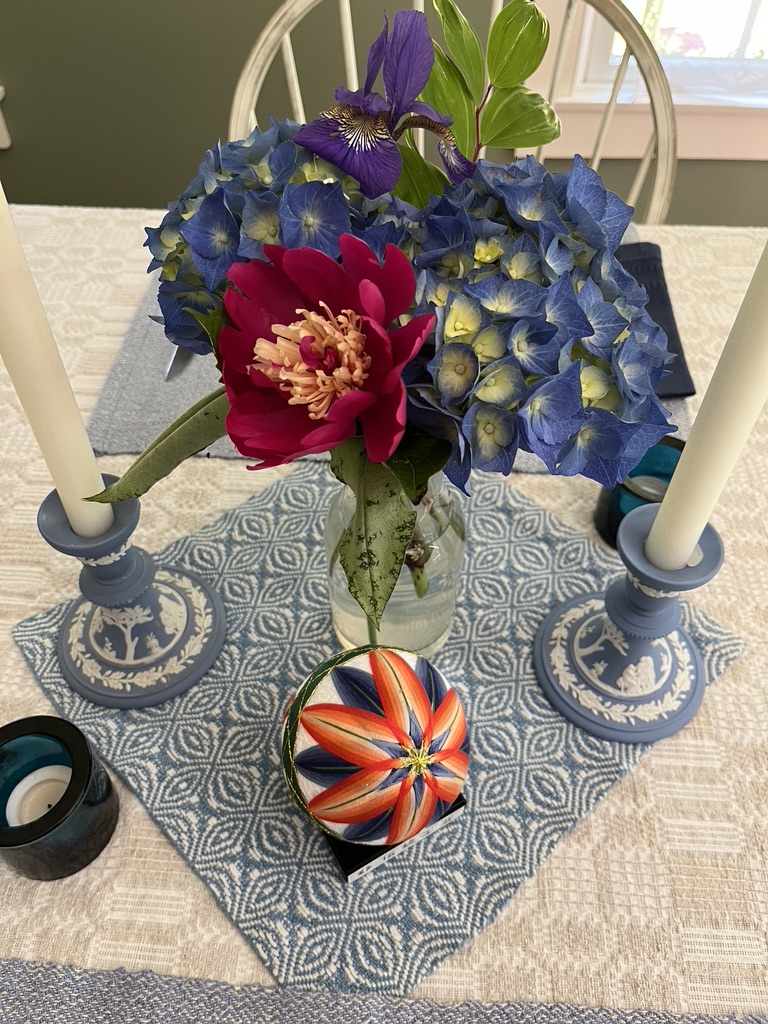
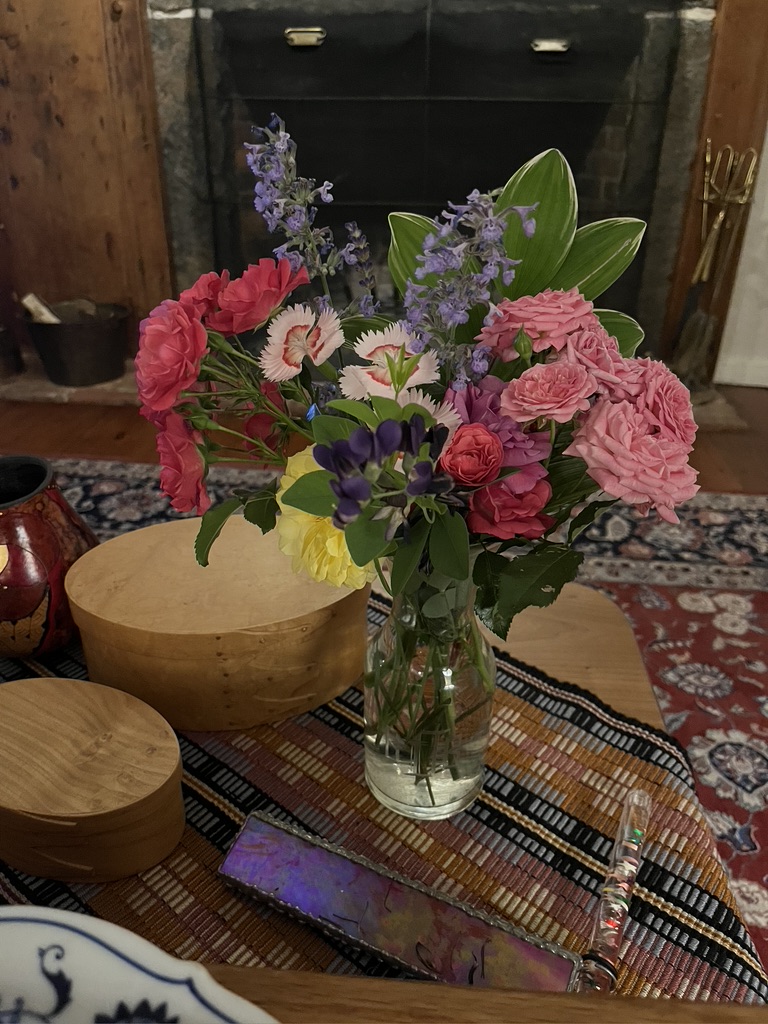
Bringing flowers into the house is one of my joys of summer.
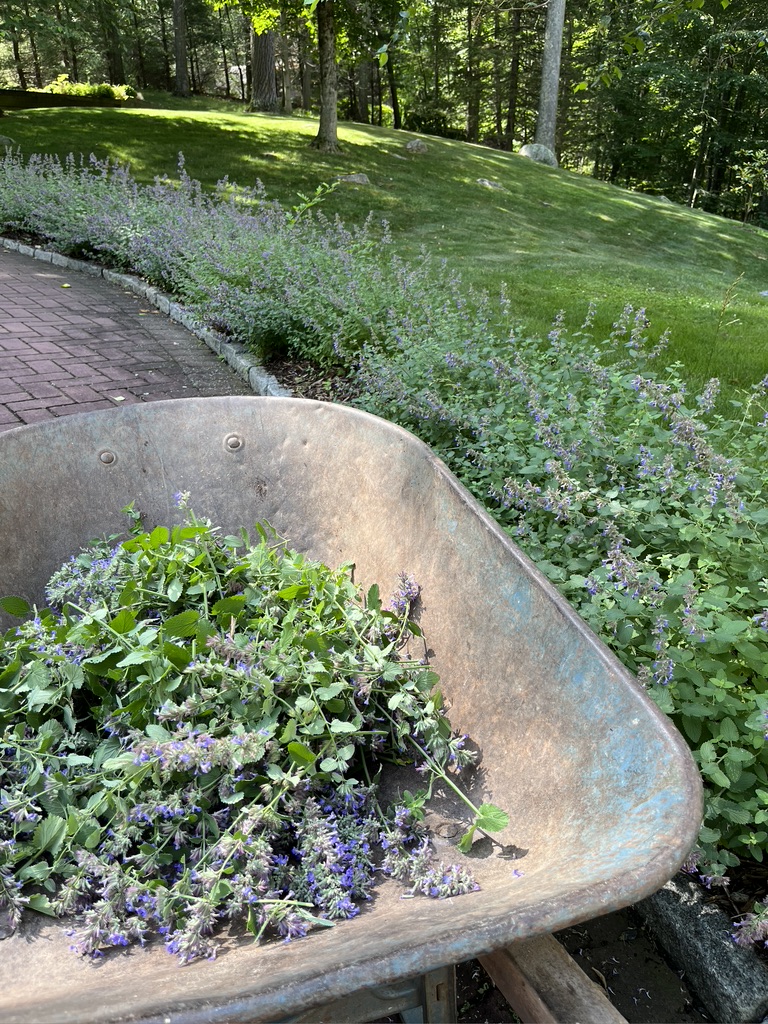
This week I cut all the flowers from the nepeta (catmint) and the lavender, hoping to get another flush of flowers in August. The bees were working just ahead of me as I cut the nepeta, and the scent was luscious. Lucky bees!
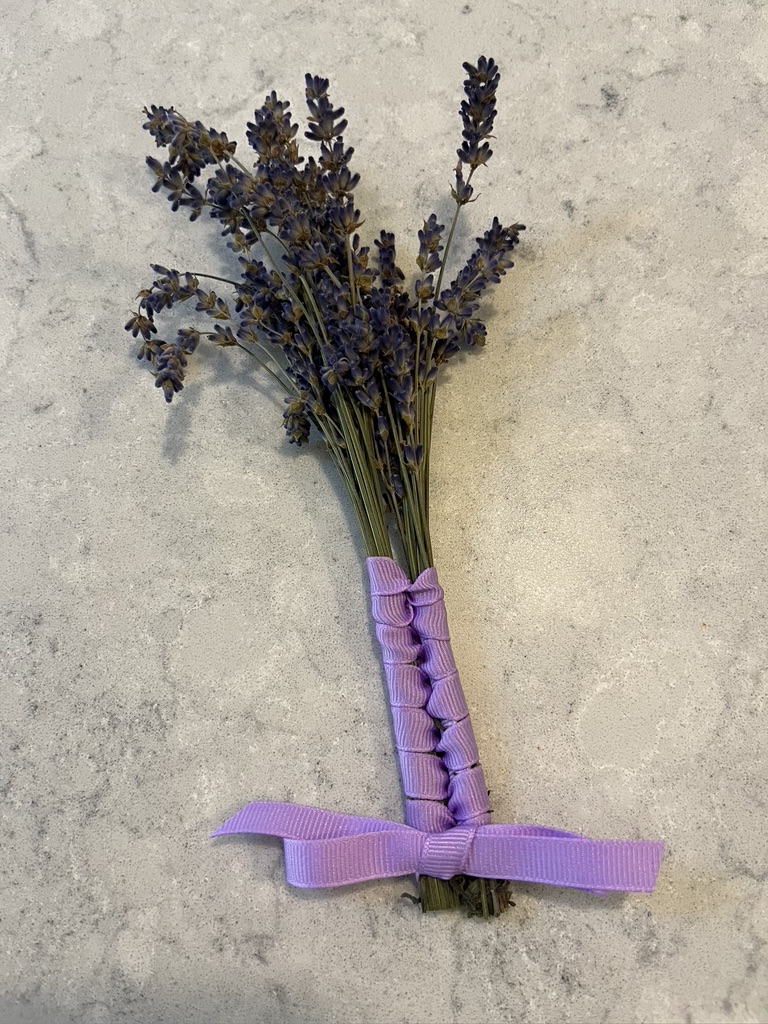
I saved the lavender and have made little bouquets for the guest bathroom and powder room, and I made a little wand to decorate a birthday present for a friend. It smells great right now, so I hope I see my friend soon.
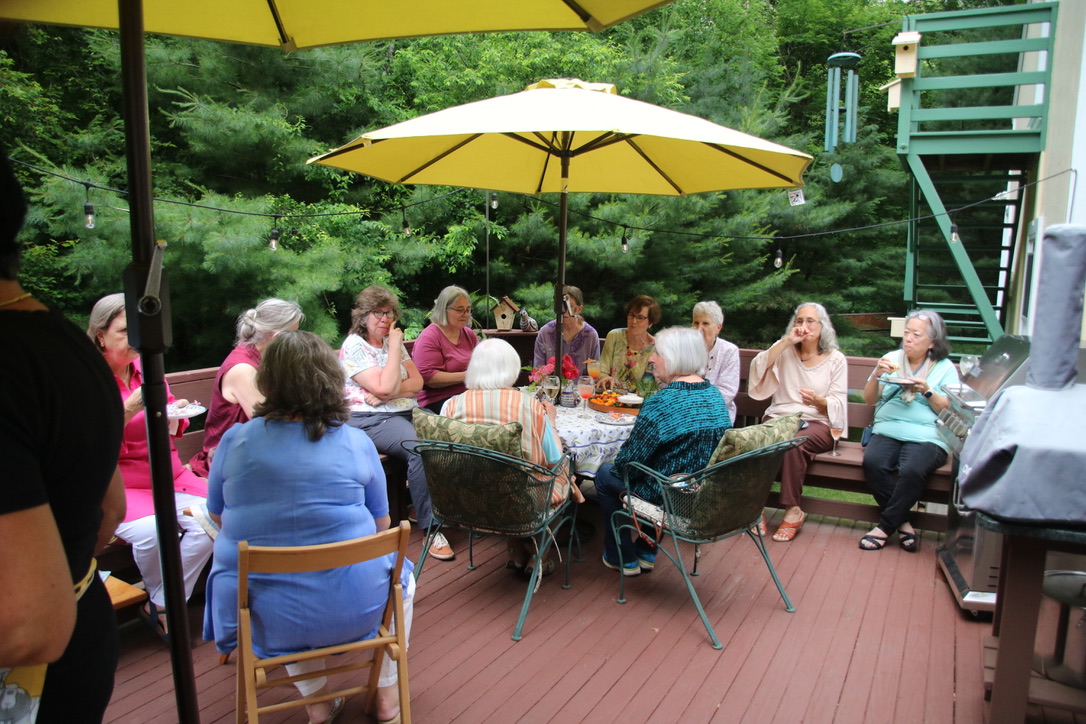
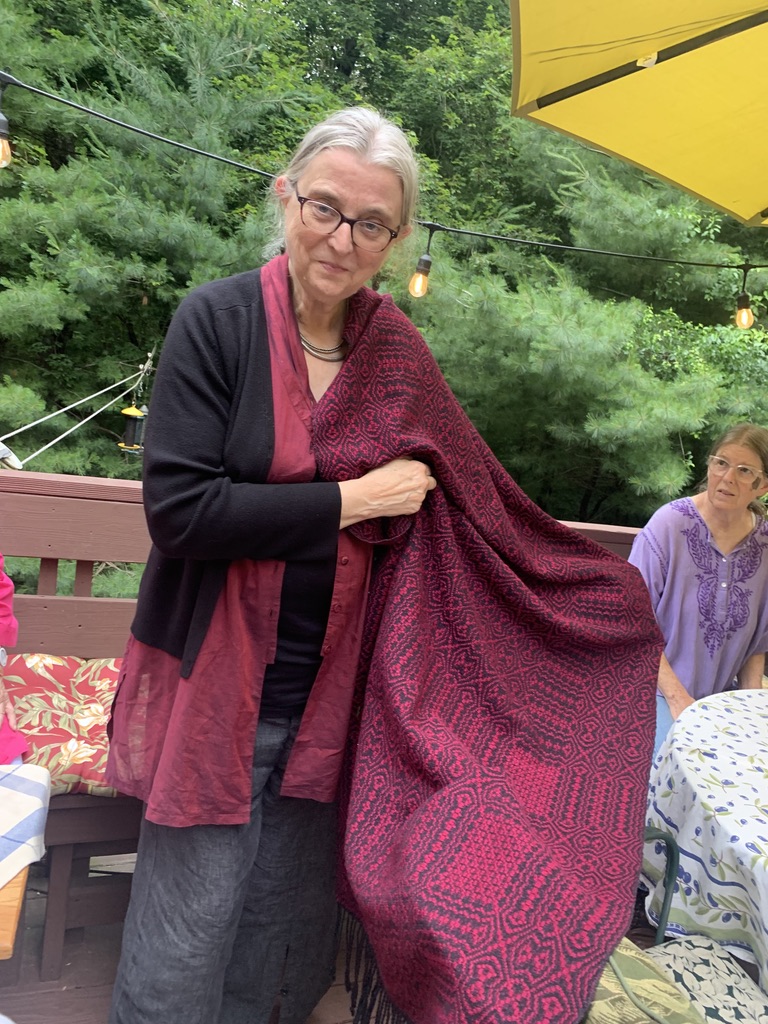
Ten days ago I gathered my dearest weaving friends together to celebrate our long weaving history, both each person’s weaving history and our history together. Friends came from New Jersey, New York State, Connecticut, and Rhode Island. It was a beautiful day. I loved every minute of it. Personally, I was celebrating my almost-golden-jubilee of weaving. I started weaving in fall of 1975. Struggling with these torturous placemats seems ridiculous after that much weaving history. After half a century things still don’t always go as planned!
Here is most of the group.
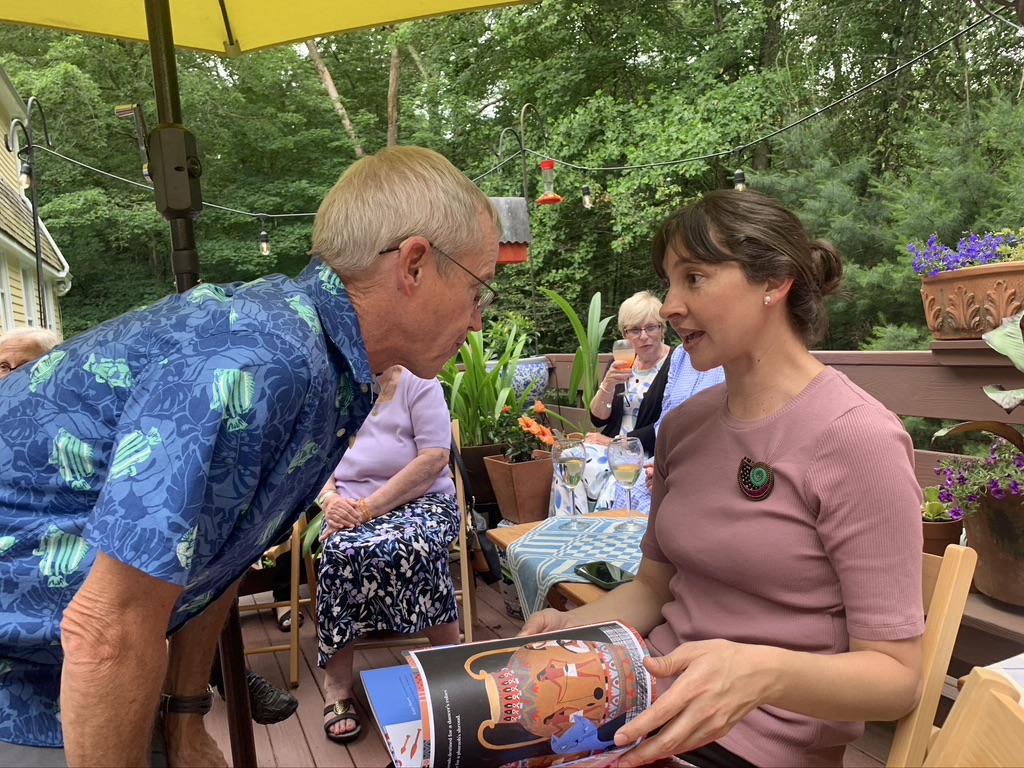
I gave books to the two newest weavers in my circle of friends. This is Melody!
My editor at Schiffer Publishing is the other newest weaver. She arranged for Schiffer to send six books for me to give away. Below my friend Judy just got a book on making paper baskets.
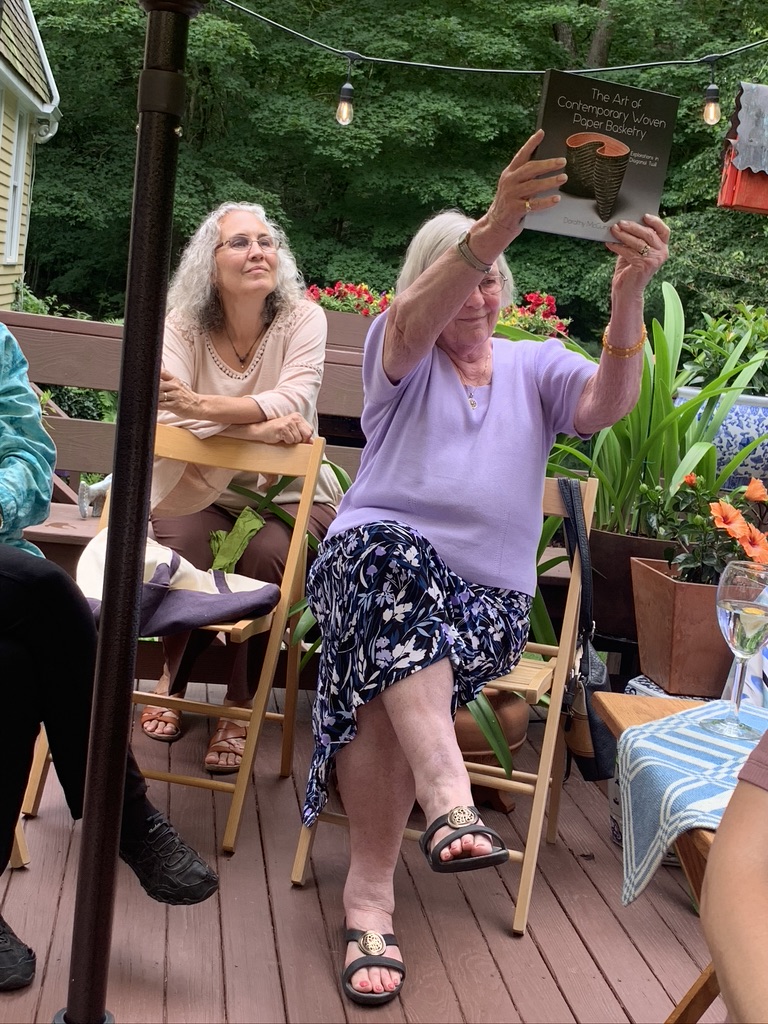
Melody took this wonderful photo of my book, which also was given away, with the various bouquets that were about to get placed around the seating areas before guests arrived.
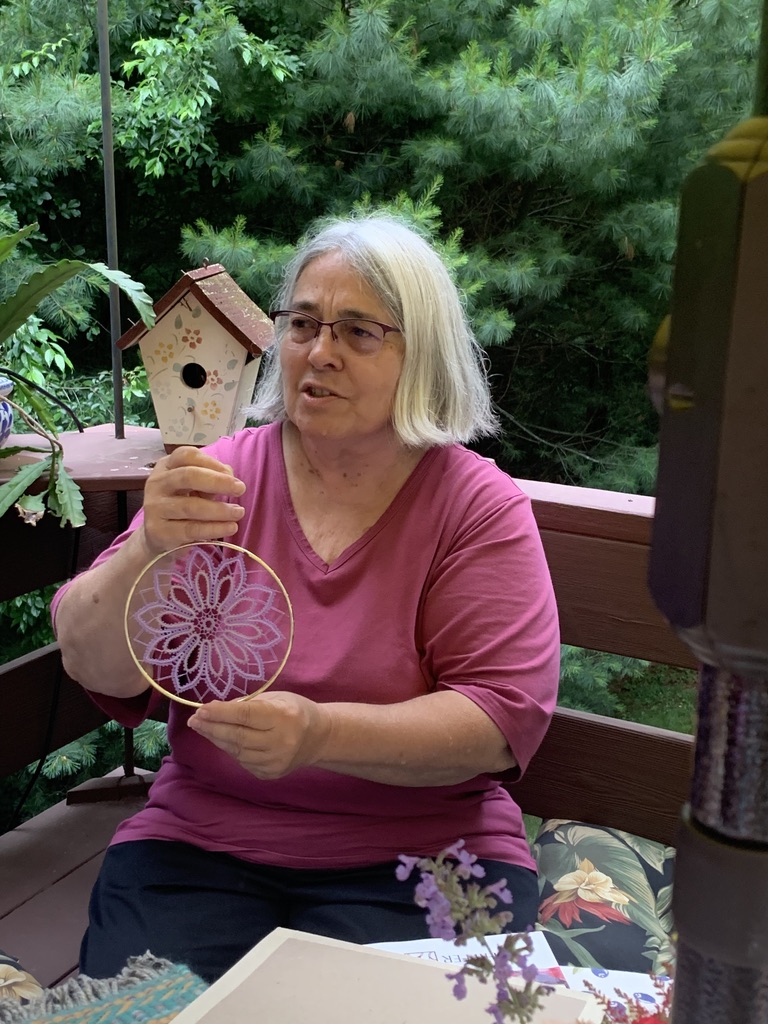
We also had a show and tell. This is Janet who makes bobbin lace and often creates her own patterns.
And Gretchen who wove this overshot shawl
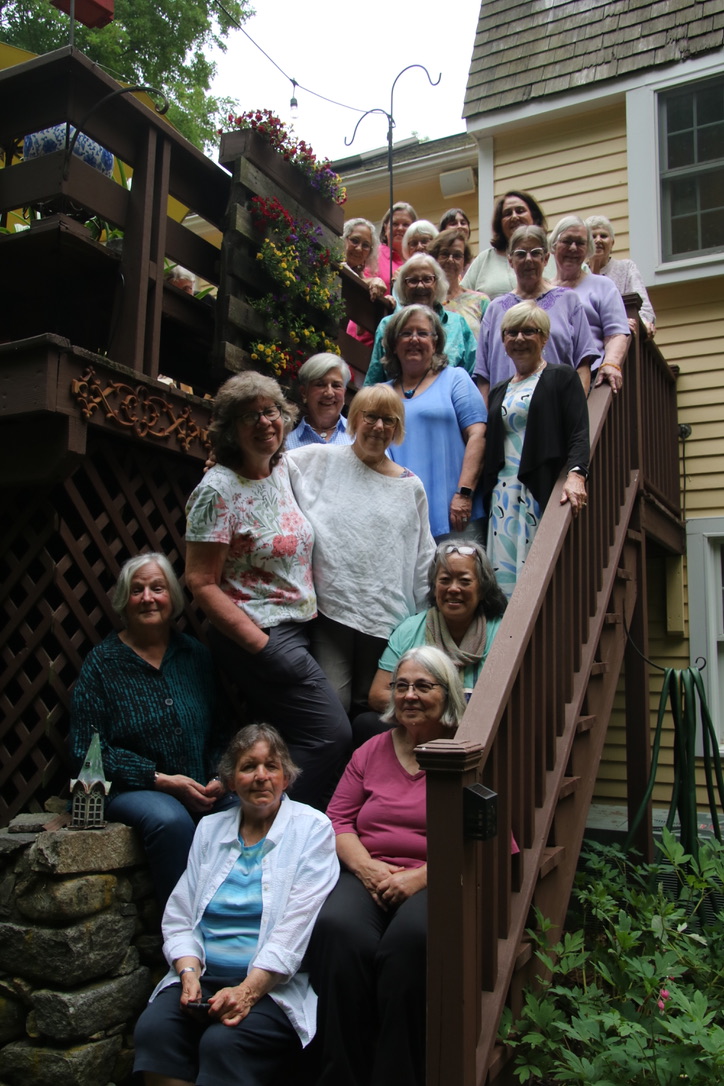
Bob took a photo of most of us gathered on the steps that lead down to the terrace off my studio. What a wonderful bunch of women who have nurtured me over so many years!
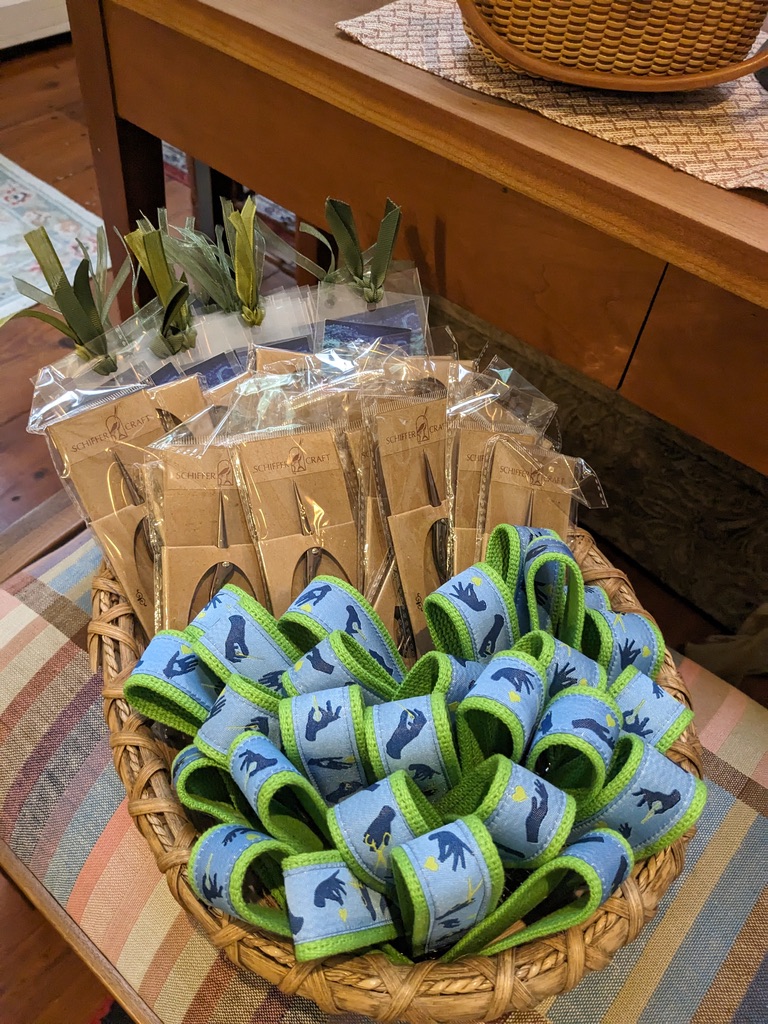
I had party favors! Key fobs made from ribbon and webbing from Renaissance Ribbons, cute stork scissors donated by Schiffer, and some bookmarks. Of course I looked for ribbon with weaving images, but this was the closest I could get. Everyone went home with some goodies.
So it’s time to get back to UNweaving. With a lot of luck I might finish today. Then I’ll move forward hopefully for the last time on this project!
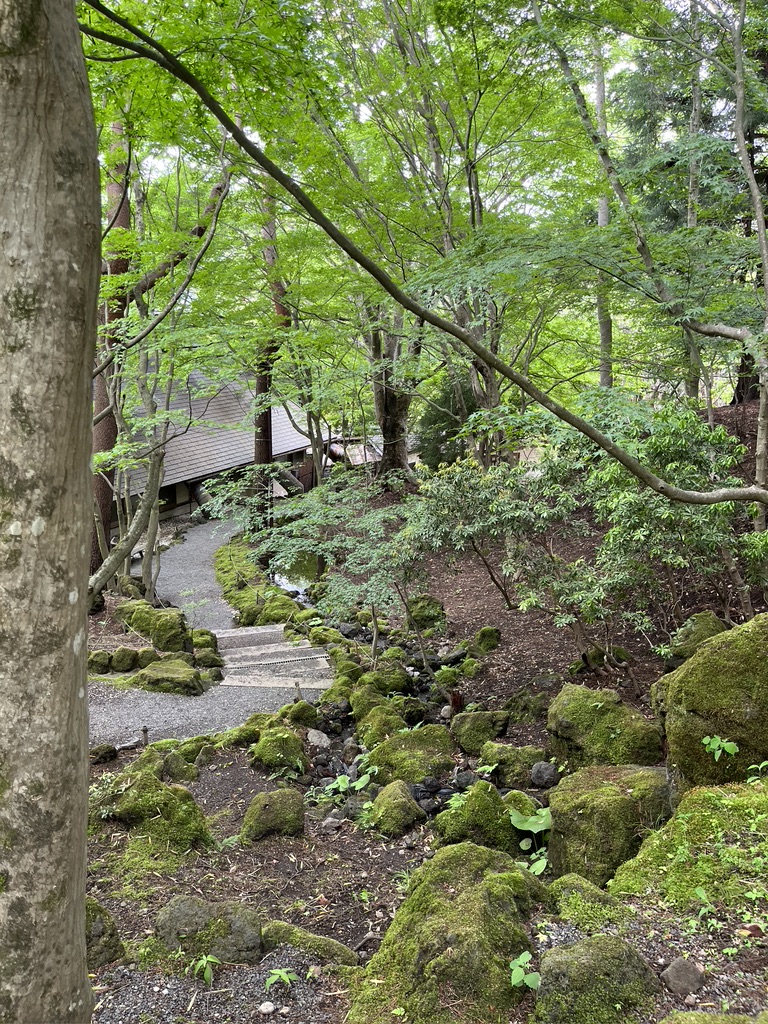
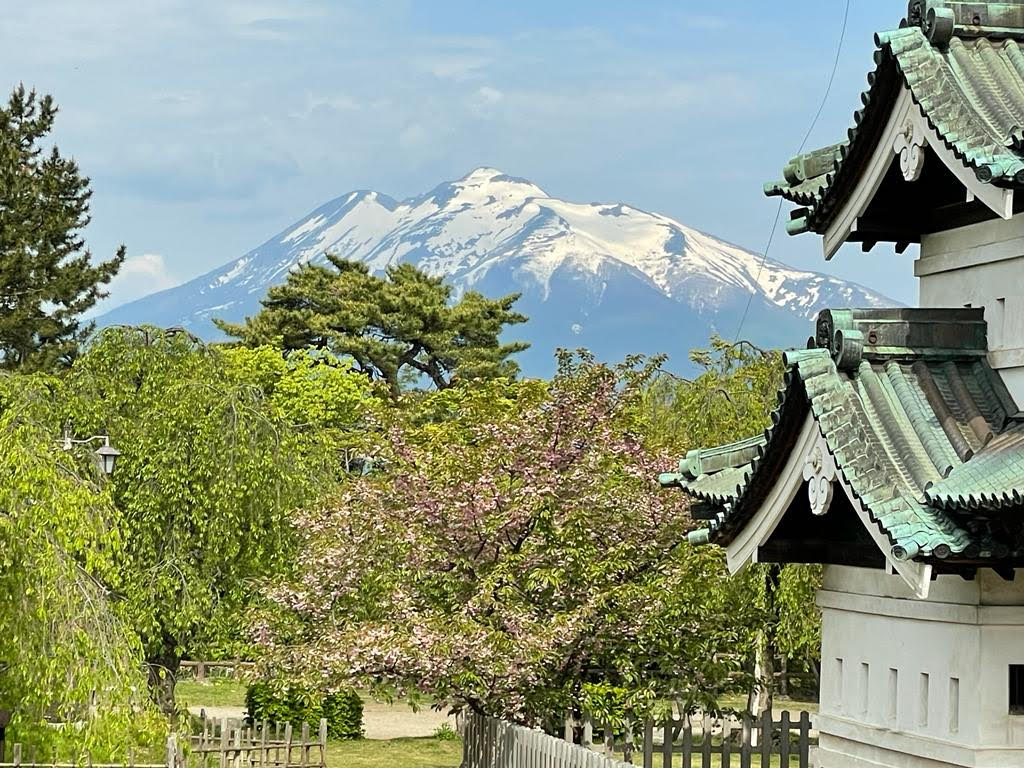
My trip to Japan in May started in Tokyo and went to the northernmost part of the island, to Aomori and Hirosaki. Over the three weeks of the trip we visited a number of museums that showcased textiles, along with temples and gardens. I’ve already described the hands-on workshops we took during the course of the tour, so now I’d like to focus on the wonderful textiles I saw in museums.
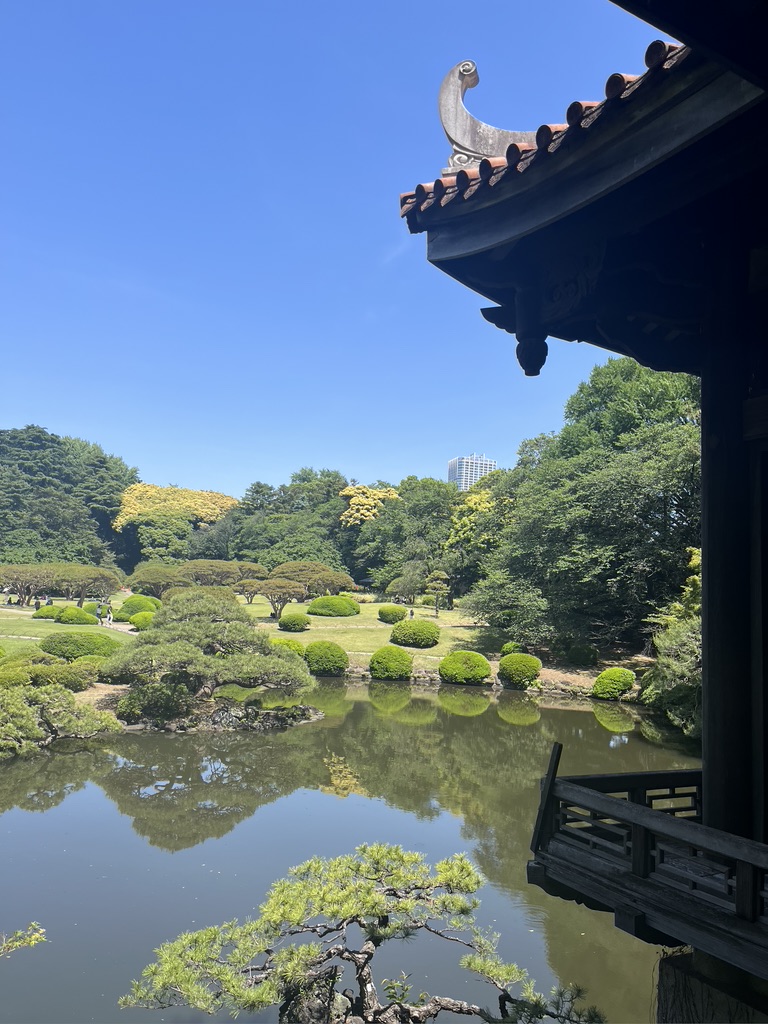
On the first day of our visit we combined seeing the Tokyo National Museum with the Imperial Palace, which are on the same grounds. None of the original castle from the Edo period remains. In fact, where that castle stood is now a traditional Japanese garden, which I enjoyed very much. There was a tale I didn’t fully comprehend about one of the shoguns from the Edo period deciding to have the river re-routed in order to have better views and stronger protection. I struggle to imagine how a river could be re-routed in a time long before modern equipment. Sorry I don’t have the details of this incredible feat. I did try to search online. Hey! If the Egyptians could do it, I’m sure the Japanese could as well.
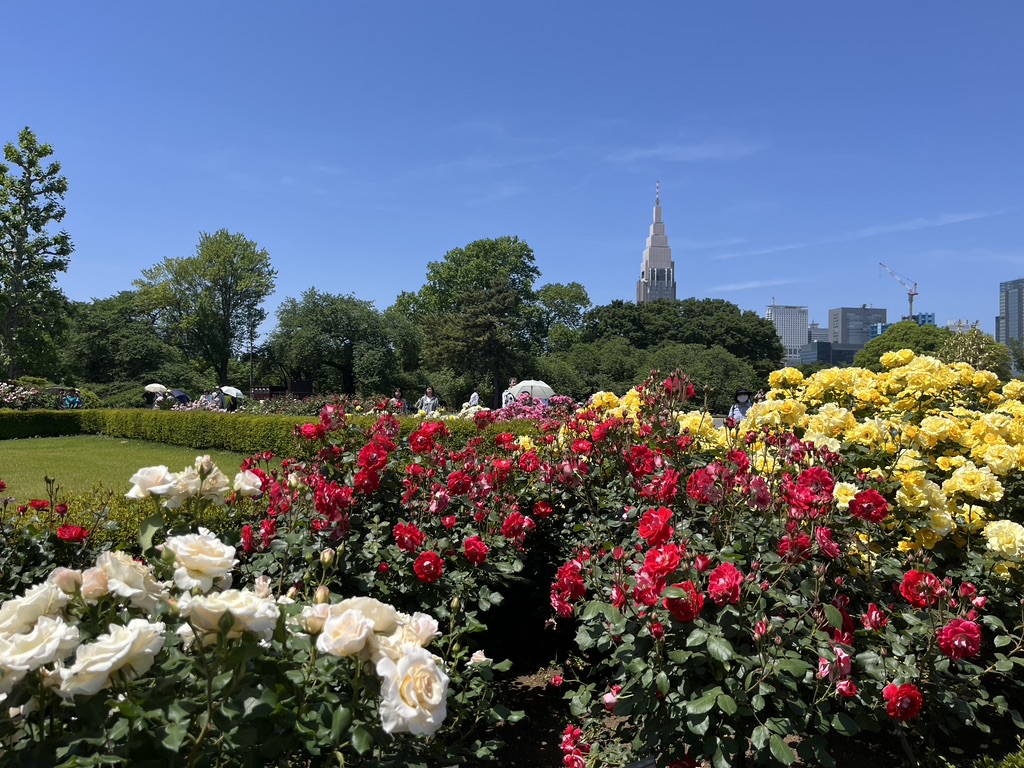
Of course we all loved the rose gardens with views of Tokyo just beyond the grounds of the Imperial Gardens.
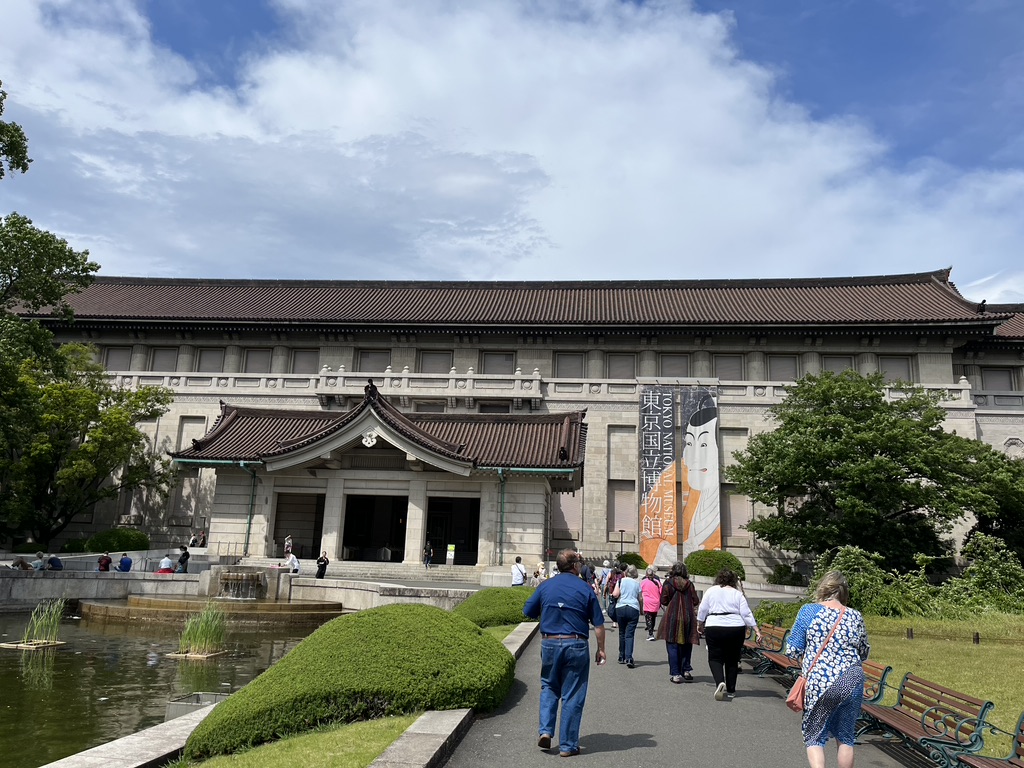
It was the museum that captured our imaginations. The second floor was devoted to textiles.
That is Tom Knisely, center, and other from our group, heading to the museum.
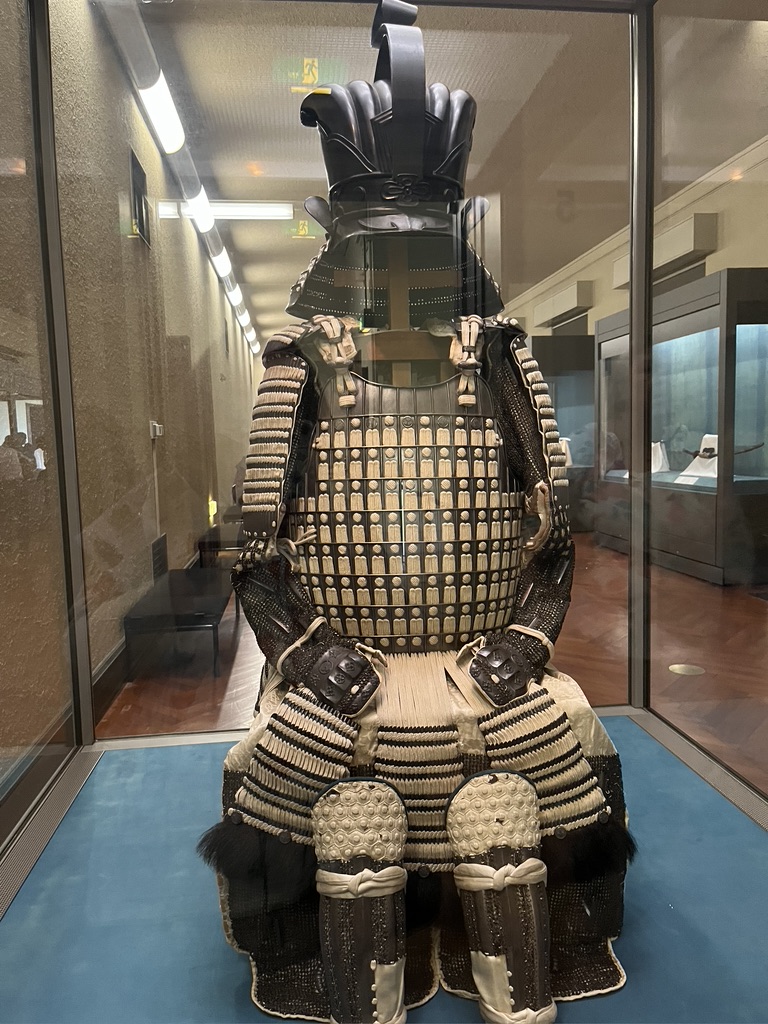
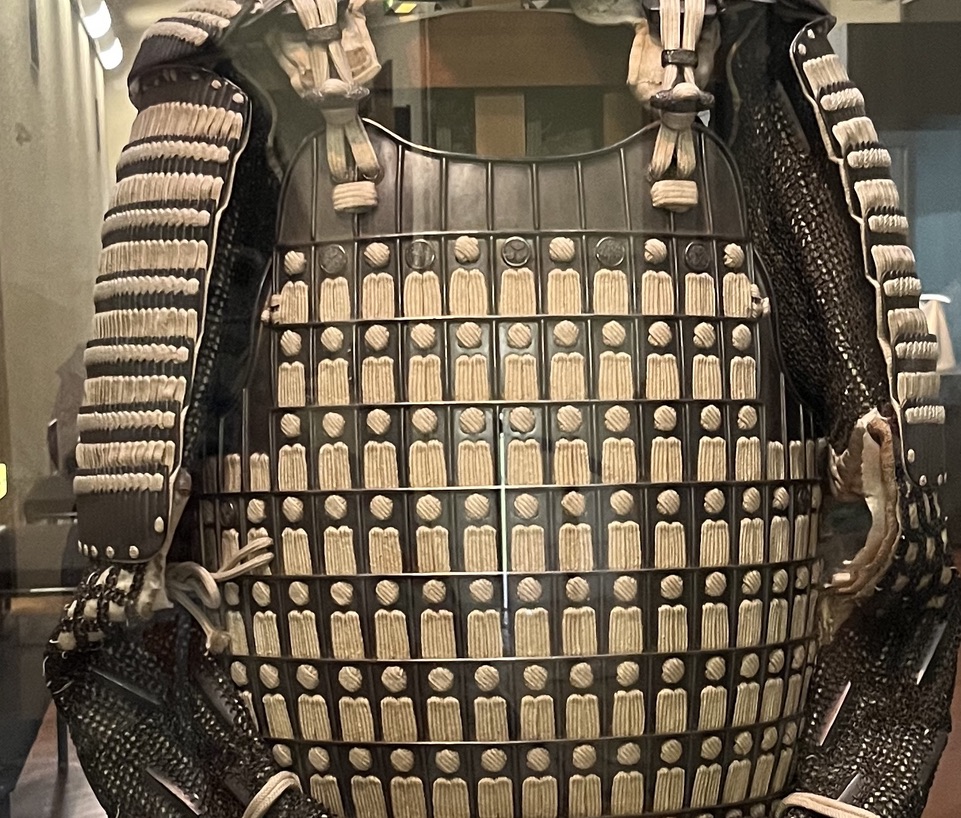
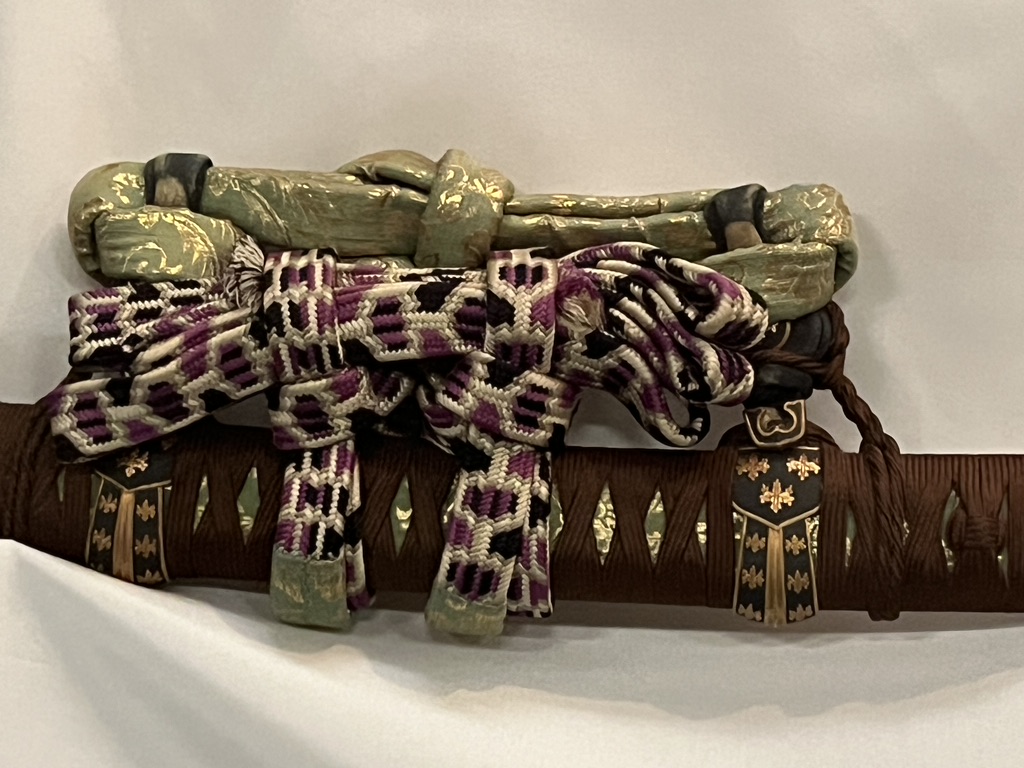
There was plenty of samurai armor on view, and I’m drawn to these wherever I find them. All the cream colored bits (and there is a lot of it, isn’t there?) are silk braids.
How about a closer look?
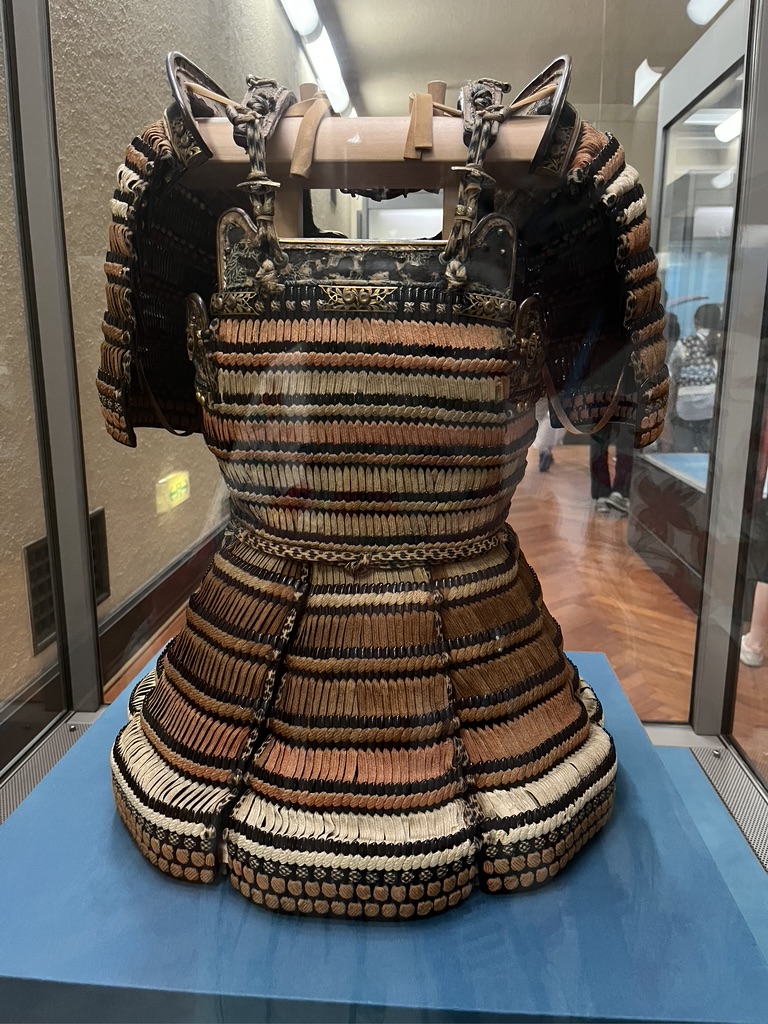
Here’s another suit of armor done in a mix of colors. It’s hard to imagine all those braids being accomplished before the warrior grew old.
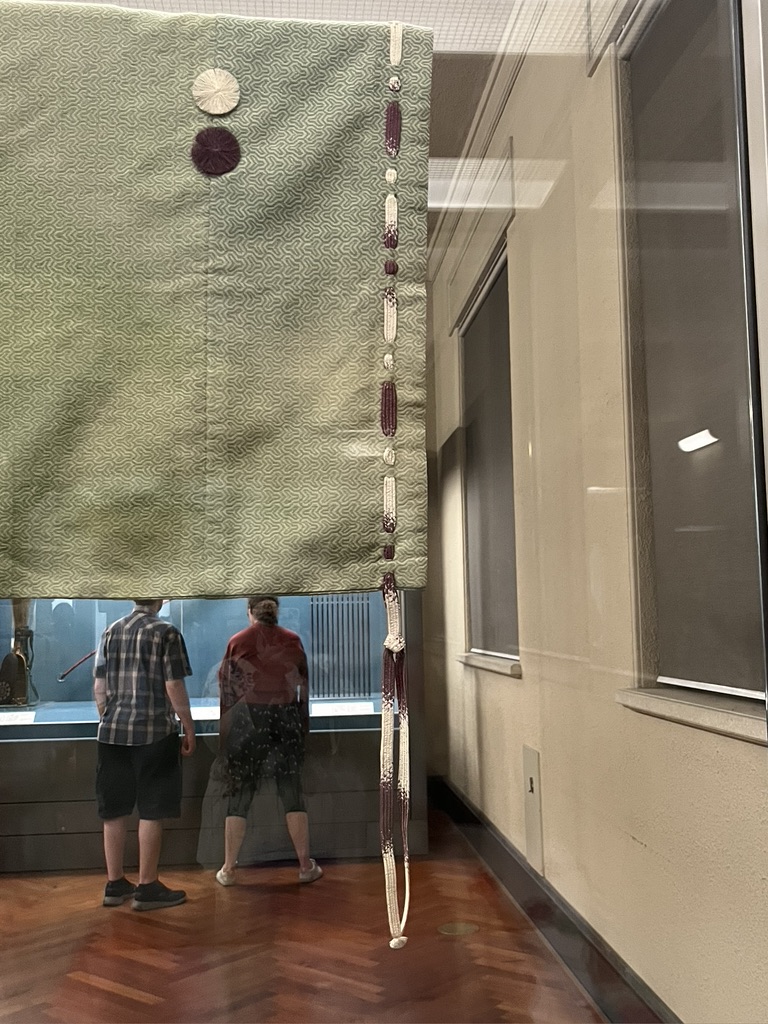
There was this fabric, stunning on its own, embellished with a braid. I love how the tassel at the ends have ‘blossomed’ over time. I’m always overly careful not have the tassels on my braids get disturbed. I think I prefer what has happened here.
Here is another view of this garment showing some hand-painted silk that was braided .
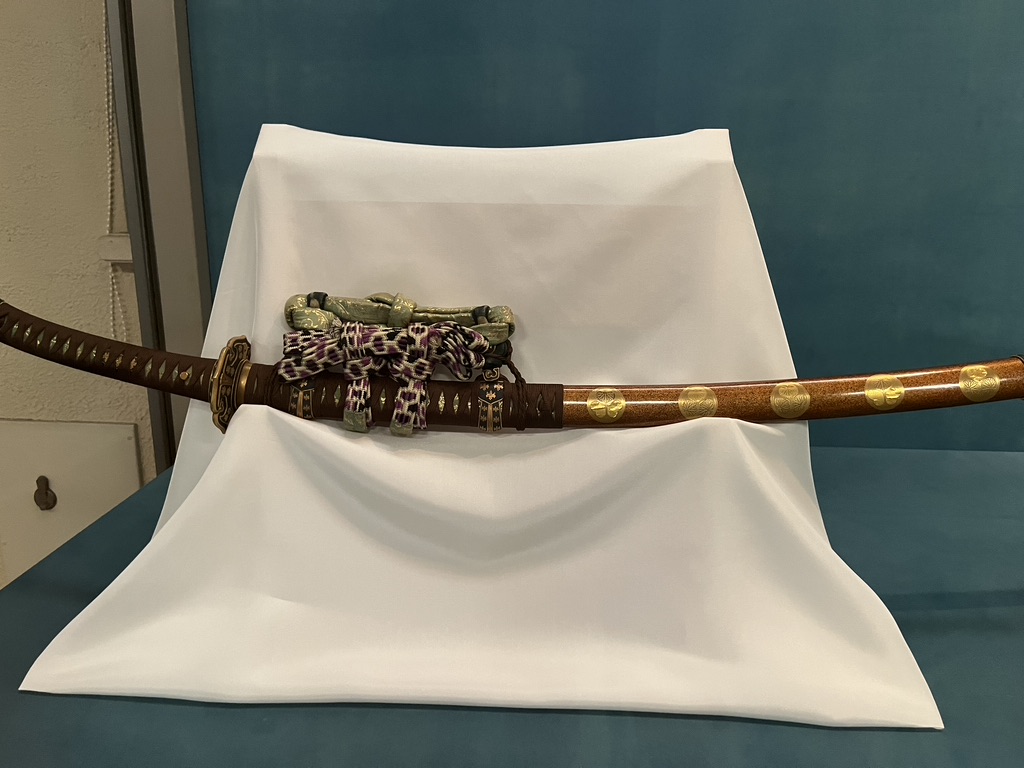
The piece de la resistance in the gallery was this braid on the scabbard of a sword. I have done a similar braid, so seeing this made my day. A touch of the past blending with my small personal history.
And then there were galleries of scrolls and kimono. I find it fascinating that fabric features so prominently in wall hangings that have painted scenes. This is a culture after my own heart. Look at the edge fabrics that frame this scroll.
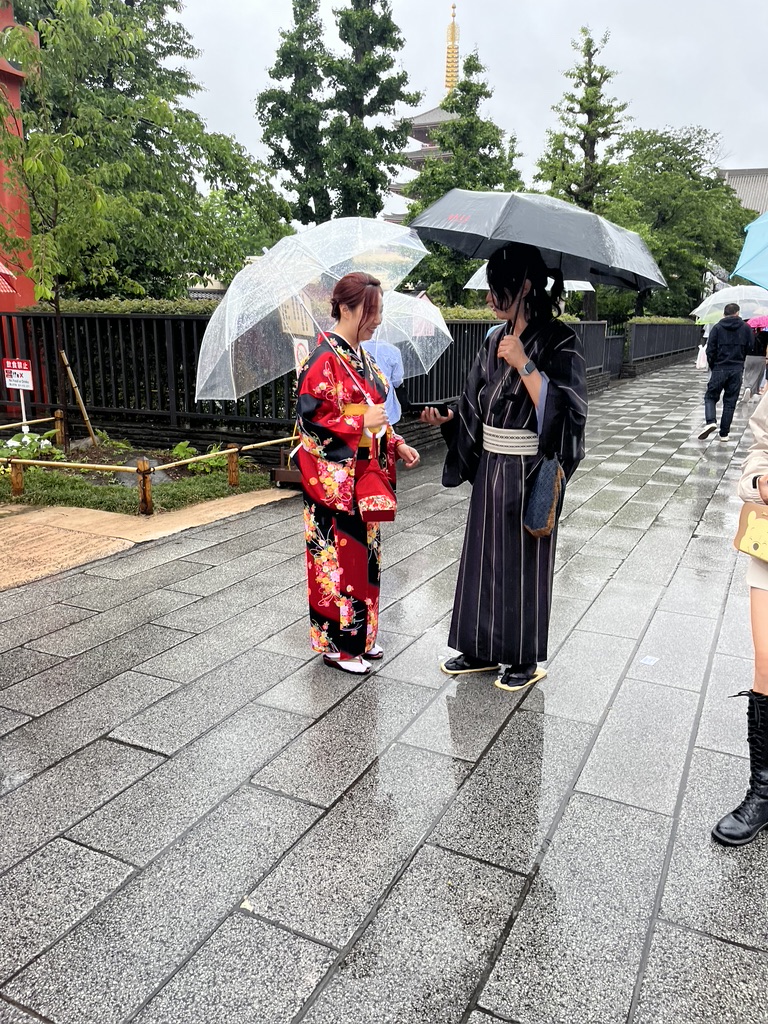
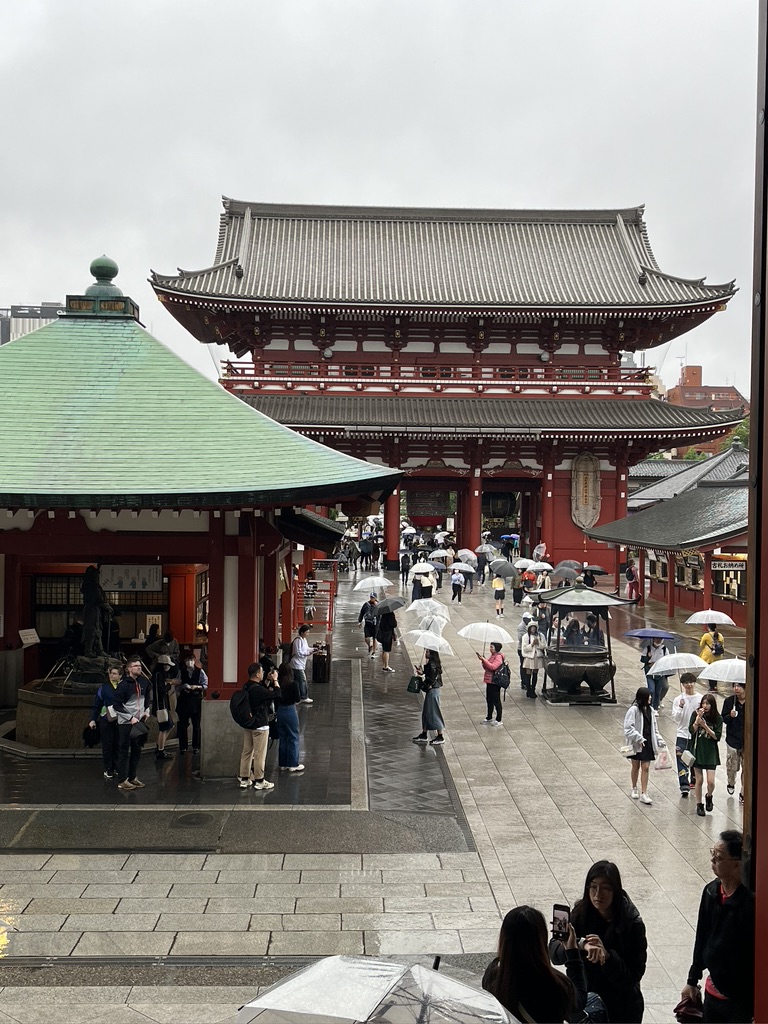
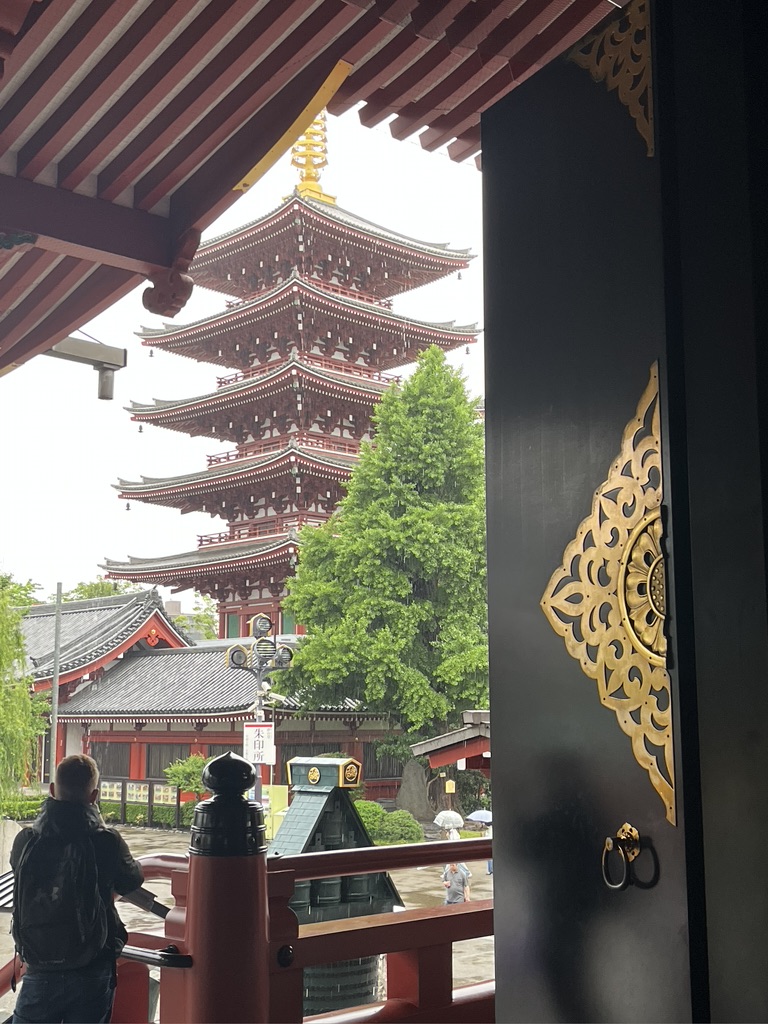
We visited Sensoji Temple, the oldest Buddhist temple in Tokyo, and I was thrilled when I saw these women. I felt lucky to get their photo! Sometime later our guide told us that it is quite a popular tourist activity, even for Japanese, to rent kimono to wear while walking about the temple grounds. I’m am still glad I saw this.
It rained quite hard while we were here, but it didn’t dampen our awe at seeing this marvelous place.
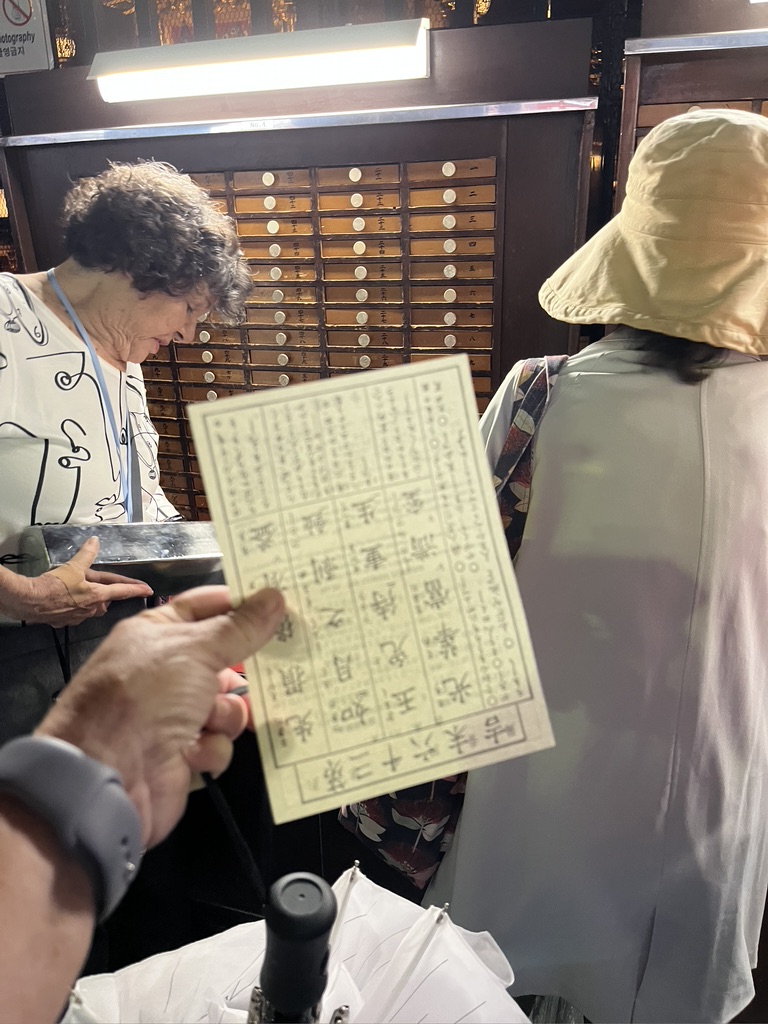
There was an area where you could get your ‘fortune’ for a fee. After you put coins in one end of a large tube, you shook the tube and pulled out a stick from the other end. It had a number on it, and you then pulled a paper out of the drawer with that number. This the paper with my fortune.
My fortune was called “Lowest Bad Luck.” Yikes! When I read it didn’t seem all that terrible. It basically said that my fortune could only go up from here and better times were coming. Well, I was having a great time that day, so if it was going to get even better I felt I was in for some incredible luck! On the other hand, my friend Kari got a card that just said “Bad Luck,” but the description was truly horrible. It was full of doom and hopelessness. She threw it away immediately. I wanted to burn it!
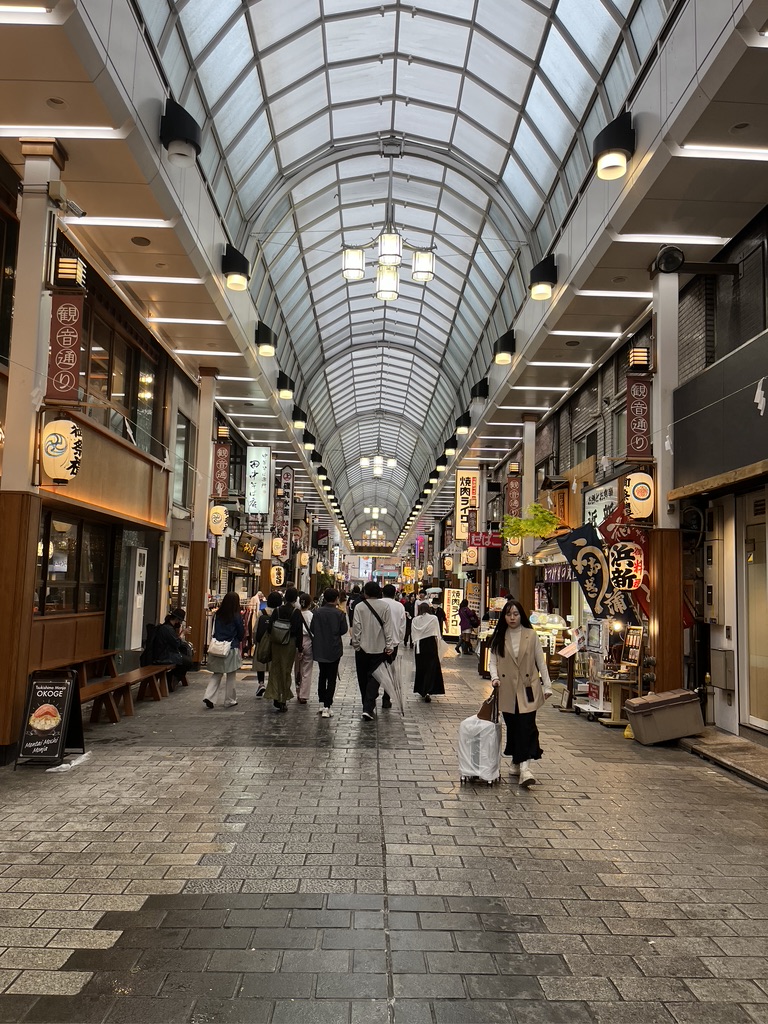
The temple grounds also housed a shopping area. It was such a pretty place, and out of the rain.
I was intrigued with a shop that sold dog and cat treats that looked like people.
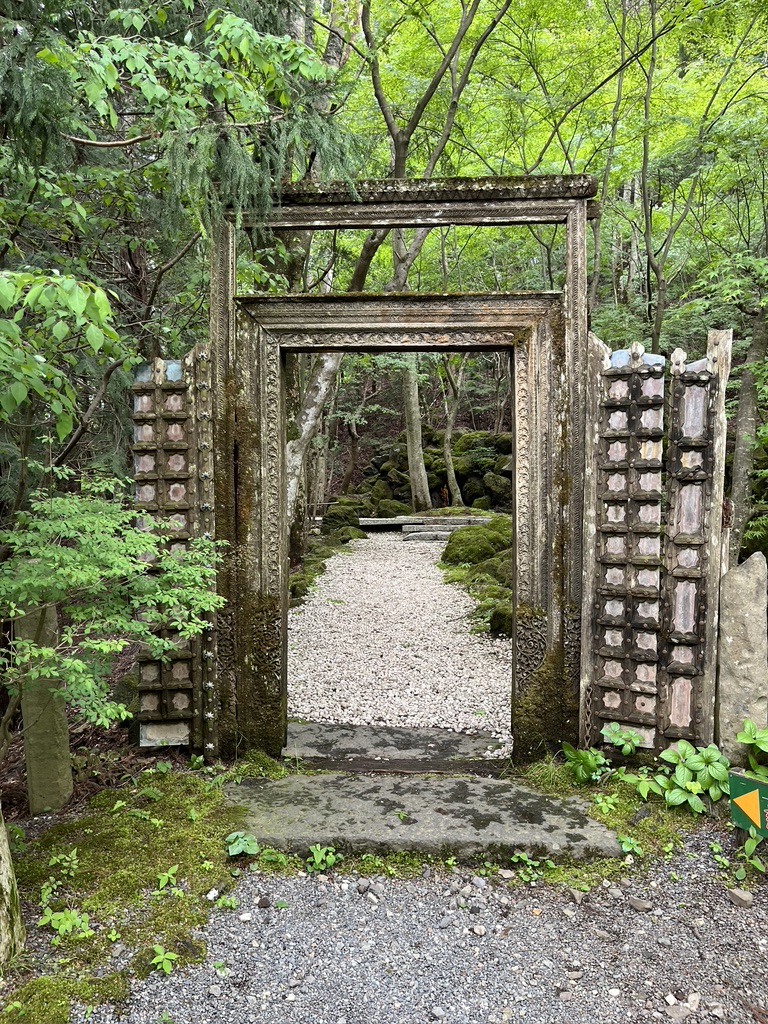
After four days in Tokyo we headed north. Our first stop was Kawaguchi to see the Kubota Museum. Have you heard of Itchiku Kubota? I had not, and now I am so glad that I not only know who he is now, but have also seen his work in person, up close. He lived from 1917 to 2003. He was inspired by some dyeing techniques from the 15th c. and he spent his life trying to recreate them and perfect them.
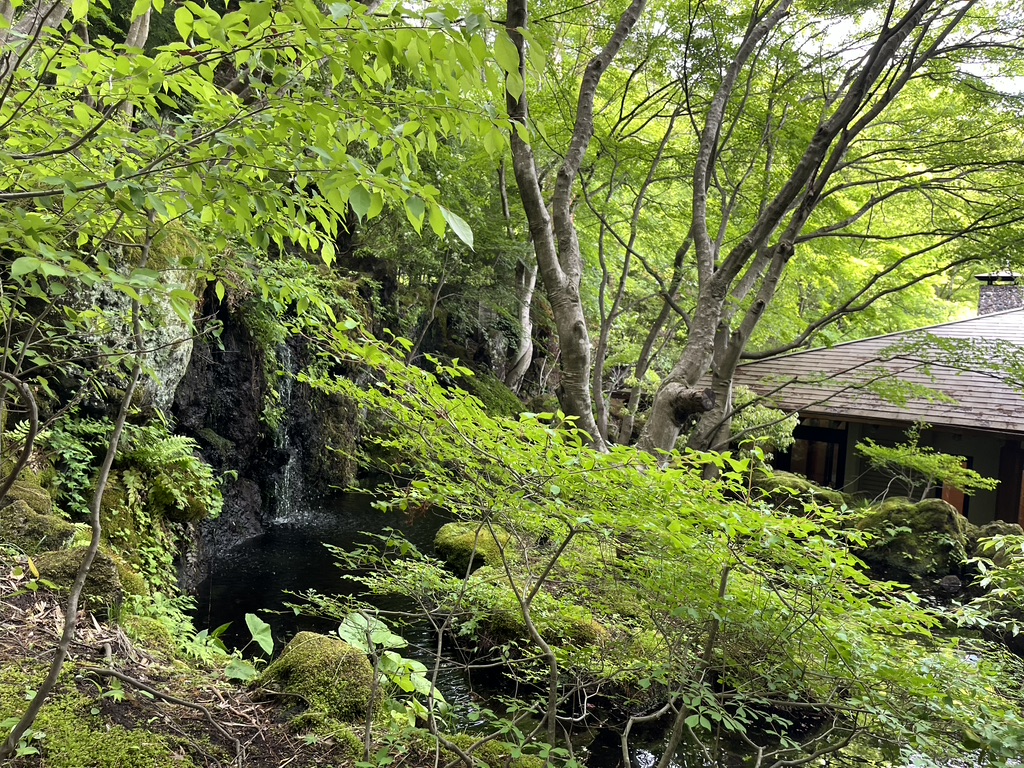
The museum is located where he lived. It includes views of Mt. Fuji, his serene gardens and a wonderful building he designed to house his numerous kimono series. No photos were allowed of his kimono, but we could enjoy the gardens, the tearoom and shop, and take photographs there.
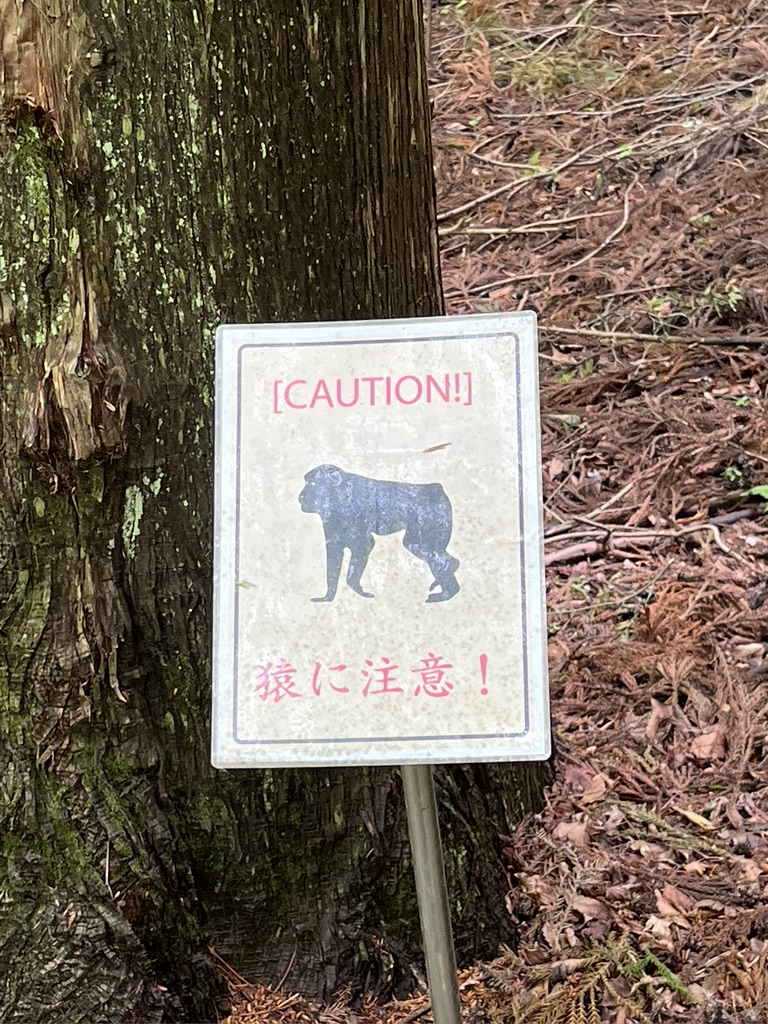
I thought this might be a joke, but it wasn’t! However, none of us saw any primates!
This was my favorite garden of the whole trip.
Can you see the waterfall to the left?
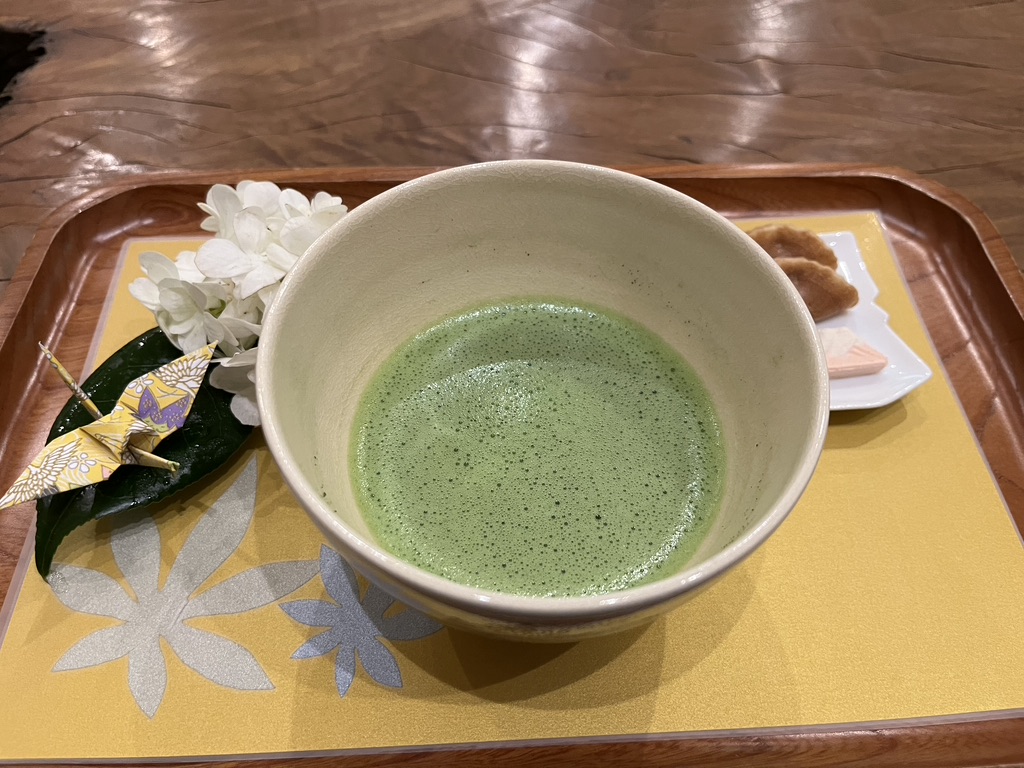
A few us opted to enjoy the tearoom. Our matcha tea came with some confections (on the right) and the tiniest origami crane I have ever seen. I brought that crane home with me!
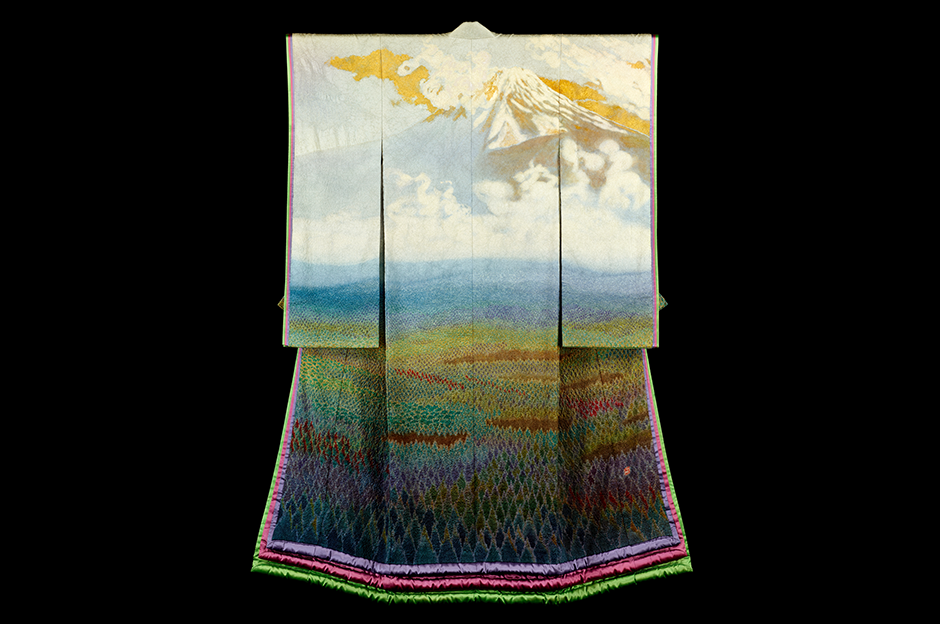
And the museum was a treasure. I don’t think I’ll ever see kimono as elaborate, intricate, beautifully designed as the numerous series that Kubota made. He had assistants at every stage of executing these designs, but it was he who figured out the techniques and spent decades perfecting the process. The kimono series represent various things. There is a series of views of Mt. Fuji where the famous mountain is shown in every season. There are two series depicting the universe. Breathtaking. Since I could not photograph them, I bought a book, and I will send you to the website.
Here is an image I took from the website. Surely they won’t mind since they don’t allow photography. Isn’t it striking how the summit of Mt. Fuji is in the band at the back of the neck? The kimono in this series are displayed right next to each other, with each kimono sleeve touching the sleeve of the next in the series.
It was hard to leave this museum. I could not comprehend these pieces fully, no matter how long I stayed or how many times I might visit in the future (unlikely). What a rare opportunity to be in the presence of so much technical skill and artistic vision.
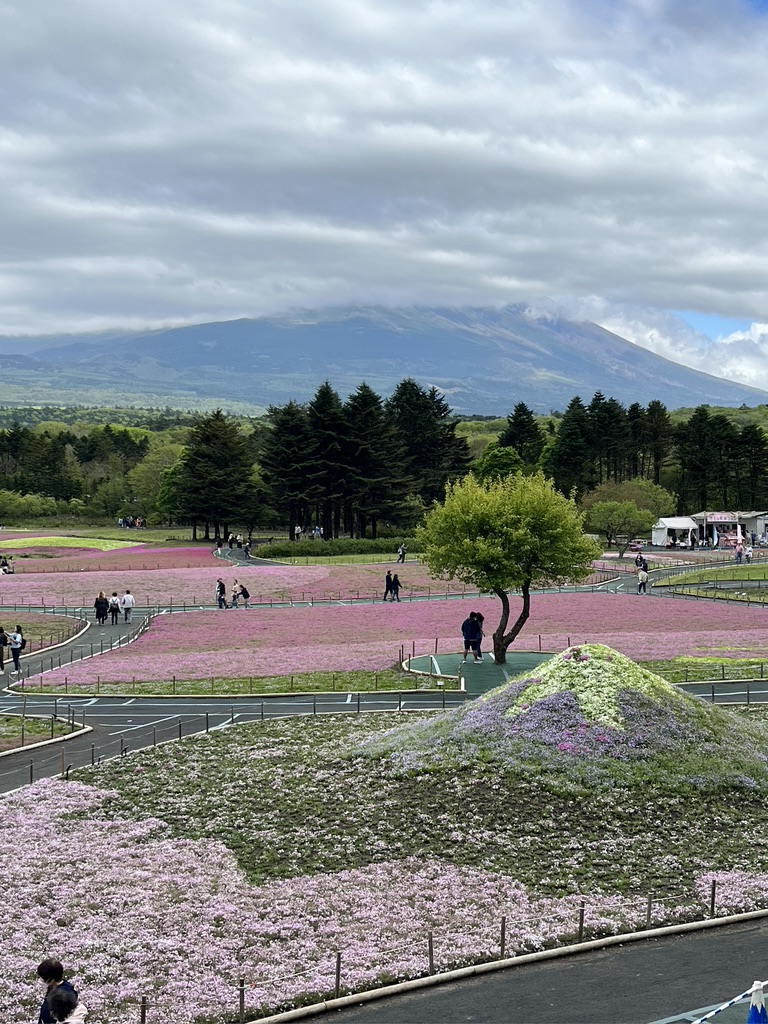
The rest of the day we spent at the Fuji Shibazakura Festival. Shibazakura is Japanese for the spring flowers we call ‘creeping phlox.’ It blooms in profusion in this area with views of Mt. Fuji. We stayed for a couple of hours, marveling at the expanse of creeping phlox and also hoping for a view of Mt. Fuji’s summit. The summit was cloaked in moving clouds and we gambled that at any moment the clouds would clear. It was chilly but we were determined to wait for that perfect moment between cloud cover. Our bus driver was on a schedule so our Japanese guide corralled us back into the coach before we got the long awaited view.
Mt. Fuji with its summit in the clouds
The big thrill came when we arrived at our hotel with plenty of daylight left. Our entire group had rooms with balconies that faced Mt. Fuji. Out on the balcony I could see that the clouds were quickly departing. And then there is was!
Kari took my photo to prove I was there, and I took hers! Sadly, my photo is blurry, but I still have to show you! Daryl Lancaster is on the balcony in the background with her camera while her daughter Briana hams it up for my photo. It’s priceless!
The other exciting activity at this hotel was the hot spring baths. Each room came with two kimono for visiting the baths. No bathing suits allowed, but you could bring your tenugui (small cotton towel) that our Japanese guide had given each of us on our first day together. Women entered the bath holding the tenugui in front for modesty, then used the towel the wrap their hair.
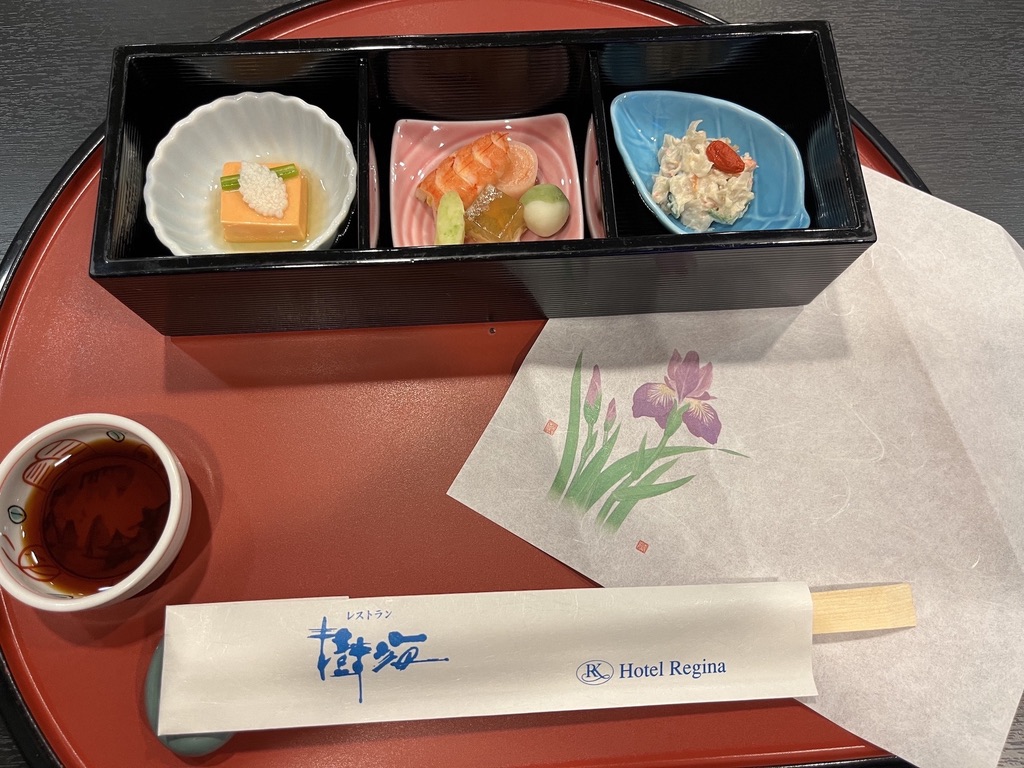
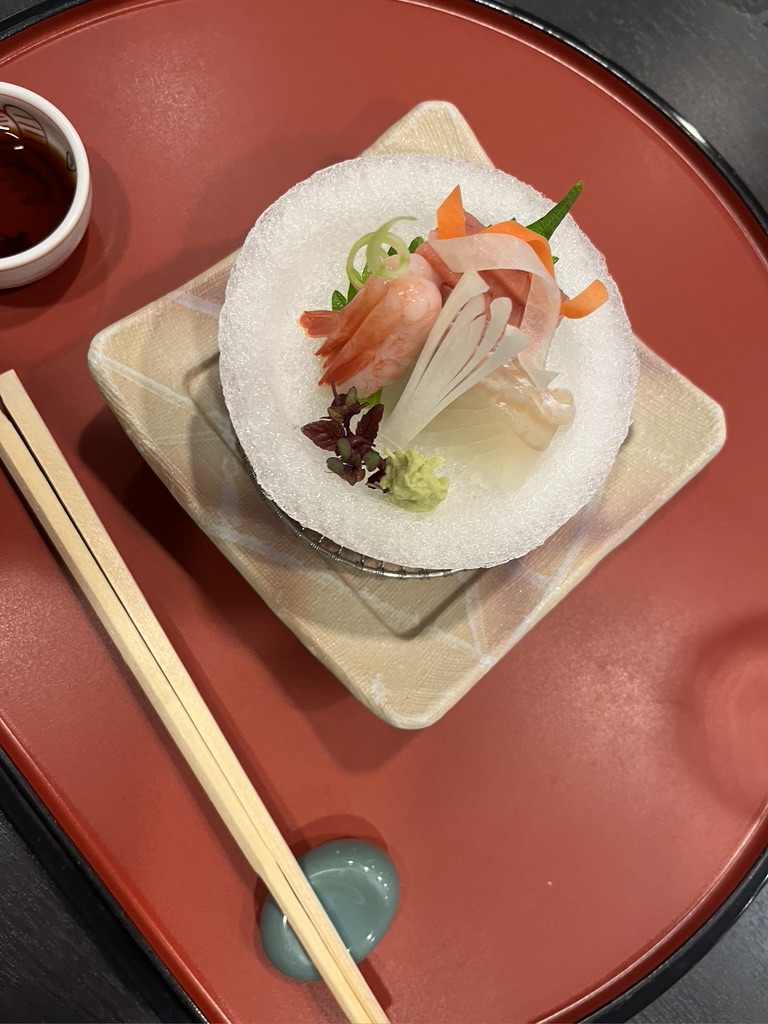
Like typical tourists, we took a lot of photos of food, along with photos of our menus in order to attempt to identify some of the delicacies.
It was perfectly acceptable to go to dinner in your kimono, straight from the baths.
Tom Knisely and Sara Bixler at dinner near Mt. Fuji
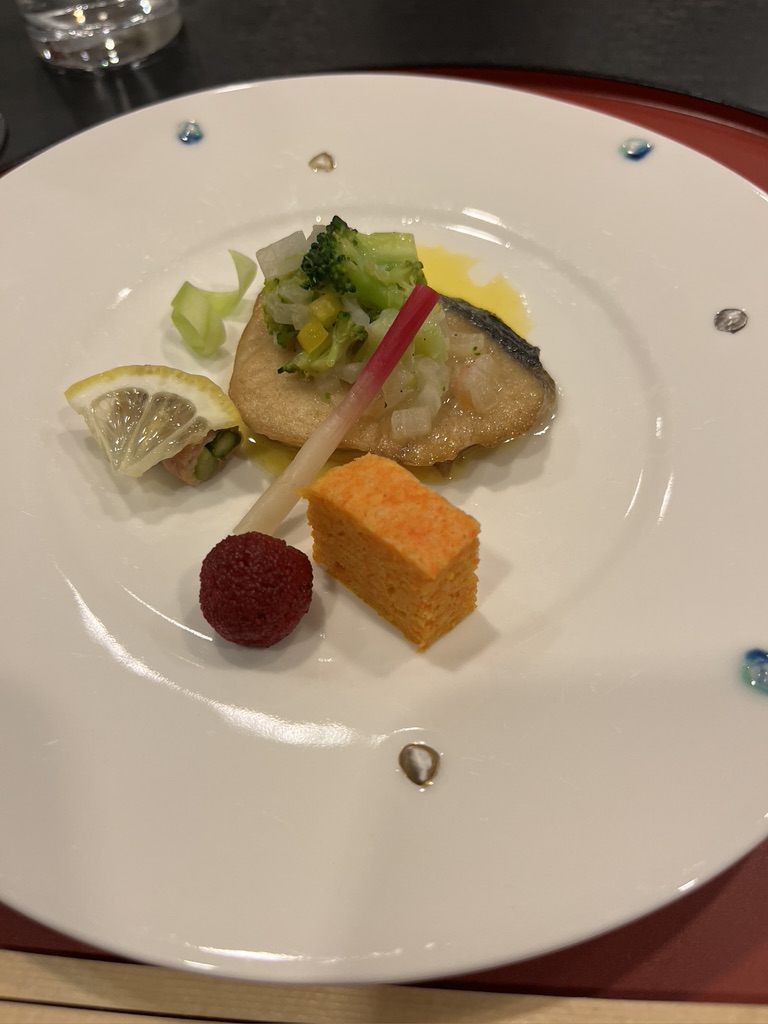
Okay, I promise no more food shots, but you must agree, it was an amazing dinner. How many people does it take to plate a 9-course meal for 24 people?
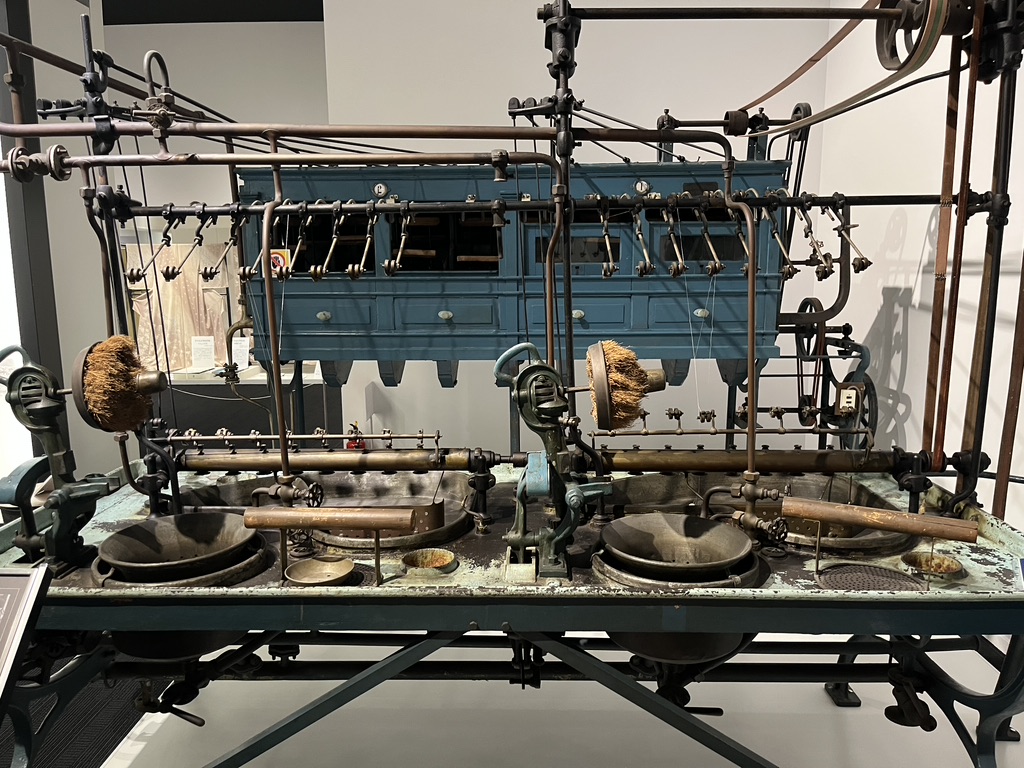
The next morning, off we went for Nagano to visit the Okaya Silk Museum, where there is a collection of reeling machines that span a couple of centuries. Here are some silk worms ready to spin their cocoons.
I don’t feel equipped to describe the changes in the technology of reeling silk, but there is one thing I found quite impressive. No matter how mechanized this process became over the centuries, the use of the little brush that is made from something like a bundle of flax stems, continued to be used. Progress with a bit of low tech material that has remained useful to this process.
In the earliest times of silk reeling you’d find a woman sitting over a hot pot of cocoons. She’d brush up a filament from a number of cocoons and begin reeling around a form. Sometime later there was this. Notice that brush in front of the sink. That’s the little bundle of plant stalks that remains part of the process to this day.
Then there was this. Note multiple brushes left and center.
Now we have many more reeling stations with a whole battery of brushes on the right.
And voila! Welcome Industrialism!
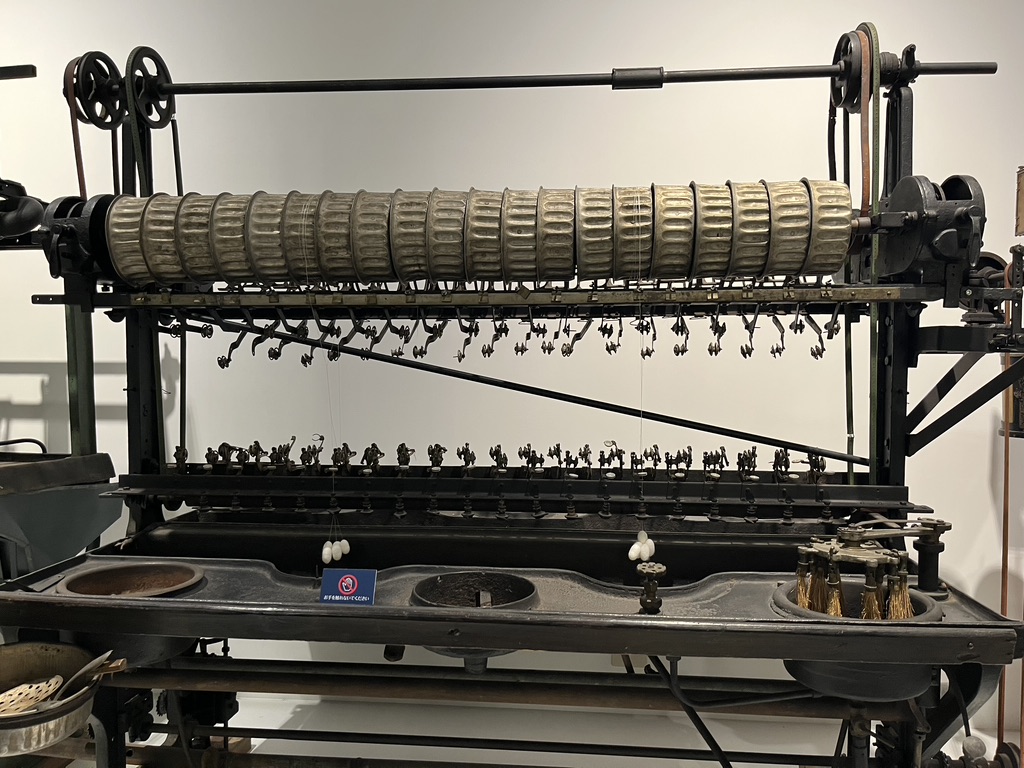
Some reeled skeins on display in front of the machine used to create them.
There was a shop! There were a number things we all wanted to buy, and high on everyone’s list was this lamp. How to get it home? Hmm…
I bought a silk fan, and some interesting soap. In the process of removing the sericin which is a gummy residue on silk, the sericin can be used to make soap. We all bought several bars of ‘silk’ soap.
On our way to Matsumoto Castle, which retains many of its details from 1592 when it was first begun, we had to walk a few blocks since our bus could not navigate the narrow streets. During that walk I passed this window.
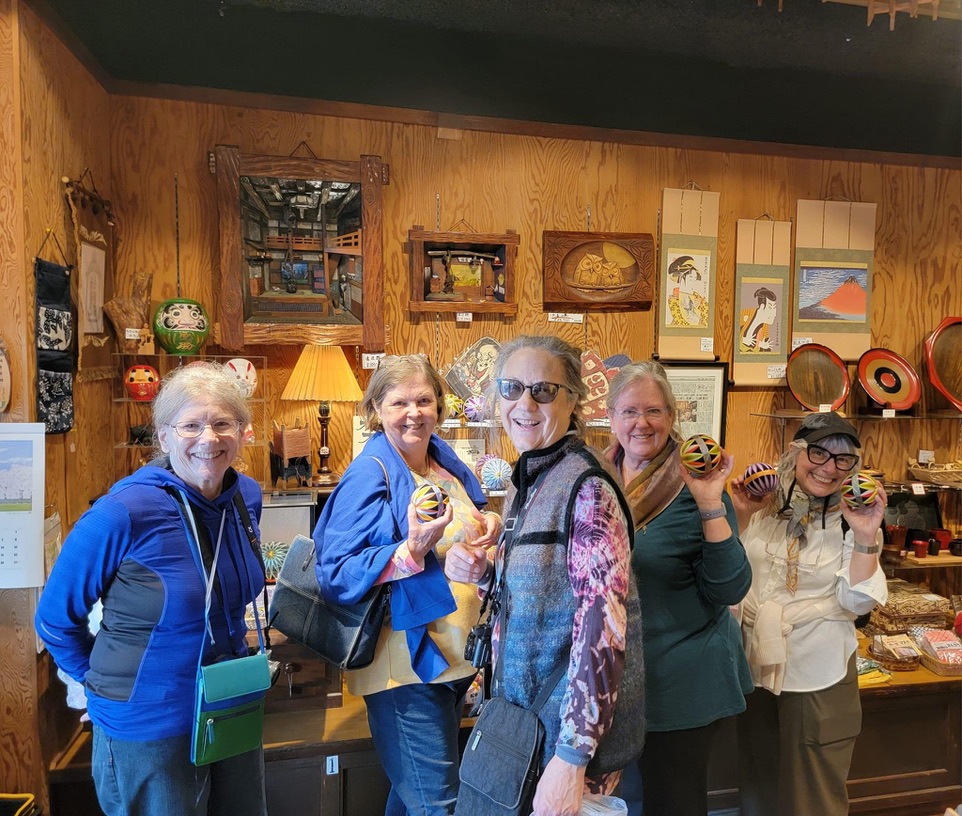
I was so tempted to just walk in to this shop filled with temari balls! But I knew that our Japanese guide spent much of each day counting heads, and disppearing from the group would put her in a tailspin. I asked her if we could visit this shop on our back back from Matsumoto Castle, and it took some convincing. Since she agreed we all had a fabulous experience, and I hope we made the shop owner’s day.
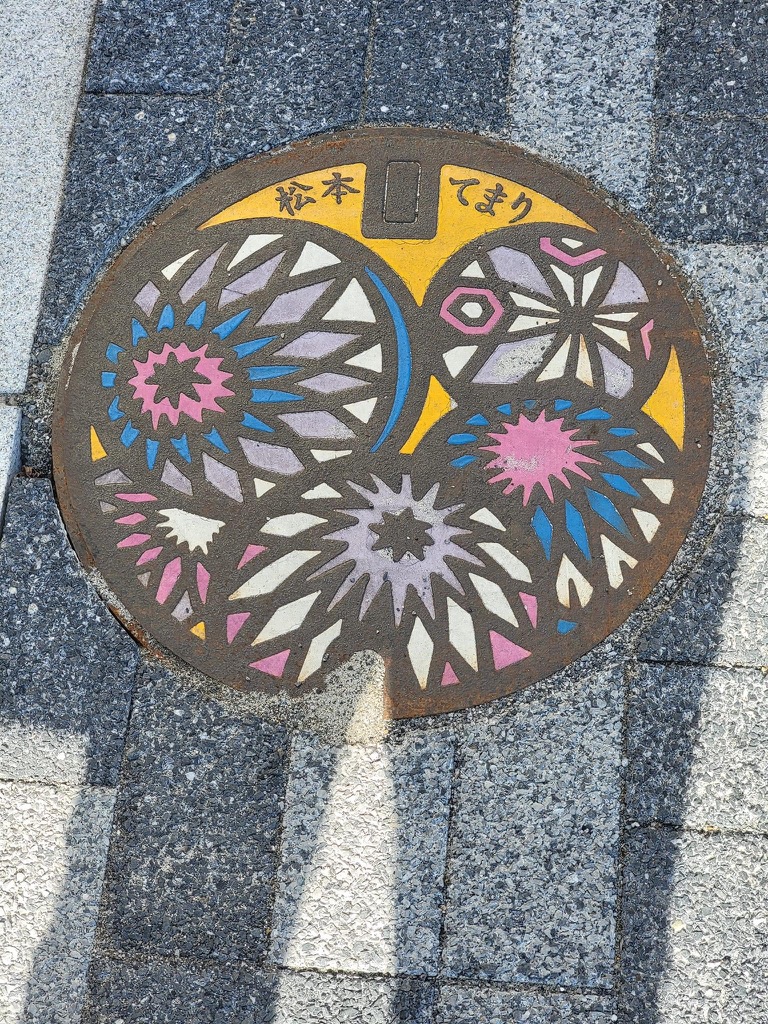
It turns our this area is known for temari balls. This is when I learned that each area of Japan celebrates its traditional crafts by having their man-hole covers decorated to display the local heritage. Interesting!
Storm Drain?
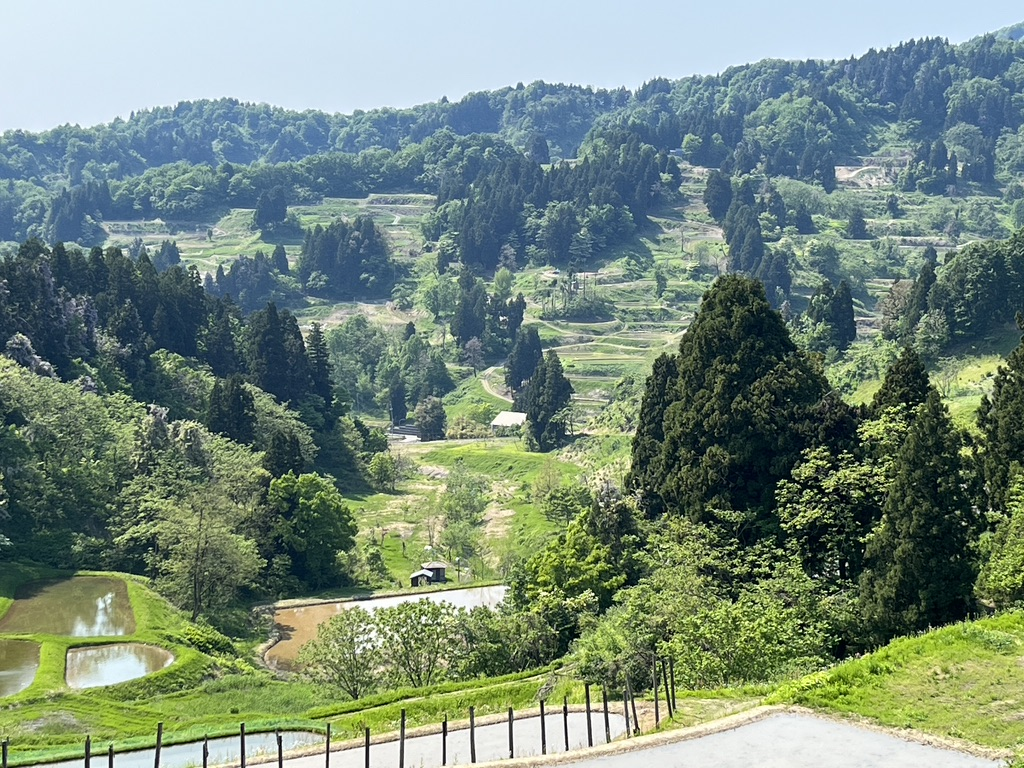
While heading north each day, we also headed west to the Sea of Japan coast. I had a geographical awakening when I realized how close we now were to both South and North Korea. It was sobering. This is a picturesque area of mountains with terraced rice fields. The views during our ride were so lush with all the spring greens and newly sprouted rice plants flooded with water from the snow melt coming down the mountains. You can read about this area here. Here is a view of rice paddies. We were told that there are no huge, industrial farms as there are in the US. The rice fields nestle into the spaces between residential properties. This is a view in Yamakoshi Village.
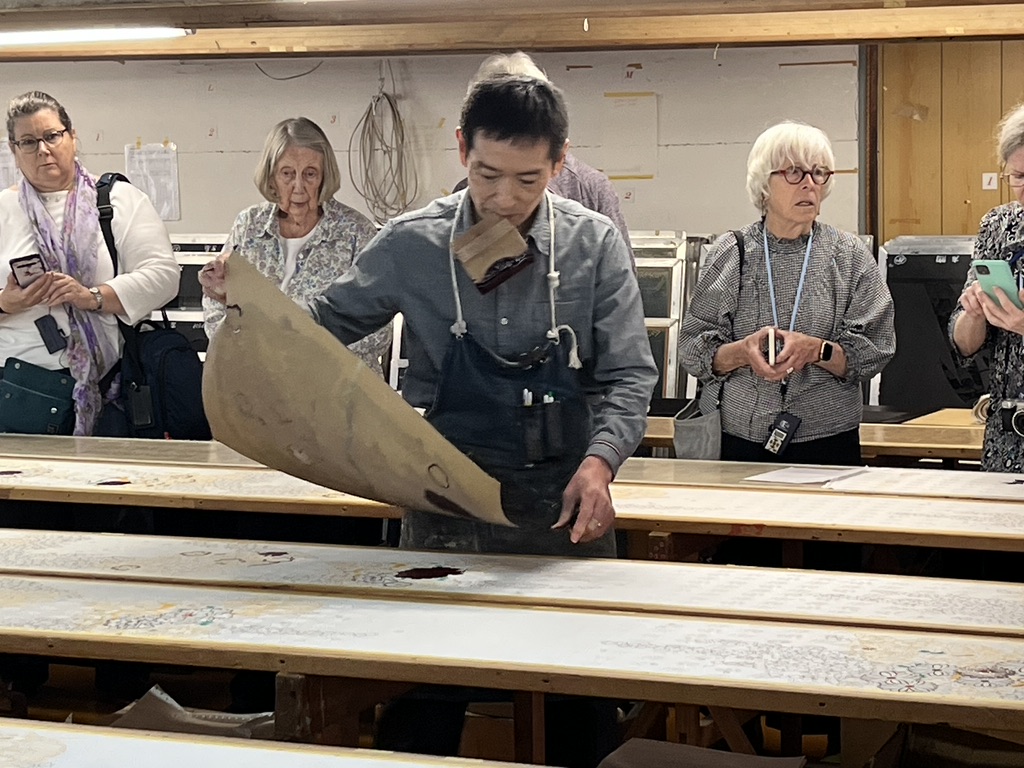
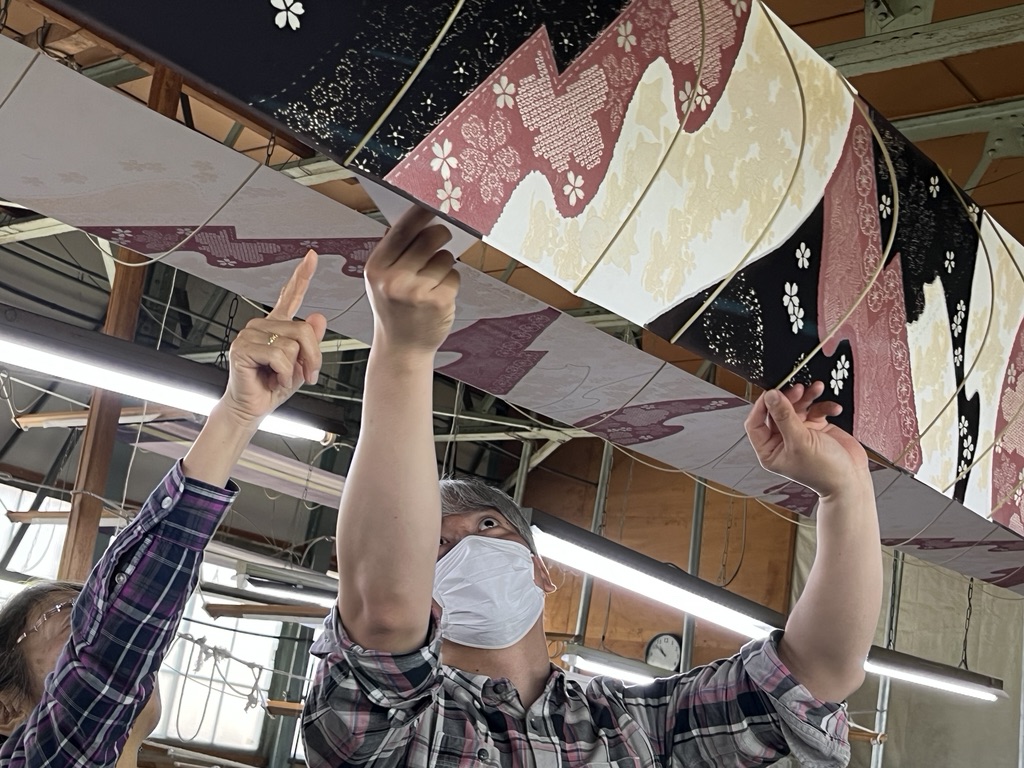
We were headed to a kimono factory in Aoyagi. “Factory” seemed a misnomer to me in this place where everything was done by skilled hands. I have about a million photos, and it would take all of them to describe the many dyeing, stitching, stenciling, resist, painting, shibori, and embroidery techniques that happen here. Here are just a few of the techniques happening all through this workplace.
Stenciling
Stitched Shibori
Hand Painting
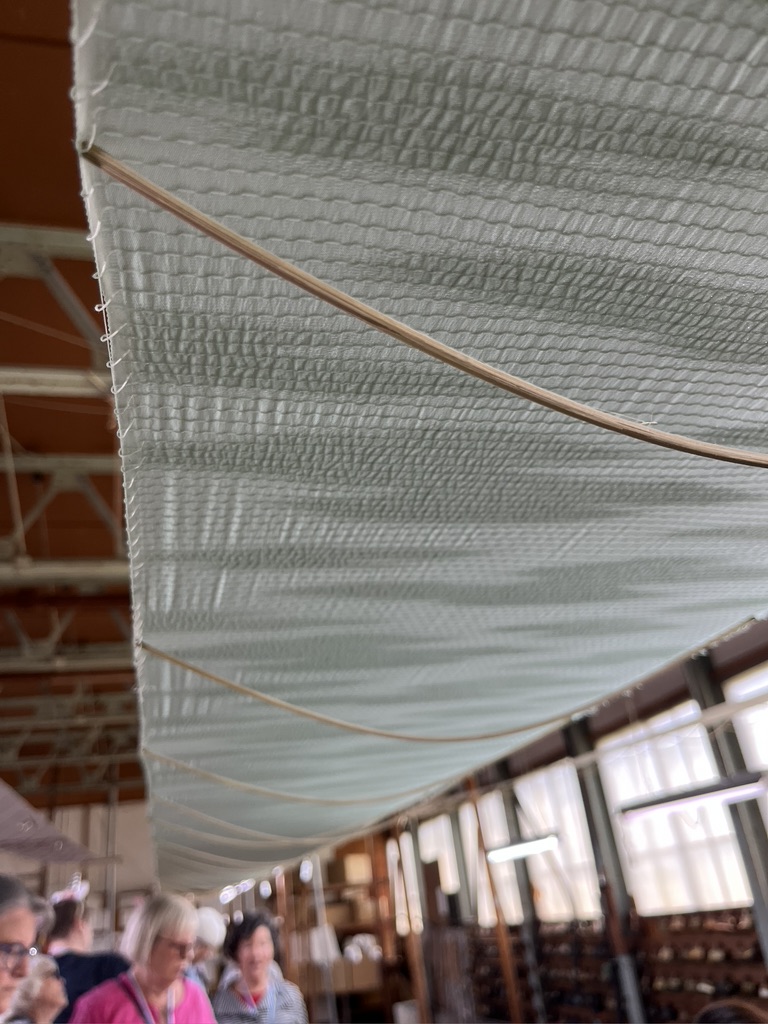
Fabrics drying overhead in between processes
Stitched fabric ready for air brushing
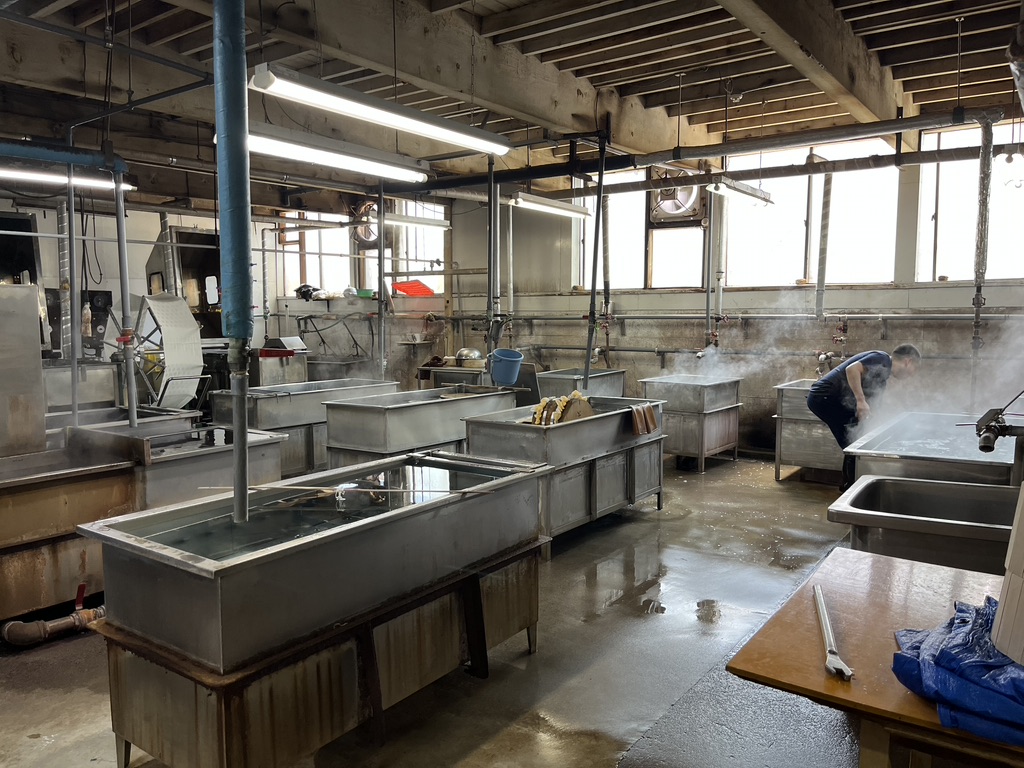
Here is the large dye room. Notice the barrel in a dye vat in the center of the photo. We watched that get opened near the end of our stay.
The Dye Room
This man is painstakingly pleating fabric and nailing it to the edge of a barrel. It is like the barrel in the photo above. The fabric inside the barrel will not get dyed, and the fabric on the outside will be dyed with the shibori pleats.
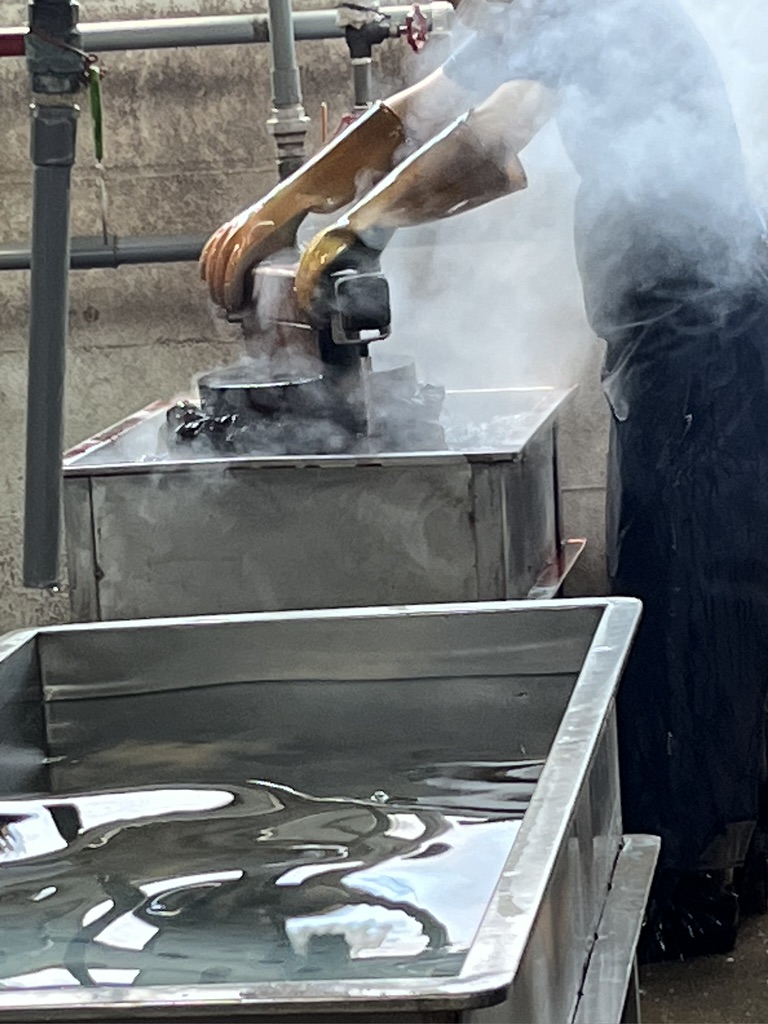
Here one of the dyers is twirling a barrel in a hot dye bath. He constantly flips and twirls the barrel to get an even distribution of dye. Every few minutes he must to go a faucet and fill his rubber gloves with cold water to prevent getting burned.
This barrel is cooling off and will soon be opened.
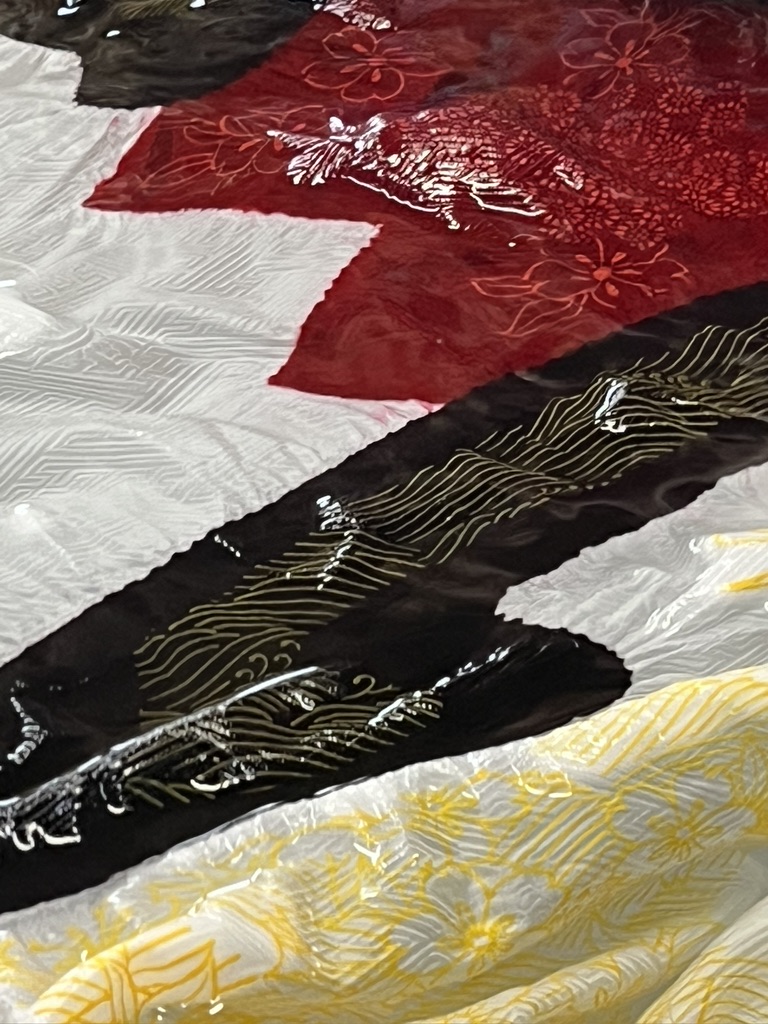
Opening the barrel, you can see how well the colors were protected inside the barrel.
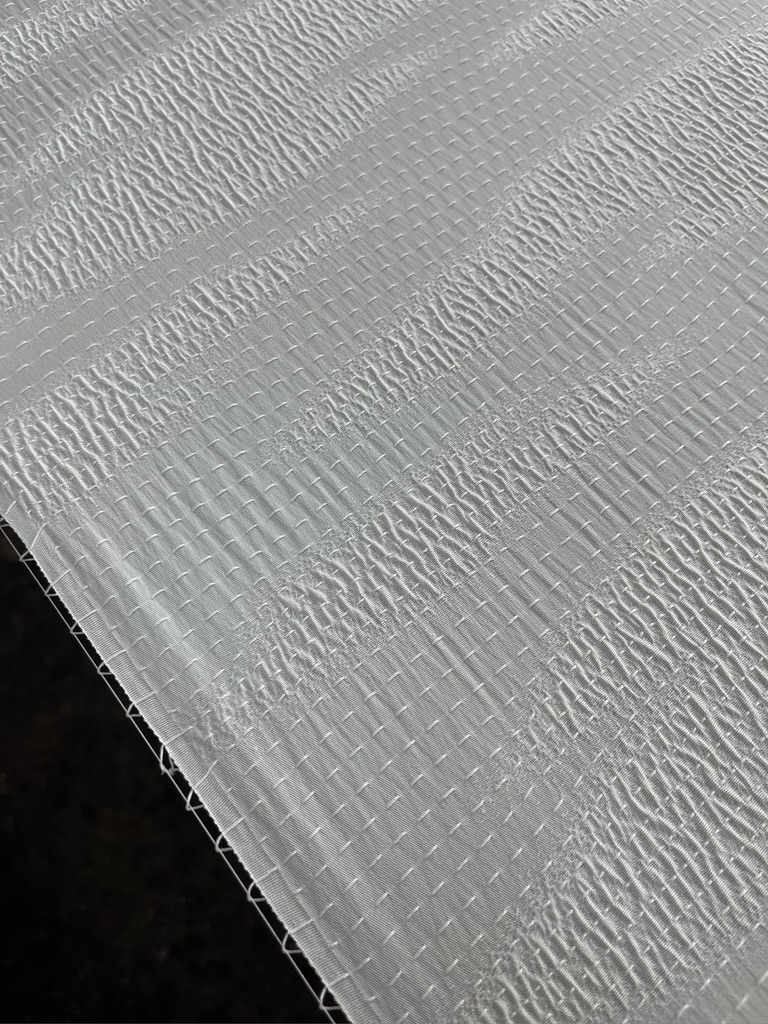
We were allowed to touch the fabric. Notice the resist design on the edge that was just dyed. Was it stenciled with resist?
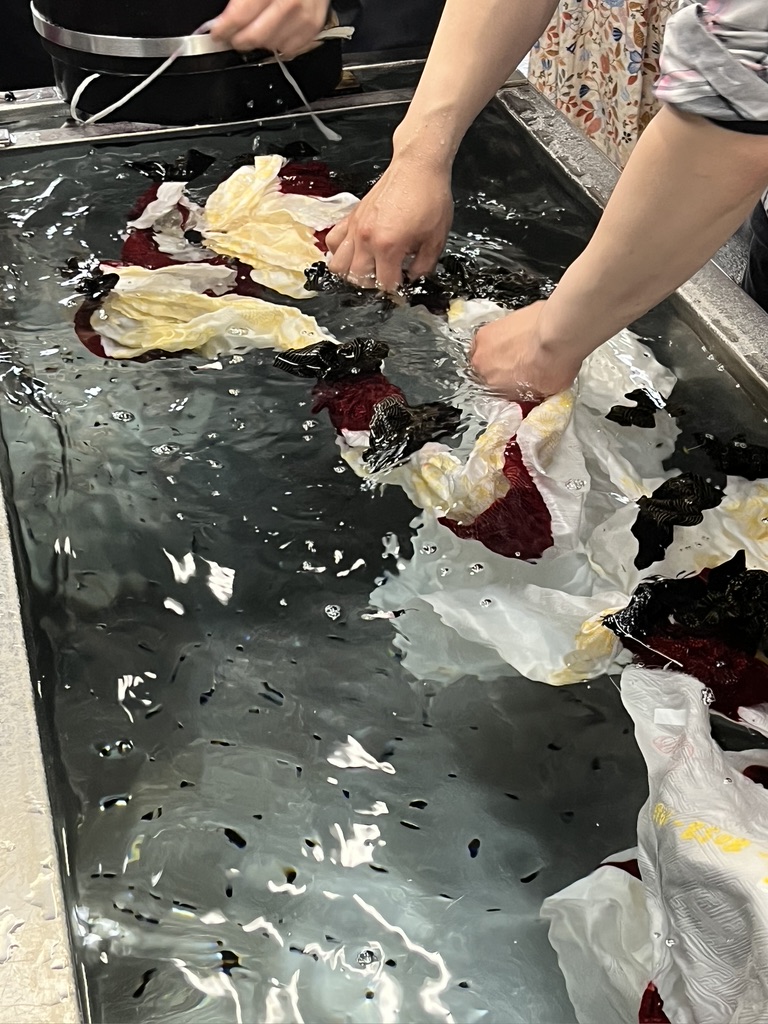
The fabric was removed from the barrel and rinsed in cool water.
I’m quite certain this fabric has more processes to go through before it’s ready to become a kimono.
In the showroom were a number of finished kimono. Some of them were the designs we saw in process in the work rooms. A kimono made with this level of handwork costs in the range of $10,000. A one of a kind kimono costs more. Here is fabric similar to what we watched being made.
This was a breathtaking and jaw-dropping experience. I can’t even wrap my head around all the processes that create these kimono.
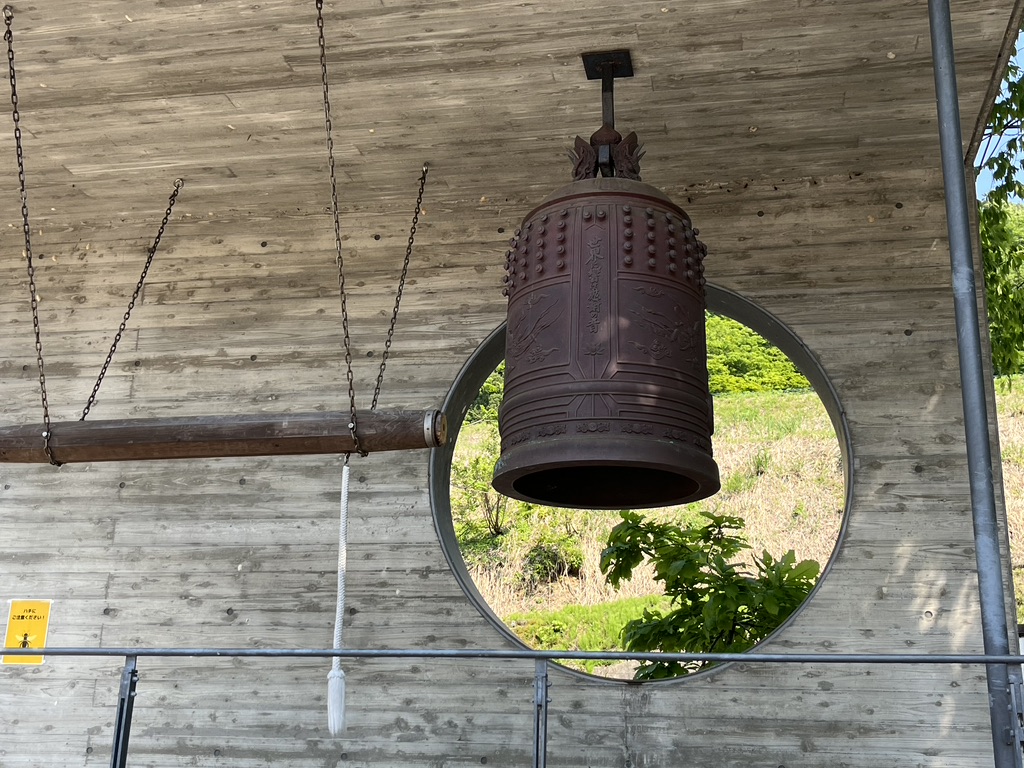
We visited a small koi farm, and outside, near the koi pools, was this bell. The temptation to ring it was pretty strong. Notice the sign in the lower left of the photo. This briefly gave us pause. What did the bee image mean? Beware of bees? Bee kind? In the long run the need to ring that bell won. Daryl did it, and a flurry of bees emerged. I am not afraid of bees and actually quite like them. They emerged sleepy and not at all aggressive. The bell sounded beautiful–muted and sonorous.
The bell in Yamakoshi Village, near the koi farm
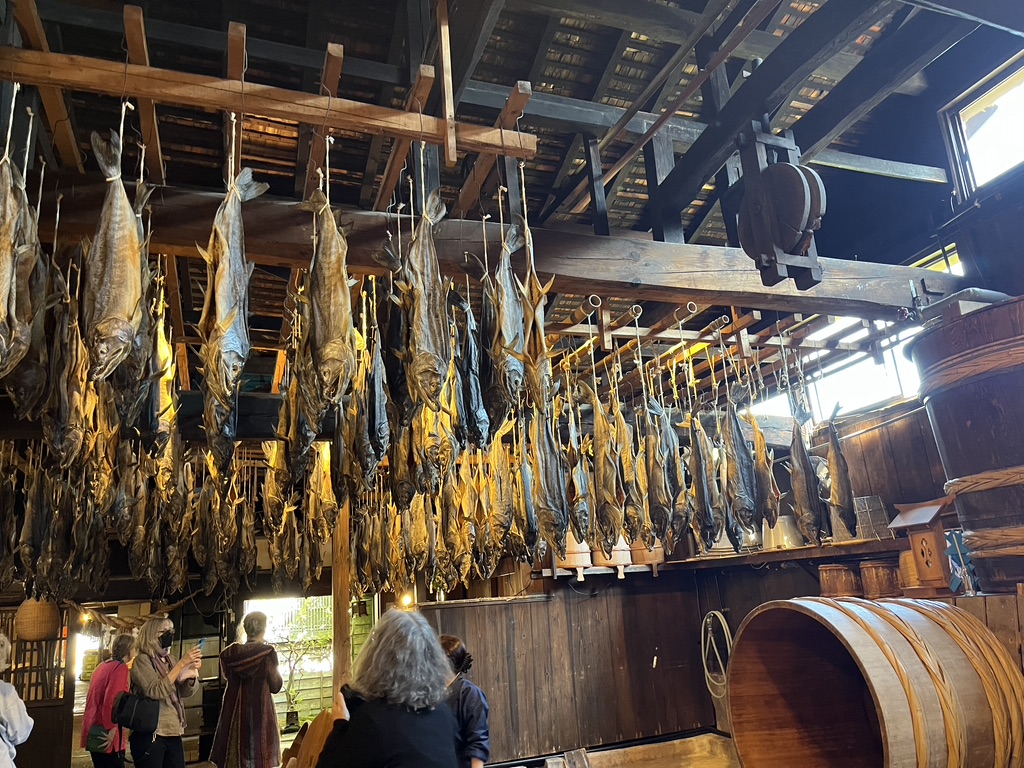
Directly after our visit to Kasuri workshop where we got to weave various ikat dyed wefts (previous post about hands-on workshops), we visited a long established shop that sells salmon products that have been cured in over 100 different ways, called Sennenzake Kikkawa. Most of the items were not meant to be taken out of the country, so there was little for us to buy. The visit included a tasting of locally made sake, and we ejoyed them and bought souvenirs!
Sake Tasting
Salmon, well dried
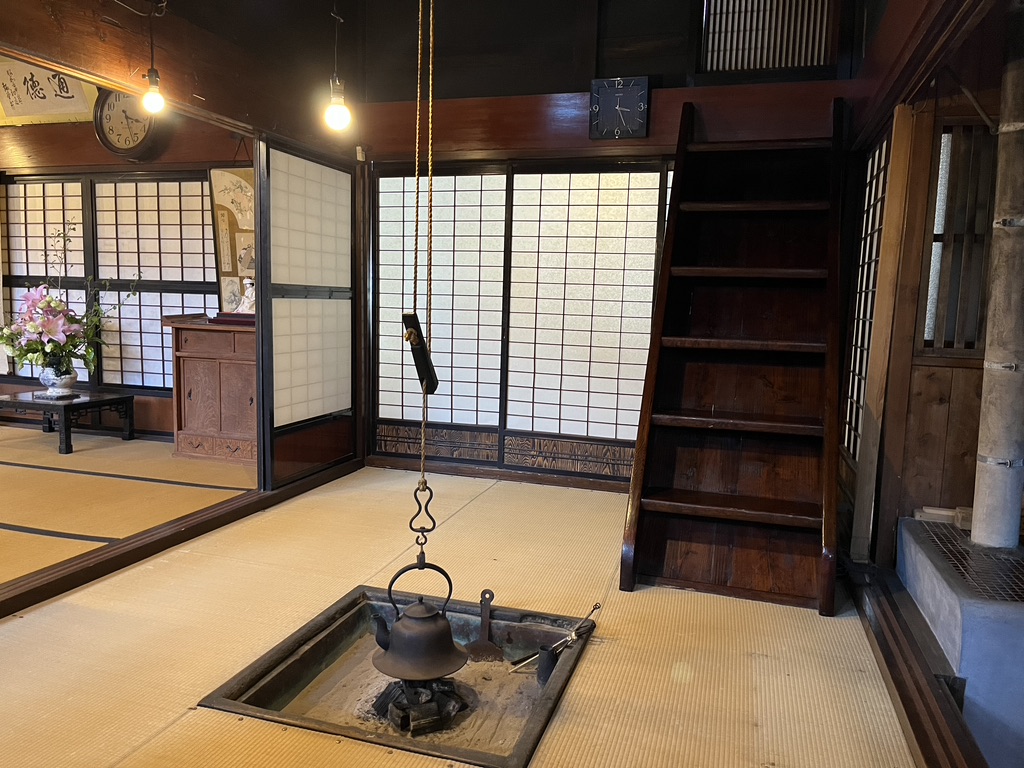
Many of the workshops we visited had a display of what the older living space would have been for the family working in the traditional craft we were seeing. Perhaps in some cases, the actual historic living space was preserved. I’m not sure which were original and which were reproductions. This was the historic living space at the salmon shop.
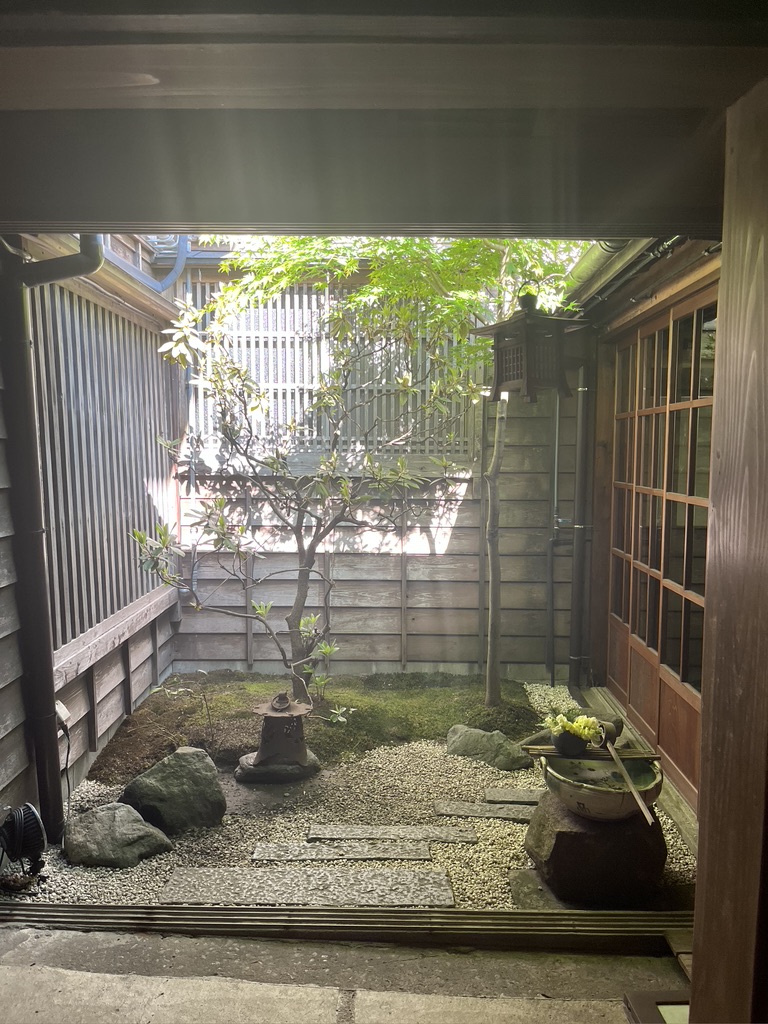
The lovely garden outside the living space of the salmon shop
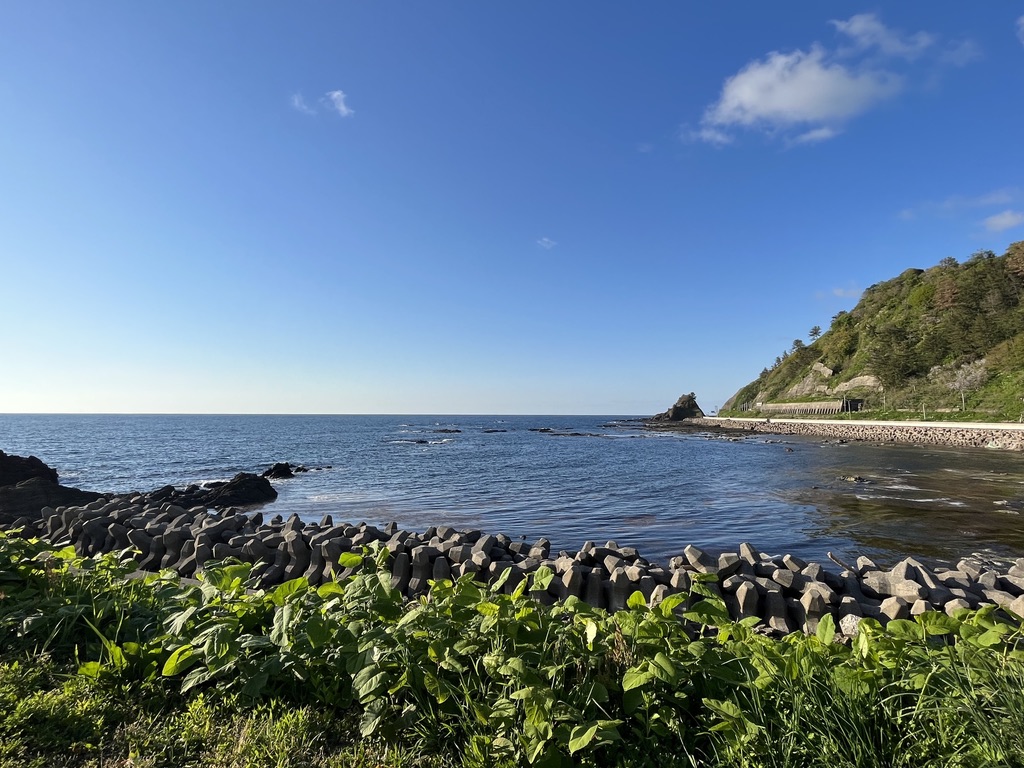
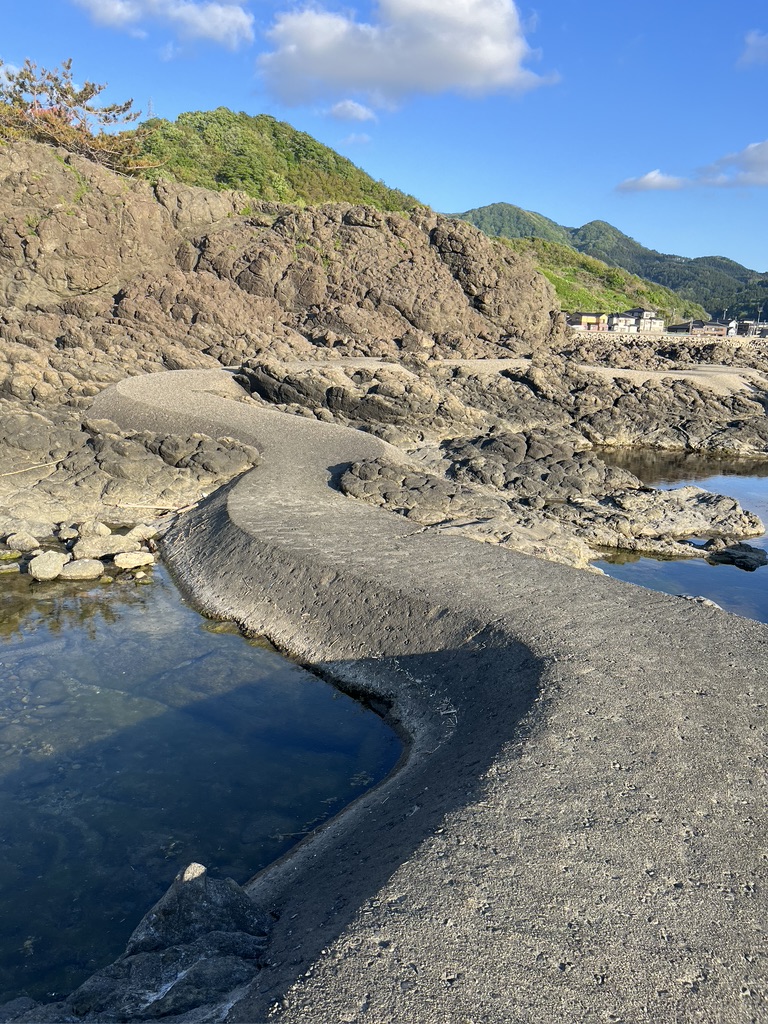
We ended the day with a scenic walk along the shore of the Sea of Japan.
Kari is in the center and Tom is to the right.
How convenient to have easy walkways through the rocky shore
The next few days had workshops that I covered in my previous post. It was a time of rich experiences. I am thrilled that we got to try so many traditional techniques, from weaving with ikat dyed wefts, to weaving with linden tree inner bark, trying rag weaving with hand dyed wefts on modified back strap looms, and dyeing with shibori techniques in indigo vats.
When we left the coast of the Sea of Japan, we took the bullet train from Sendai to Hachinohe. Everyone talks about the bullet trains in Japan, and now I know why. That was the smoothest ride I’ve ever taken! I didn’t know that the trains are connected by magnets. We had two trains connected, and the other train disconnected from ours when it reached the track where it would diverge to a different route. I also didn’t know that what makes the ride so smooth is that the trains rise a little above the tracks due to magnet repulsion. I don’t know enough to say more! We glided at very high speeds!
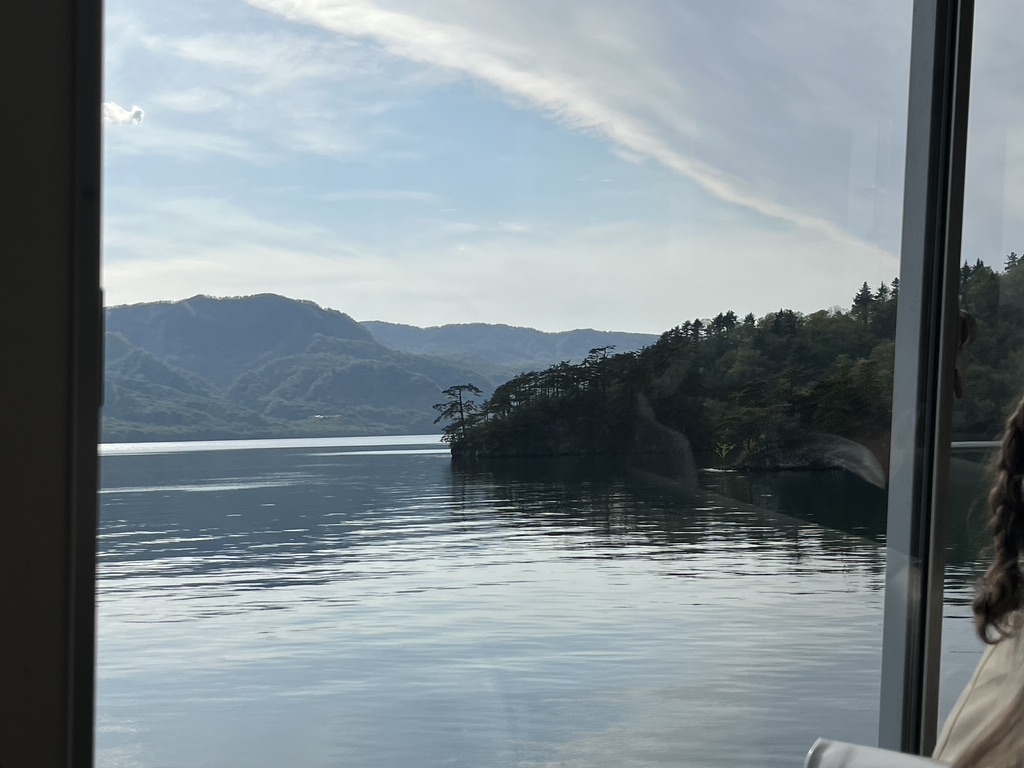
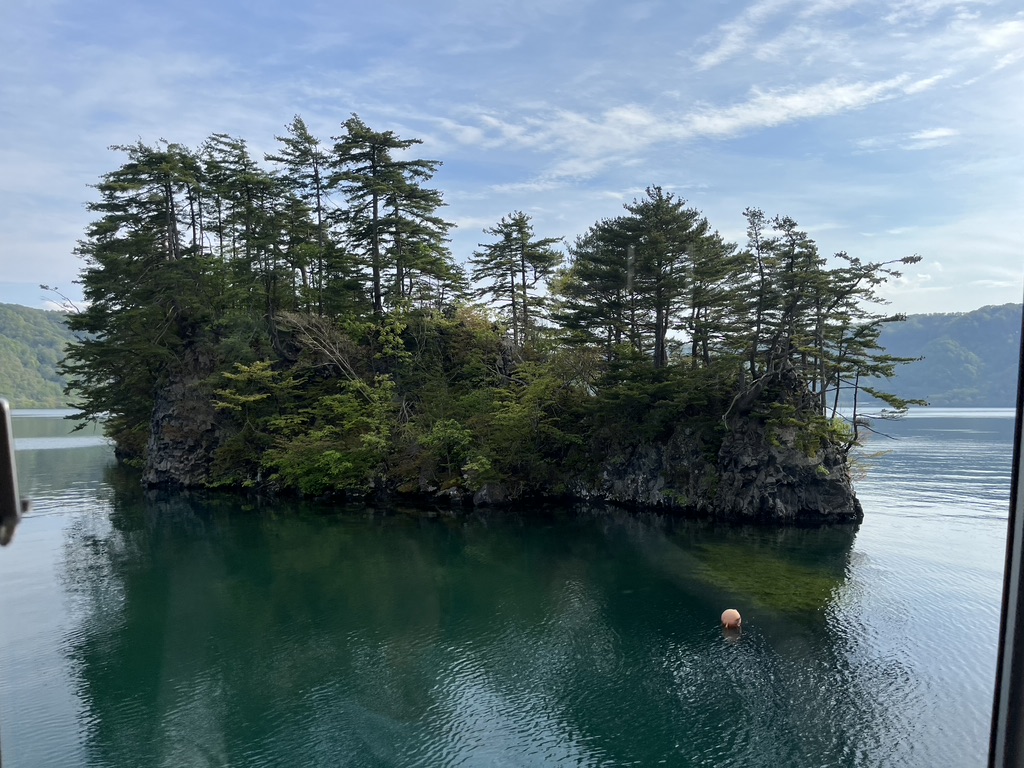
We were headed to the northernmost area of the main island of Japan, to Hirosaki and Lake Towada. Along some of the drive we followed a stream, and I took a video of the lush surroundings. The video is one minute, and the second half is the best part!
We had a boat ride on Lake Towada which was quite a treat.
A small island on Lake Towada
Our Japanese guide, Suka, on the right, and Nina, the one weaver who brought her husband!
We visited Hirosaki Park which rivaled Lake Towada.
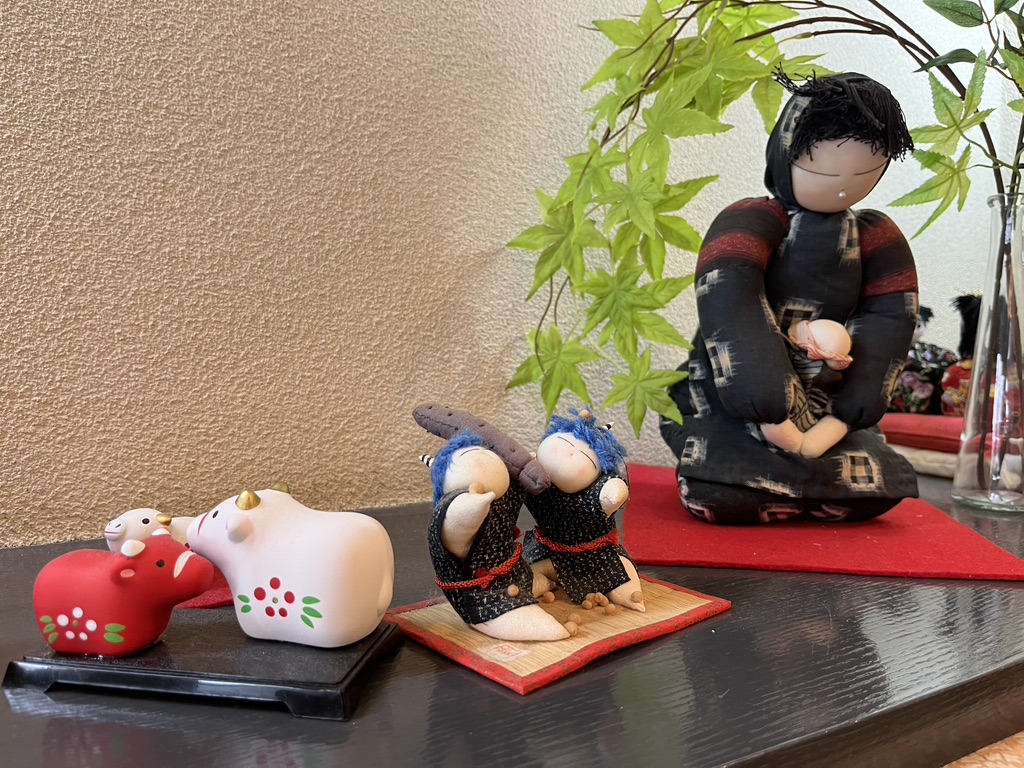
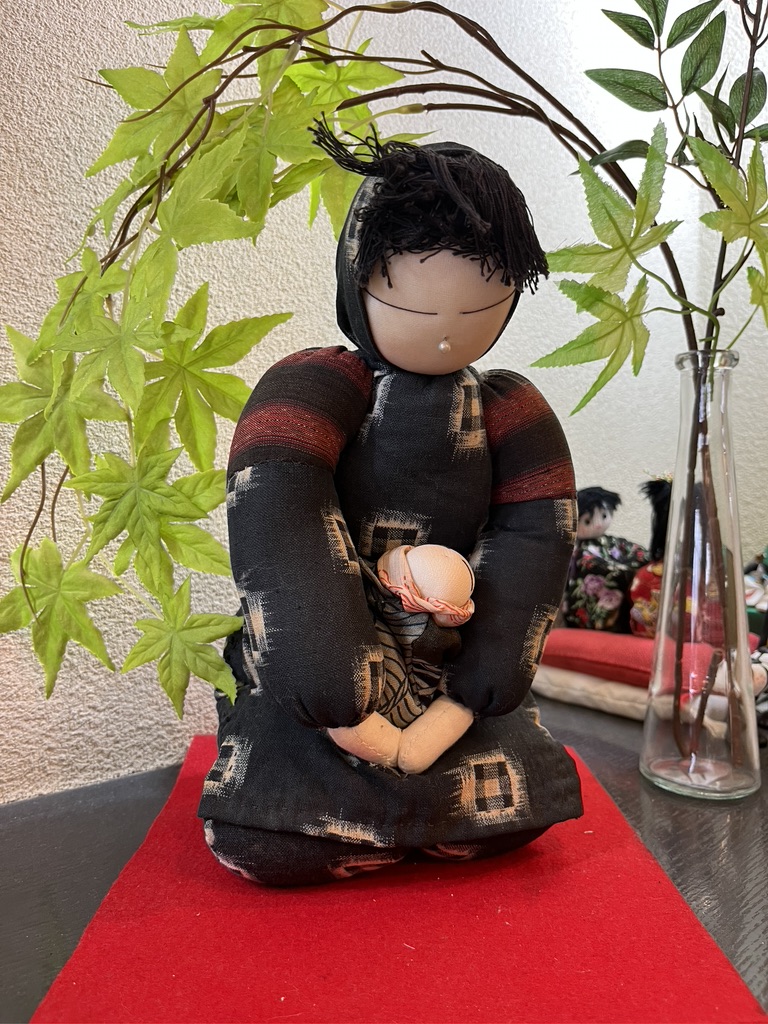
One day in Hirosaki we were on our own for lunch, and four of us found a restaurant where there were some handmade dolls right behind my seat. These were soft sculpture dolls, and while I know the Japanese make beautiful dolls, both in porcelain and in cloth, I have no idea what they call them.
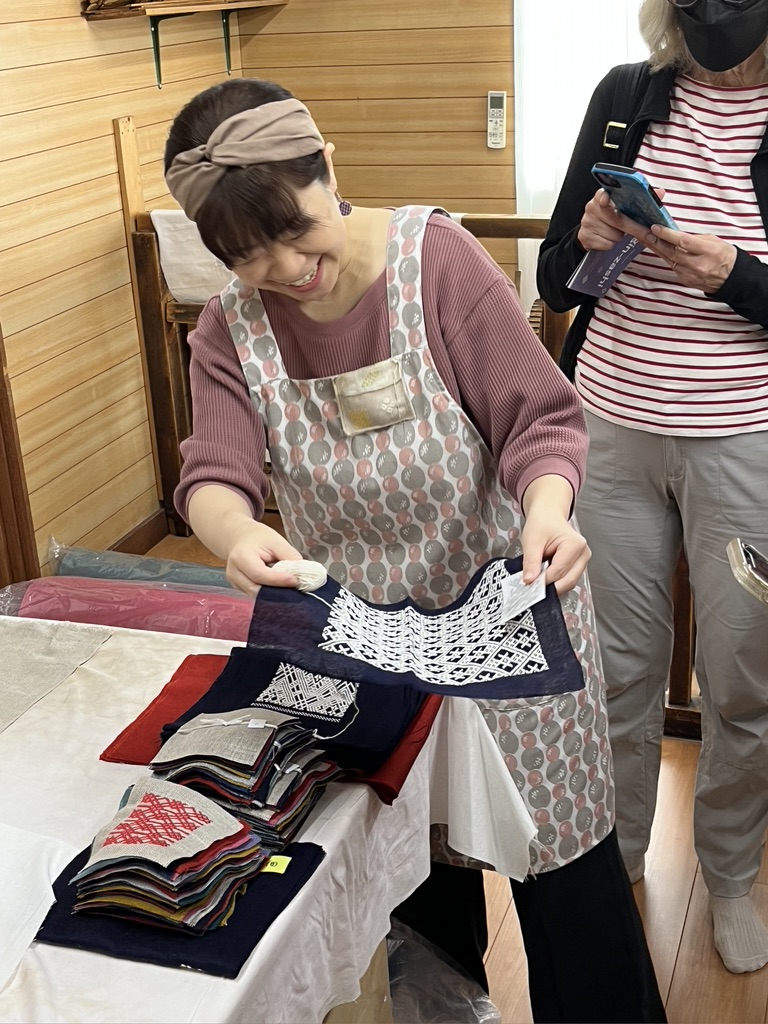
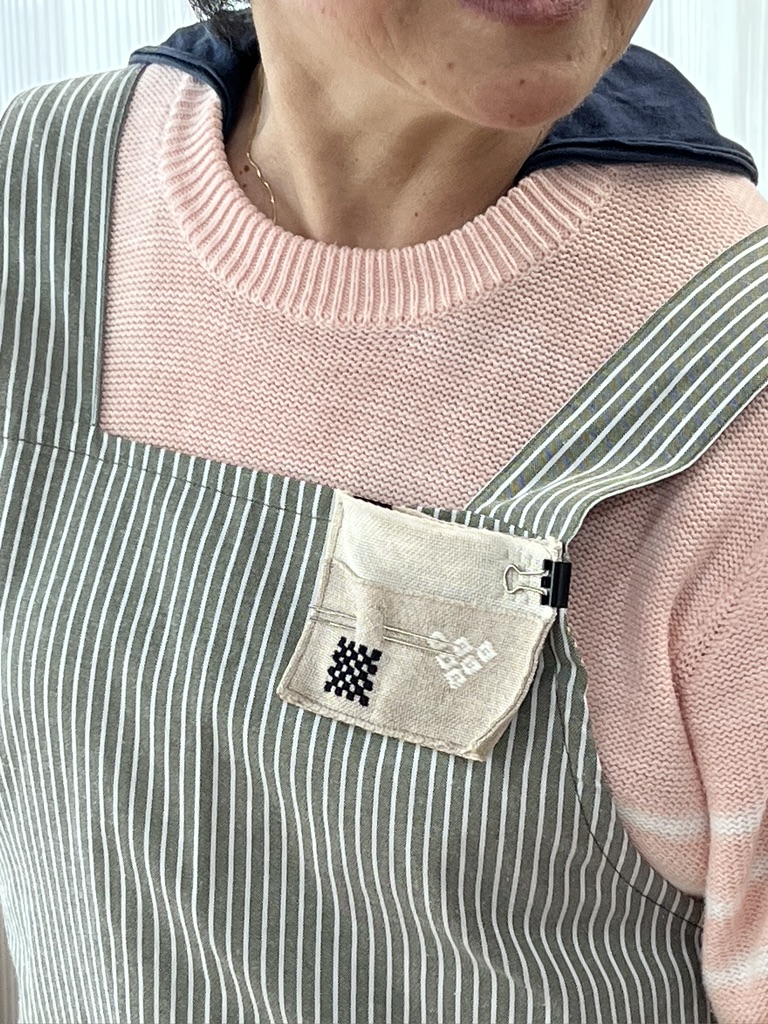
While in this northern area we visited the Hirosaki Kogin Institute. Kogin (hard G) is a type of embroidery that involves straight, long stitches. As I understood the guide, this institute is a cooperative of women who want to keep this tradition going. There was a weaver, but I do not think the dyeing takes place. There were numerous embroiderers as well as women who prepared the embroideries for shipping to various places that had commissioned the pieces.
Kogin embroideries being readied for shipping
Weaving cotton fabric for use in kogin embroidery
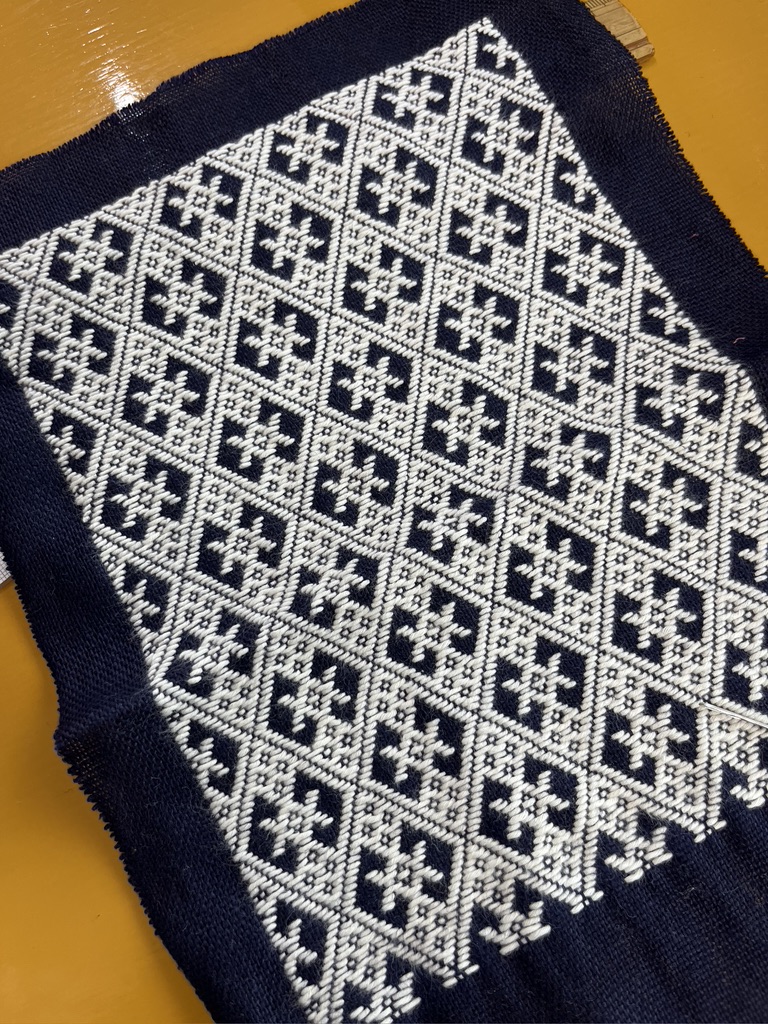
Here are some of the beautiful designs.
I was particularly enchanted with the little pin/needle holder on this woman’s apron.
Most of the finished pieces were small, to be added in some way to a larger project at the destination where these embroideries were headed. This finished garment was one of the only large items on display. Wow!
This has been a long post, likely the longest post I’ve ever done. Short on words, long on images. We took a longer bullet train from Shin Aomori Station back to Tokyo. Each of us got a lot handwork done during the smooth ride. I made great progress on my second sashiko project.
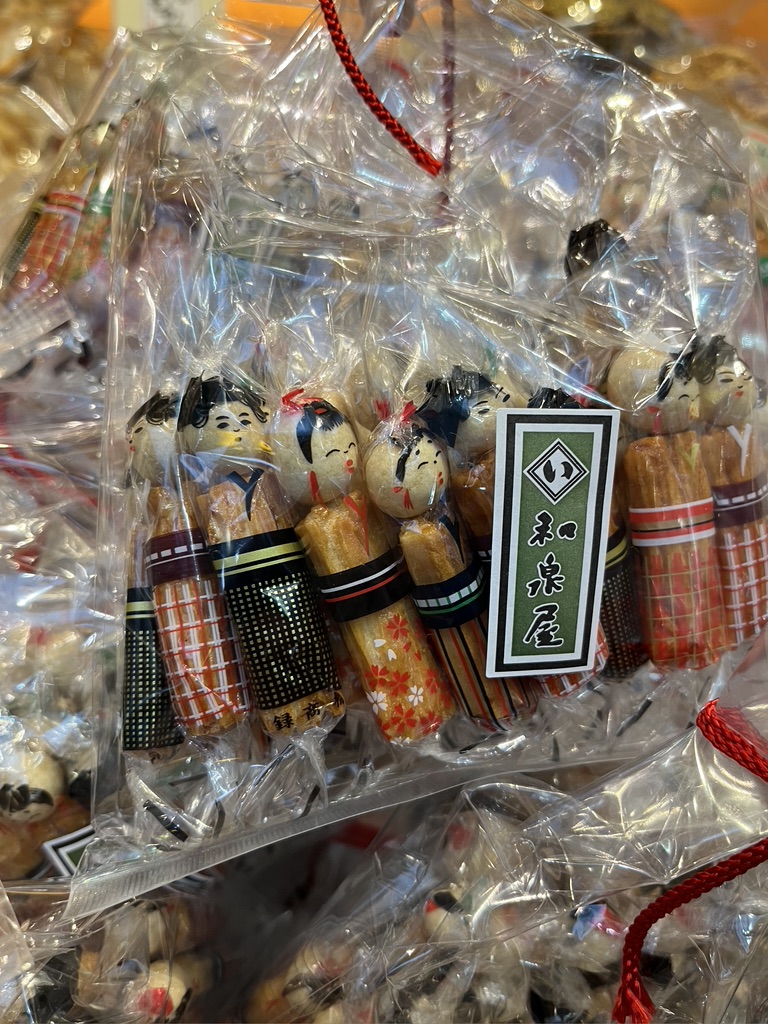
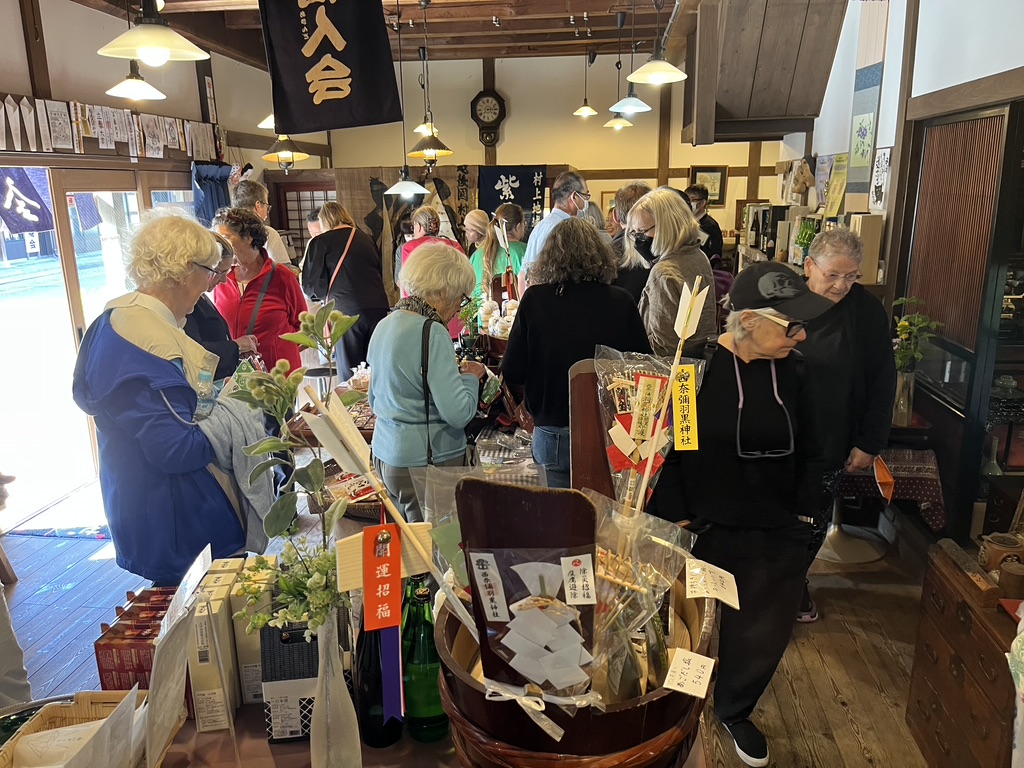
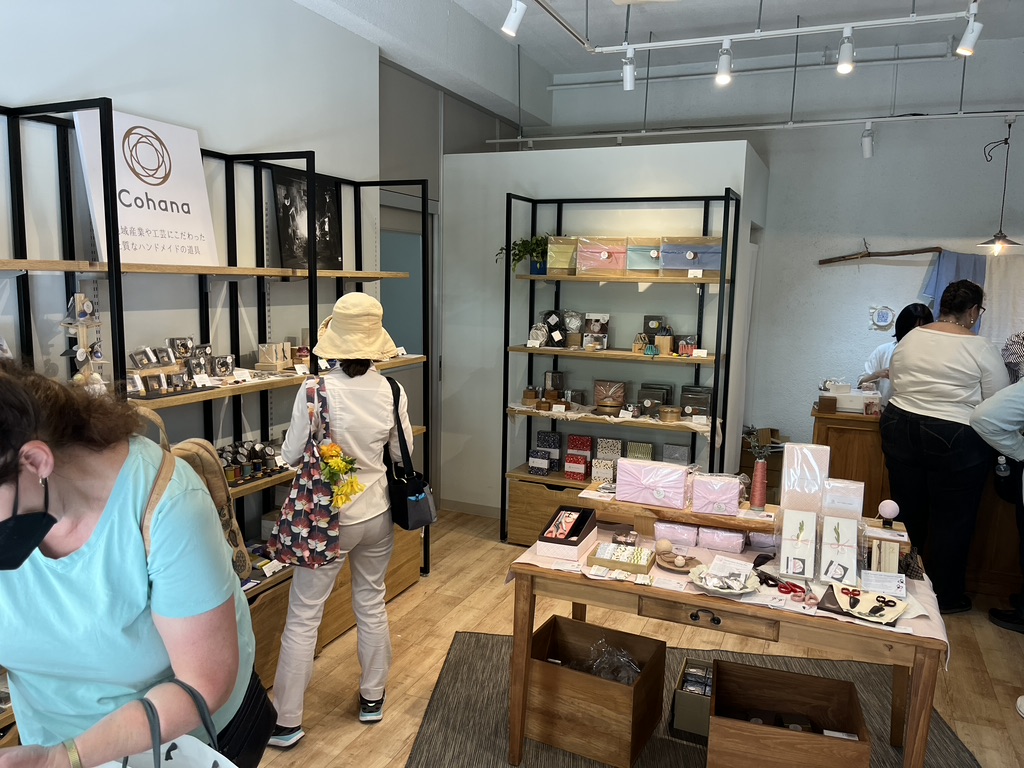
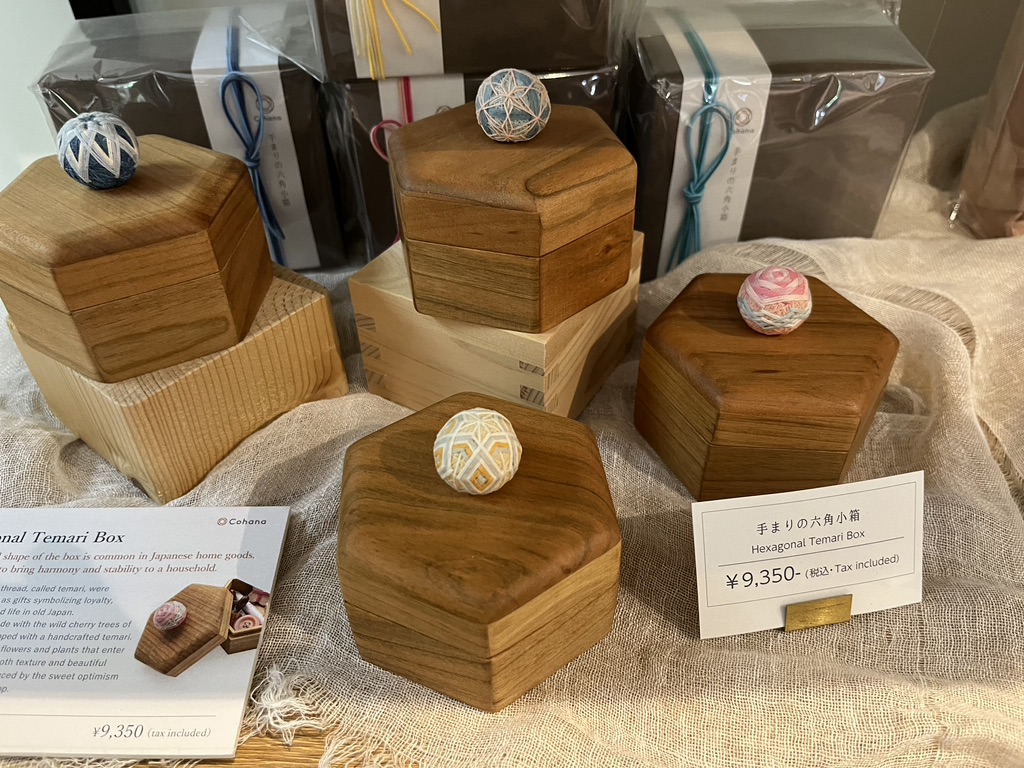
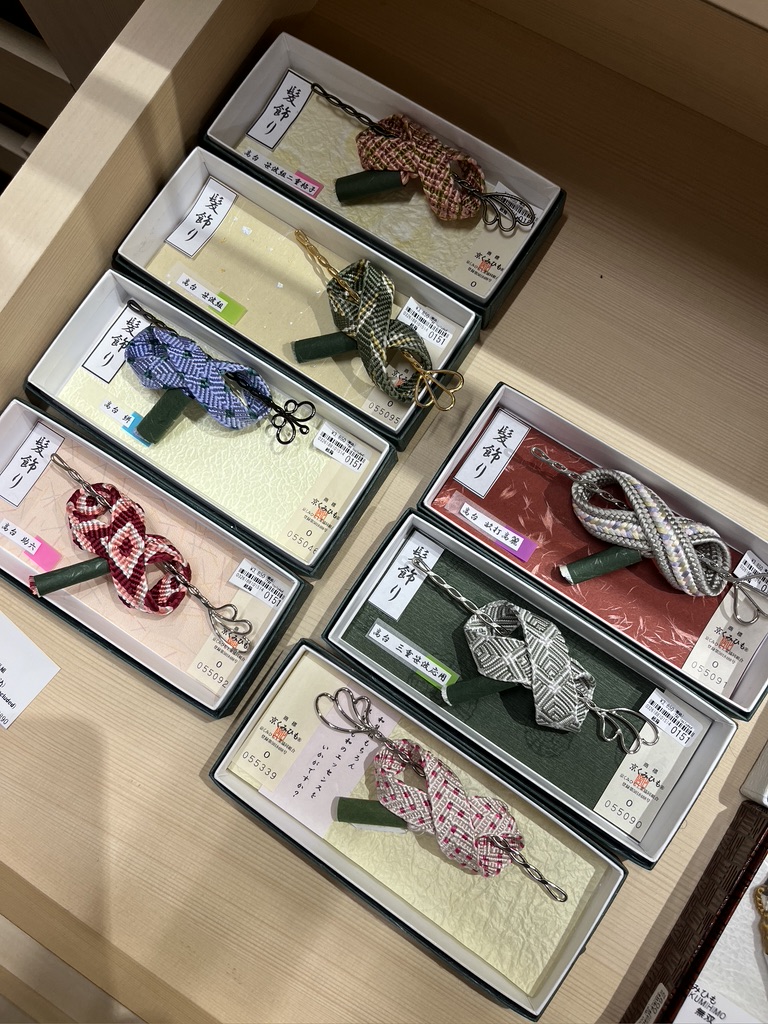
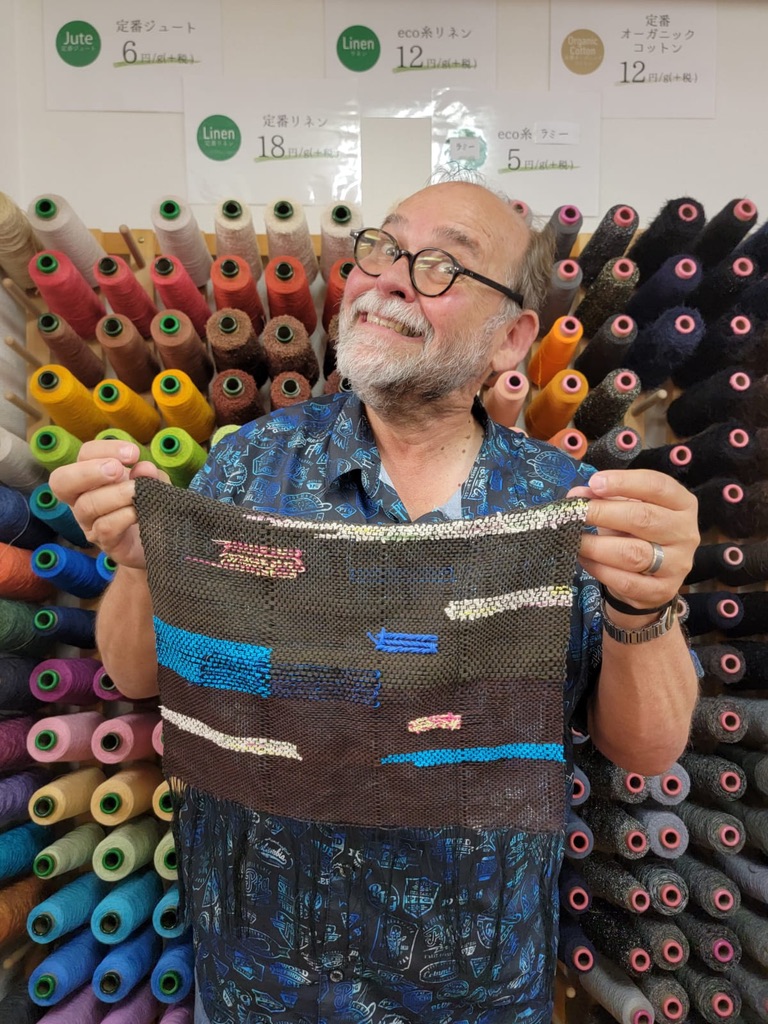
On our last days in Tokyo as a group, we visited some exciting places for shopping for beautifully handmade items or tools and fabrics to make our own creations. This is the Cohana store which sells tools for hand sewing. I indulged in quite a few lovely treasures.
Treasure boxes with temari for lid pulls.
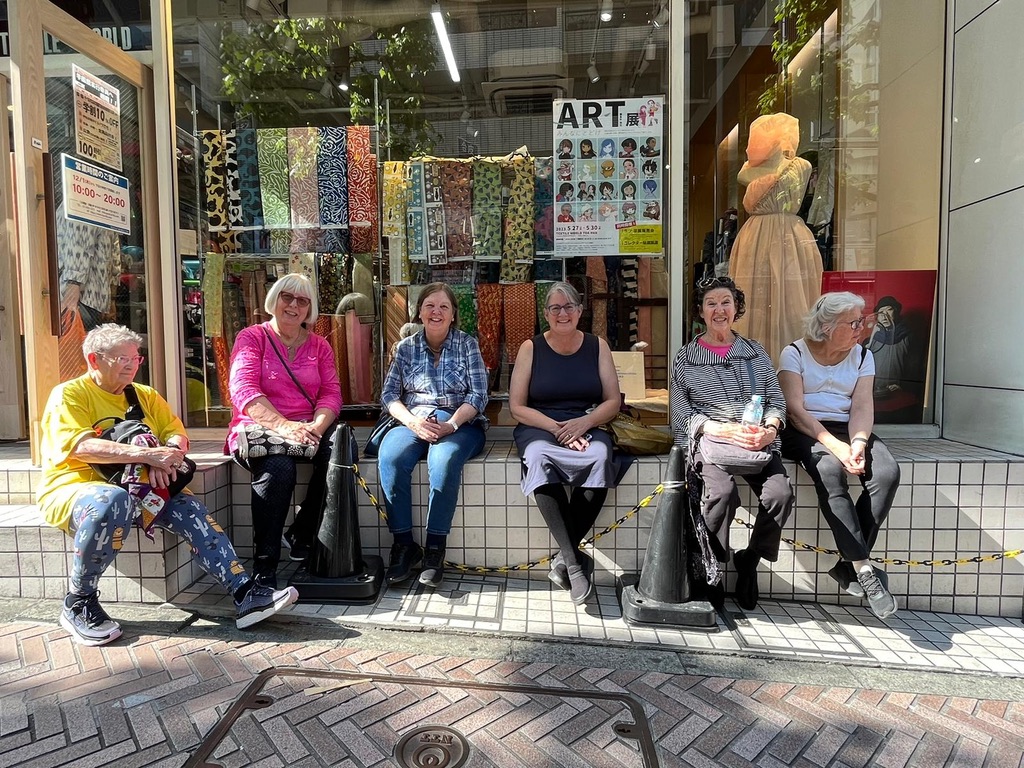
We visited Toa Textile World and indulged in quite a few purchases there.
We also got to spend some time in a shop dedicated to Japanese fine craft.
And suddenly our time together was coming to an end. We were all a bit exhausted from how much travel we’d done, how many workshops we’d taken, the visual overload of the fine crafts and beautiful countryside we’d seen. But I was not ready to leave. Luckily Kari and I had an additional three days to see and do some things on our own.
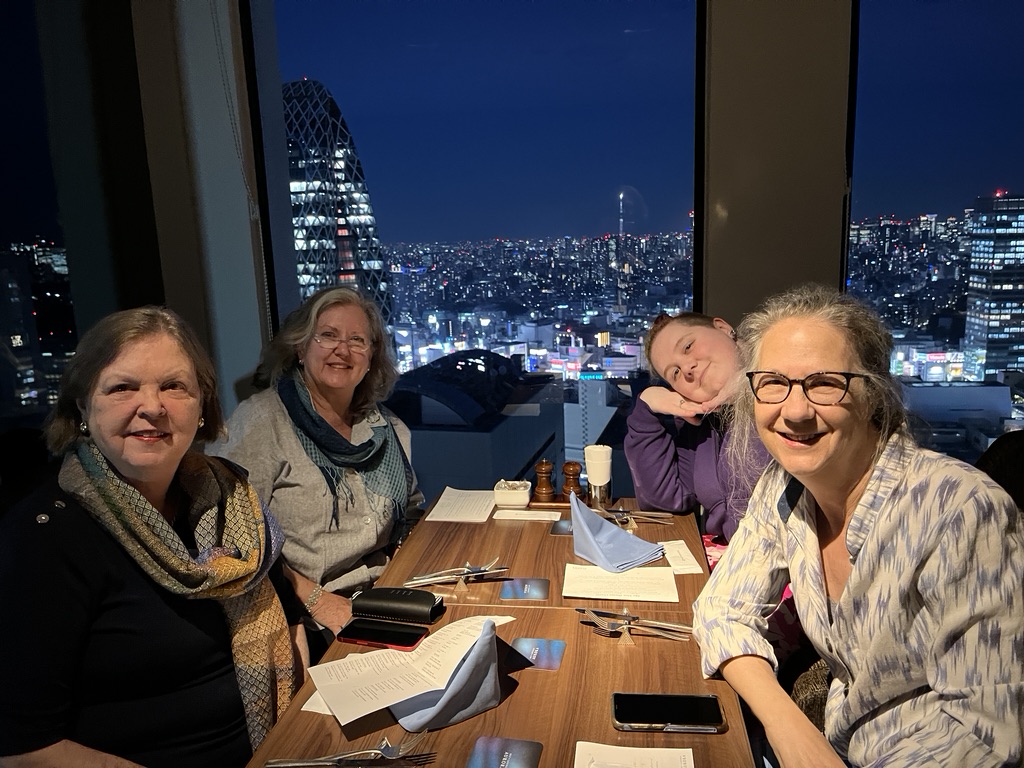
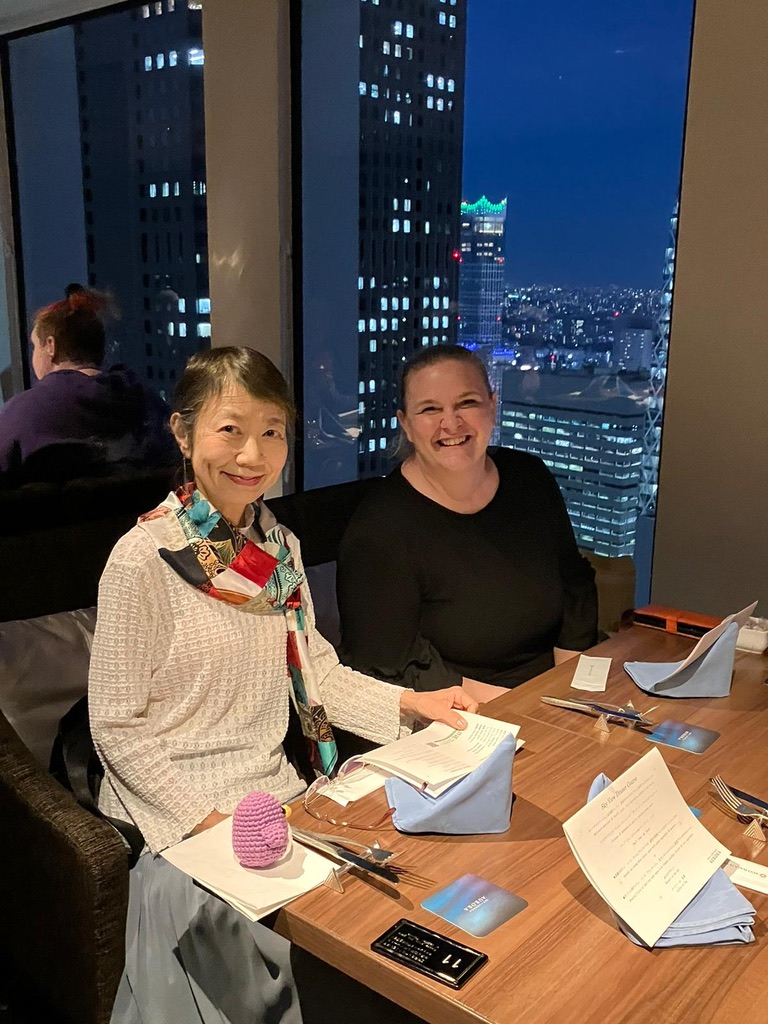
Our final dinner on the 45th floor of Keio Plaza Hotel in Shinjinku Tokyo with impressive views from every table:
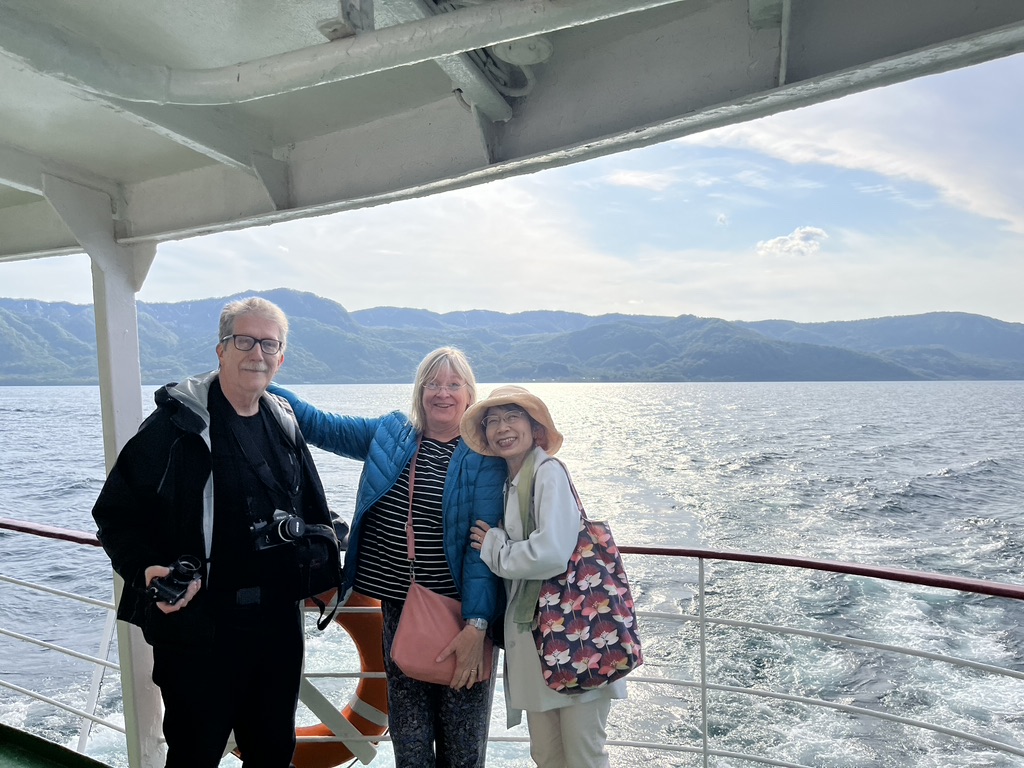
Clockwise from bottom left: Kari, Brenda (moi), Briana, and Daryl
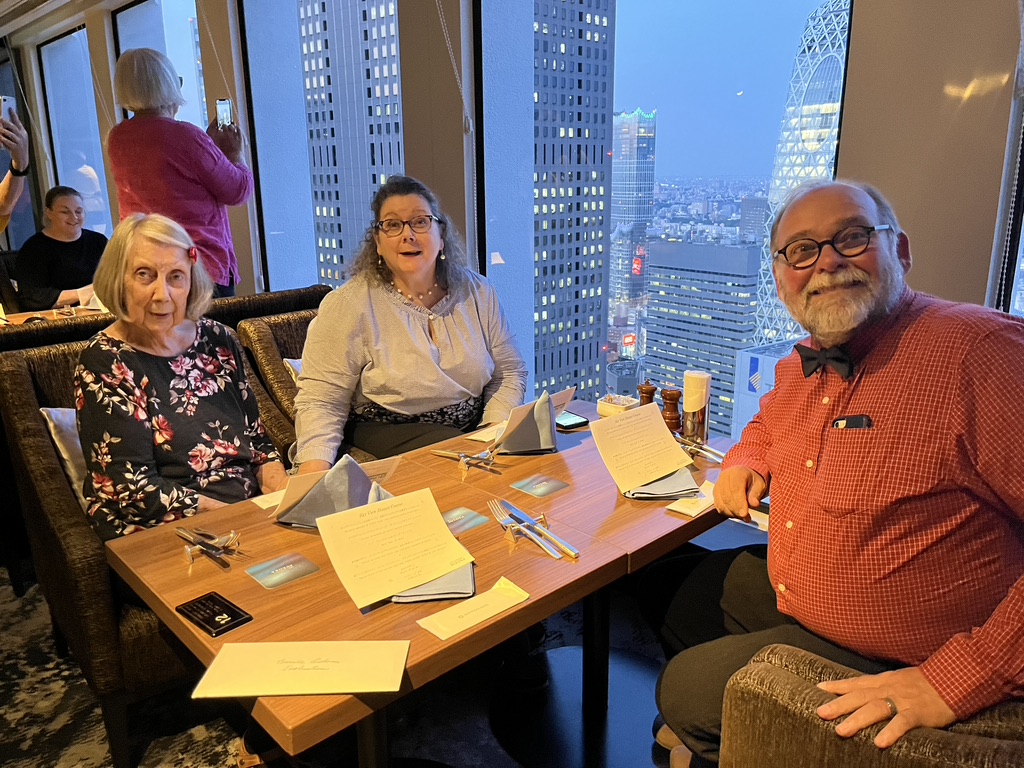
Left to right: Joan, her daughter Diane, and Tom
Our two wonderful guides! Suku and Sara. Someone of our group crocheted that pink penguin for Suku, but now I can’t remember who!
If you’ve made it this far I sincerely thank you for letting me share my Japanese journey. With a little luck and a lot of focus I hope to make use of some of the things I learned and experienced on the trip. I know some of my co-travelers have already dressed their looms and are weaving some sakiori projects with rag weft. I need to focus! Bang! Bang!
May is a beautiful time of year in many places, including my home region of New England. This year I chose to step away from home and visit Japan during their glorious mid spring. It was a journey outside of my familiar Western culture into a wondrous world of traditional textiles that are highly valued, into a culture that celebrates its traditions. It was a dazzling time of year to visit Japan!
I can’t imagine how I would tackle a trip like this on my own, so I felt lucky to take a tour led by Sara Bixler of Red Stone Glen. Sara’s well known father, Tom Knisely, joined the tour, and we had an excellent Japanese guide through Opulent Quilt Journeys, who arranged all our destinations and travel. It was the guide’s first time to lead a tour for weavers, and it was her first time to participate in weaving at the workshops she arranged for us. She enjoyed trying her hands at weaving!
Shortly before leaving home I learned that I knew a number of people on the tour, outside of Sara and Tom. My long time weaving friend, Kari, and I were going to travel together and room together on the trip. Then I learned that another old friend, Joan, would be going. What a trill! I haven’t spent time with her since I moved out of New Jersey, more than a decade ago. Also on the trip were Daryl Lancaster and her daughter Briana. While I’ve known Daryl for several decades, I hadn’t seen Briana since she was a small child. Now she’s well into adulthood and a great weaver in her own right. It was a perk to meet Pat White, of MAFA-founding fame, after all these years. We were a great group of 22 weavers who bonded quickly on this trip. There was one husband on the trip, and one daughter who came to accompany her mother.
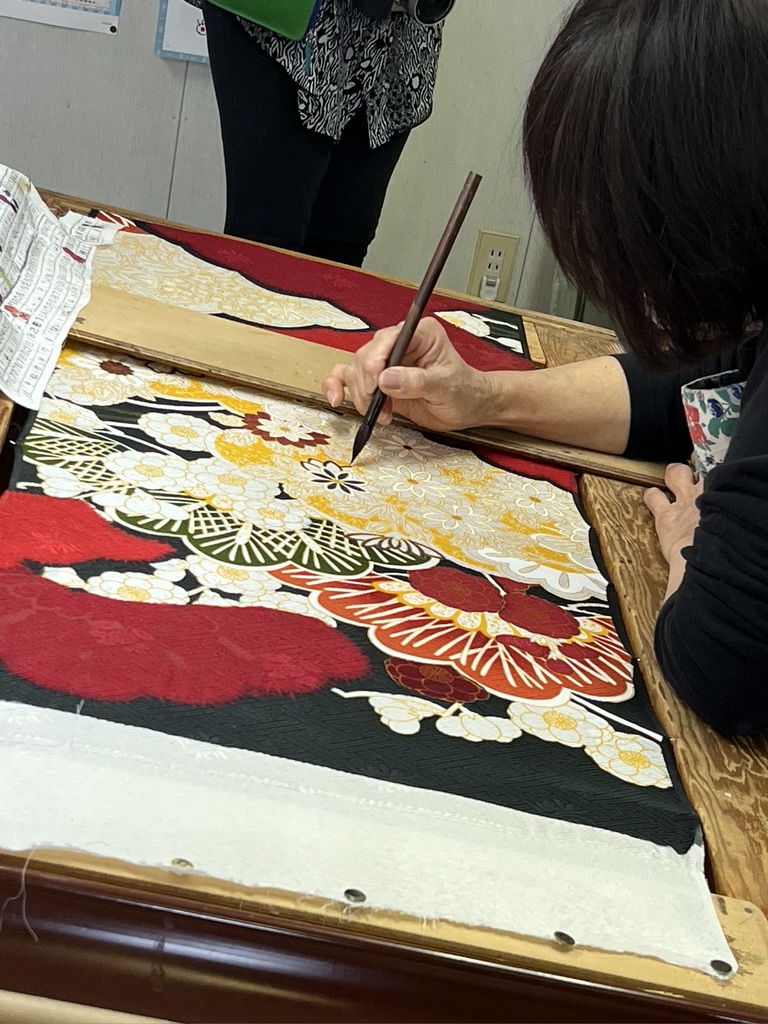
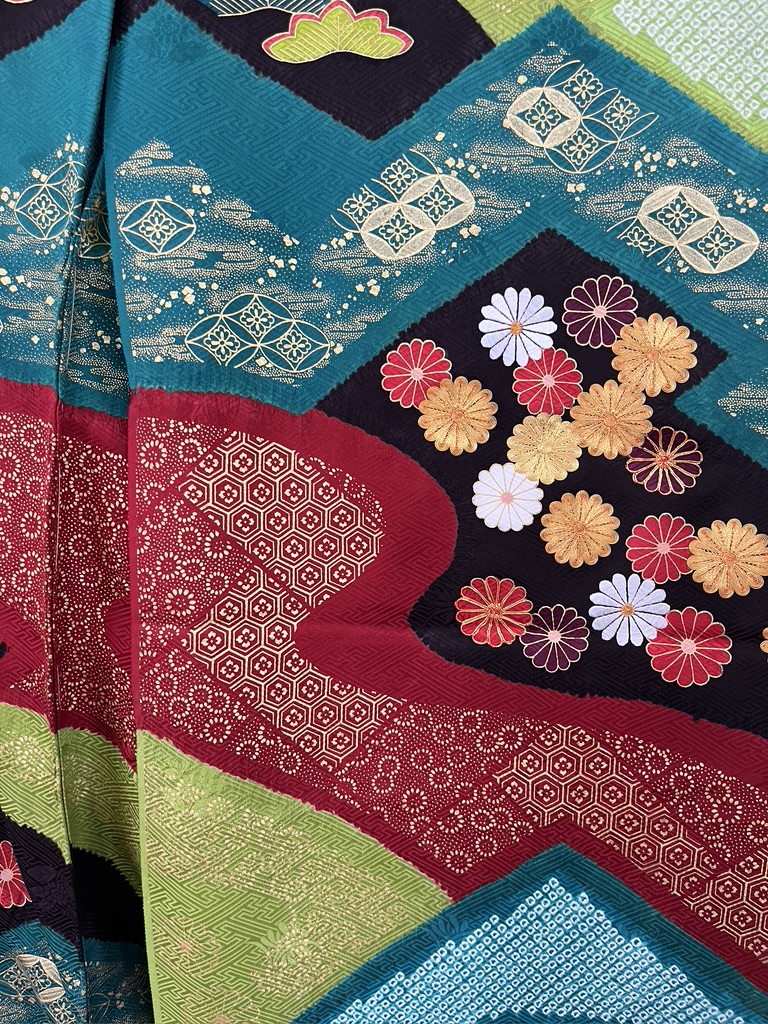
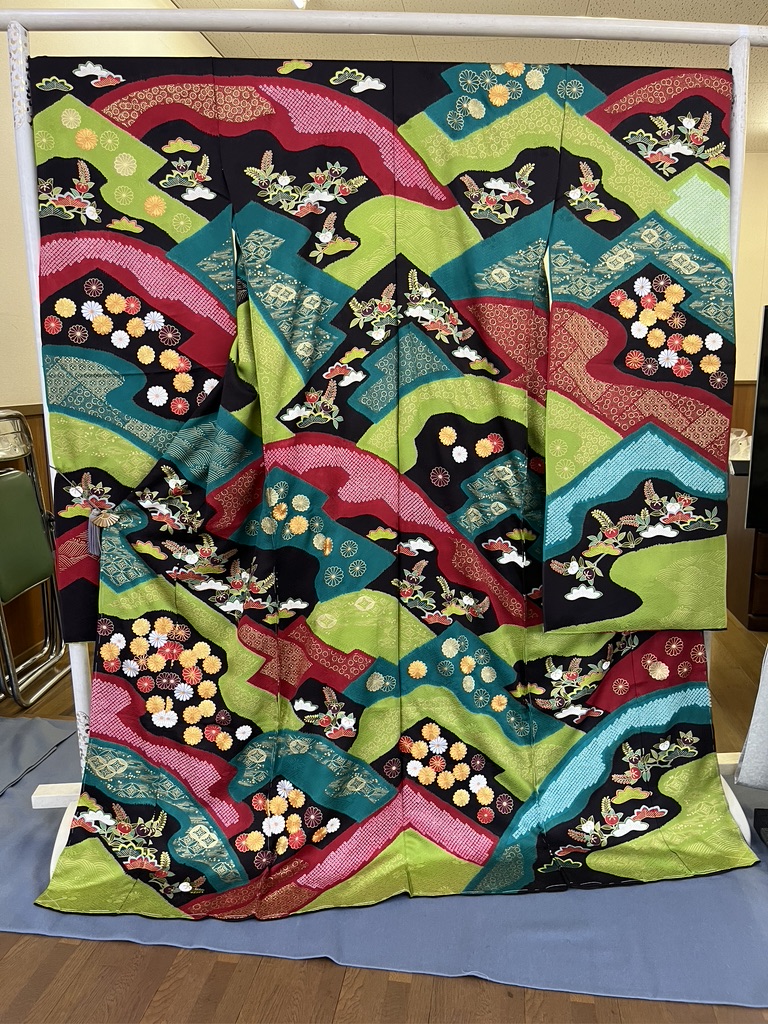
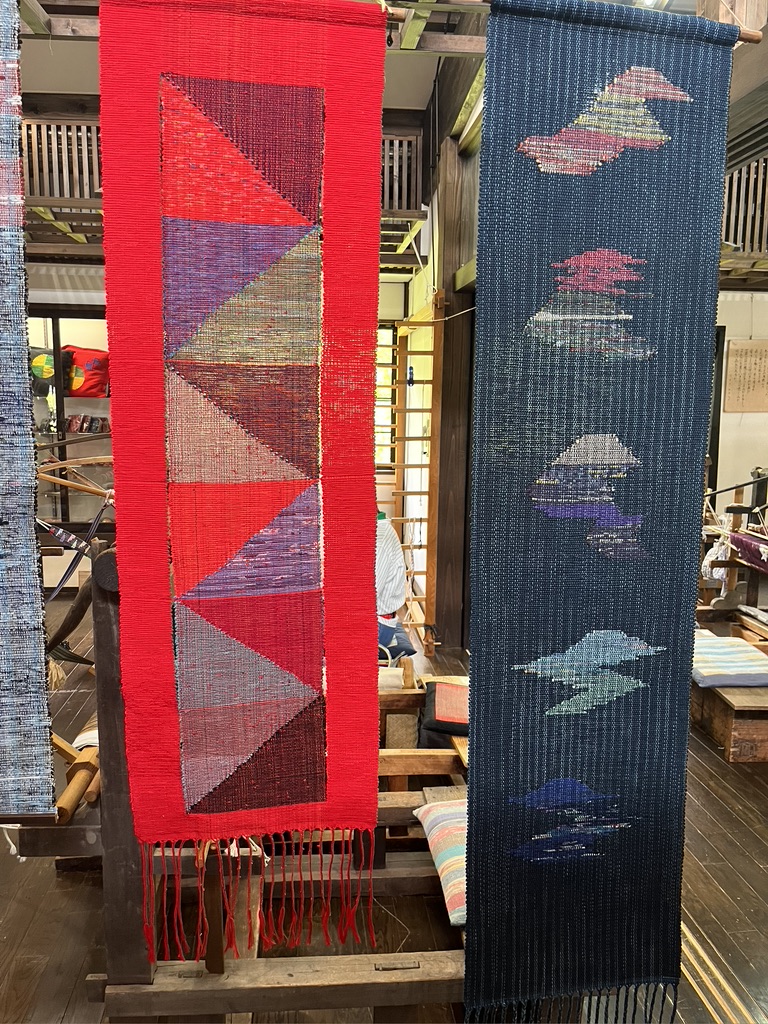
There was so much to this trip: wonderful opportunities to try both traditional Japanese weaving techniques or materials, and a chance to weave the modern technique called Saori. We saw silk being reeled and processed as well as dyers doing all kinds of techniques, from stenciling and resist applications, to hand painting and shibori techniques. Often all these techniques are combined on one fabric to make a stunning kimono, like this glorious piece.
Since there is so much to cover, I will focus on the workshops we participated in for this post, and I’ll write about the museums, gardens, and temples/shrines in a following post. Everything we did contributed to a once in a lifetime immersion in Japanese textile culture. I’m so glad I made this trip!
Kari and I arrived in Tokyo two days before the tour officially started. We felt we needed that time to acclimate to the time change, a whopping 13 hours ahead of Eastern Daylight Savings time. We arrived at our hotel around 5pm and decided to take a walk to the nearby busy area of Shinjuku Station. It was a step into the iconic culture of busy Tokyo. The station is far larger than Grand Central in NYC, with many shops, fast food joints, and of course, train tracks. As it was approaching dusk the lights of all the computer generated billboards were beginning to glow and the crowds during the evening rush hour were straight out of any images you may have seen of Tokyo crowds. We had never seen so many people in one place ever! They all knew where they were going, so it felt like a choreographed modern dance, with Kari and I being the chink in the cogs. Standing still and taking in the scene, we caused such a ripple in the incredible flow of humanity. Much of the station is underground, like Grand Central, and we were soon lost. We asked a number of times how to get back to the street and got conflicting directions. Finally we asked a woman at a cosmetic counter in a large department store, and she actually left her counter to take us to the nearest stairway to the street level. My big regret from this experience is that I was too awestruck to get any photos of this typical, but nonetheless amazing, view of Tokyo at rush hour. Somehow, I thought to take a couple of photos of the food counters in one department store in the station.
A food stall in a department store in Shinjuku Station, Tokyo
Saori No Mori The first day of our tour we visited the Imperial Gardens and the National Museum. More on that in the future! The second day of the tour we visited the Saori workshop in Tokyo. This is not the founding Saori workshop, which is in Osaka and still run by the founder’s family, but this Saori location was certainly a large space with lots of looms and yarns. Here is Tom showing his finished piece in front of that wonderful wall of yarn (photo taken by Sara).
At all the workshops we did during the tour, we had to divide into two groups. Here is Group I with their finished pieces. My good friend Kari is in the back row wearing red. Can you find Daryl and Briana?…and Sara?
Group One’s finished work at the Saori Workshop
And here is Group II with their pieces. I’m in the back row, wearing an orange shirt. My good friend Joan is in the front row, 2nd from the left. Pat White is in the front row, on the right.
Group II holding their finished Saori samples
This was a perfect first workshop. As you know, there are no rules to Saori weaving, just experiment and express yourself. It was a relaxing day. Half of us went to lunch while the other half wove. In the choatic streets of Tokyo we all wondered if we’d find our way back to Saori! No one got lost!
We soon began our trek north to very top of the main island of Japan. Along the way we saw both coasts of the Pacific Ocean and the Sea of Japan. I got a real sense of how close Japan is to both North and South Korea across the Sea of Japan.
Kasuri Weaving Workshop and Ojiya Chimjimi fabric: This was the day I’d looked forward to since I first got the agenda for our trip. I have a wall hanging in my stairwell that must be close to 30 years old that is from Kasuri Dyeworks. I bought it at a weaving conference those many years ago, and I still love it. To get to visit this place was high on my list.
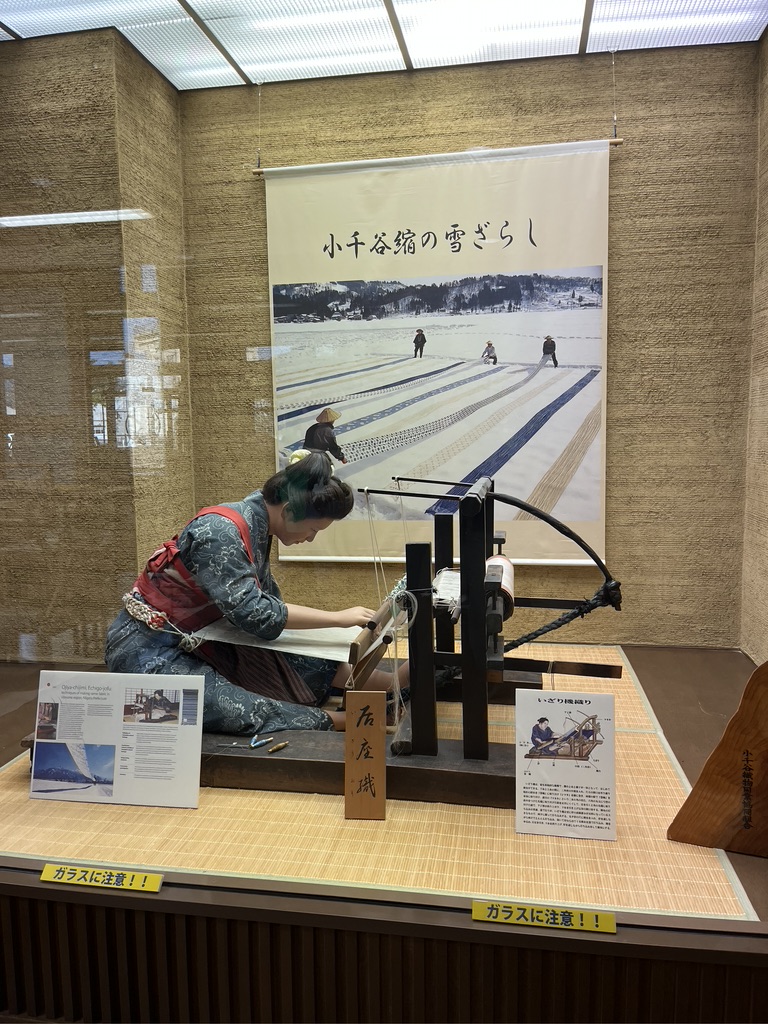
Ojiya chijimi is a fiber made made from ramie, a bast fiber in the nettle family which is perennial in this region. The process of making a spin-able fiber out of the ramie is very similar to how flax is prepared for spinning into linen. The fibers of ramie are naturally bleached in sunlight on snow covered fields, and this process has been practiced in this part of Japan (the Ojiya region of Niigata Prefecture) for at least four centuries. Older versions of making fiber from different bast plants has existed in this area for a thousand years. Traditionally there was no cotton growing in Japan, and no sheep, so spinning and weaving involved bast fibers and silk.
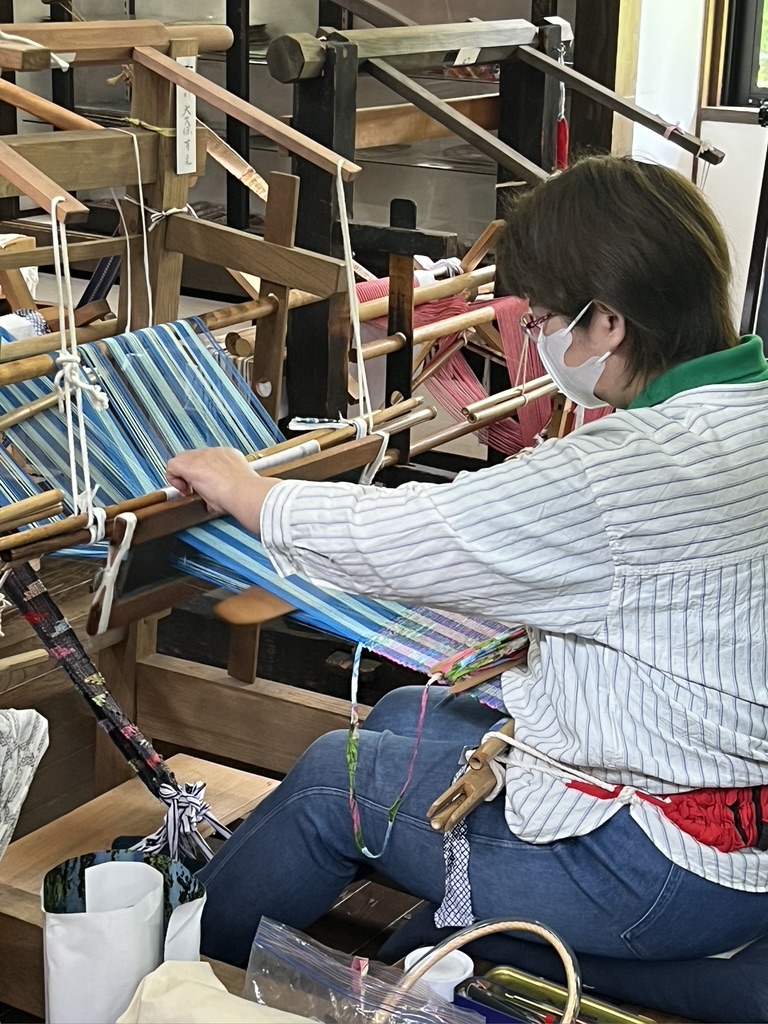
This display in the museum area of the workshop shows a woman weaving the bast fabric on a traditional loom that features backstrap weaving on a stationary loom. There is a braided cord leading from the curved bar at the back of the loom to the weaver’s foot. The cord has a loop in the end that encircles the weaver’s foot. She changes the shed by pulling her foot back or extending her foot forward. She controls the tension by the backstrap around her hips which is attached to the cloth beam. In the background is a poster of ramie cloth being bleached in a snowy field. (Sorry about the reflection on the glass display!)
Here is an example of weft ikat wound on a reel. The dyes have been carefully placed to create an image when woven. It’s mind boggling to me to imagine trying to do this.
The workshop space where we got to weave a small image in weft ikat is bright with views of the surrounding hills, terraced with early spring rice sprouting in the patties. The space was serene. Outside this workshop area was a display of the centuries of ramie weaving and ikat techniques.
The Ojiya Workshop for weaving weft ikat.
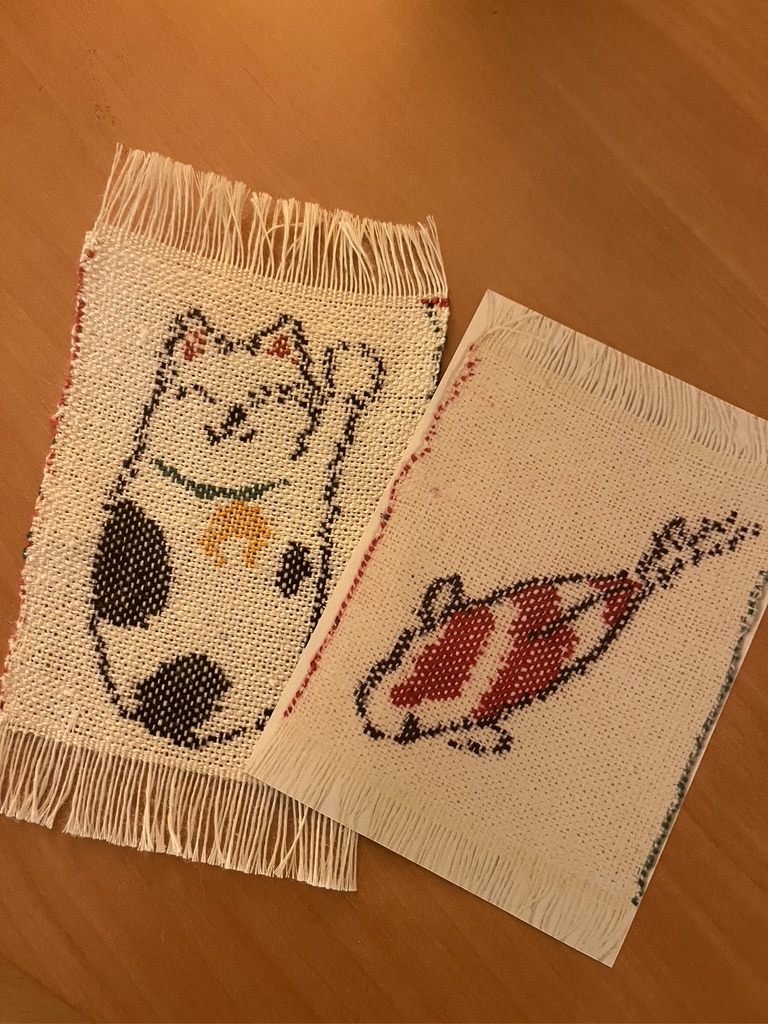
We had several choices of ikat designs to weave, and we could only choose one! It was a hard decision for each of us. The choices were a lady bug, four paw prints, hearts, a swimming koi, and a maneki-necko (the waving cats of good fortune often seen in restaurants).
Tom is weaving a weft ikat lady bug. There is a sample for him to refer to on the table to his right.
My new friend Peggy is weaving a maneki-necko. That’s the one I chose to weave also.
Some of the looms were set up with complex projects that the weavers on staff were working on. Here is a pattern of butterflies done entirely in weft ikat.
Weft Ikat bundles that depict what they will create when woven in the fabric on the right.
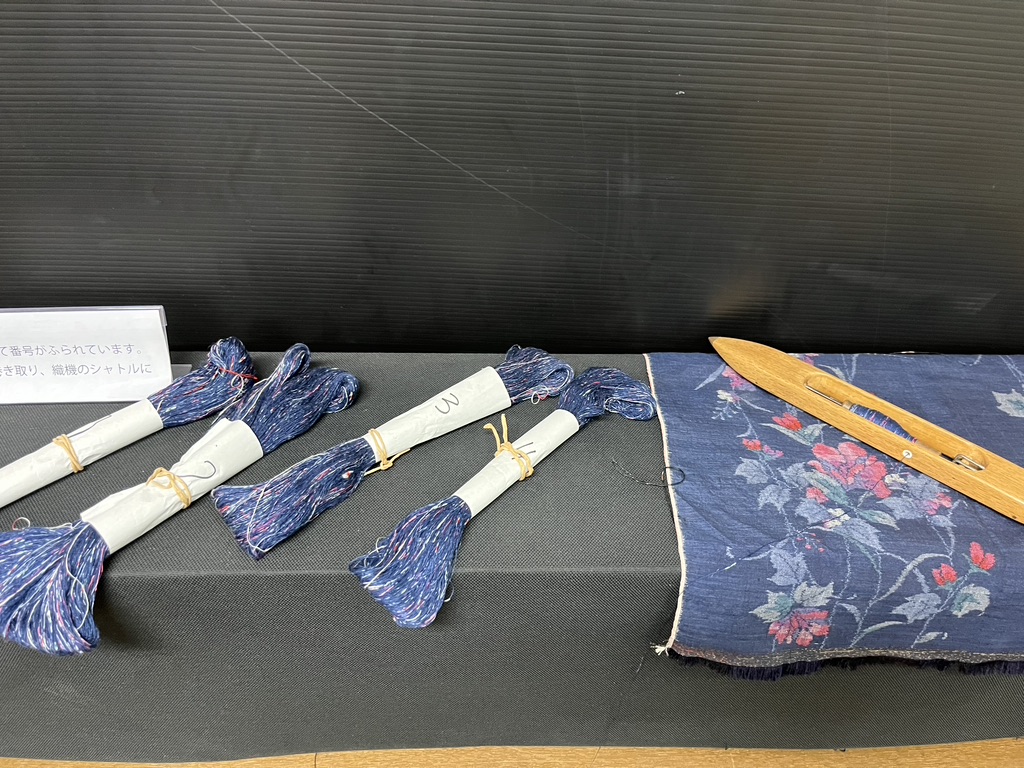
Seeing these weft bundles and the samples they wove made me ask if the weft bundles for our little samples were available for sale. They were! I asked for six sets of the koi pattern, and now I have it. I made a note that the warp was ramie set 10 cm wide on the loom (4 inches) and the warp sett was about 18 epi (71 warp threads in 10 cm width). I’ve now got that info here as well as in my notes. I don’t have ramie for warp, but I have plenty of linen. It will have to do. The photo below shows my woven Maneki-necko and the paper copy template for the six koi weft bundles I purchased.
Each workshop we took got more and more exciting. I cannot imagine a better way of immersing myself in the textiles of any culture than being able to participate as well as learn the history of how and why these techniques were developed.
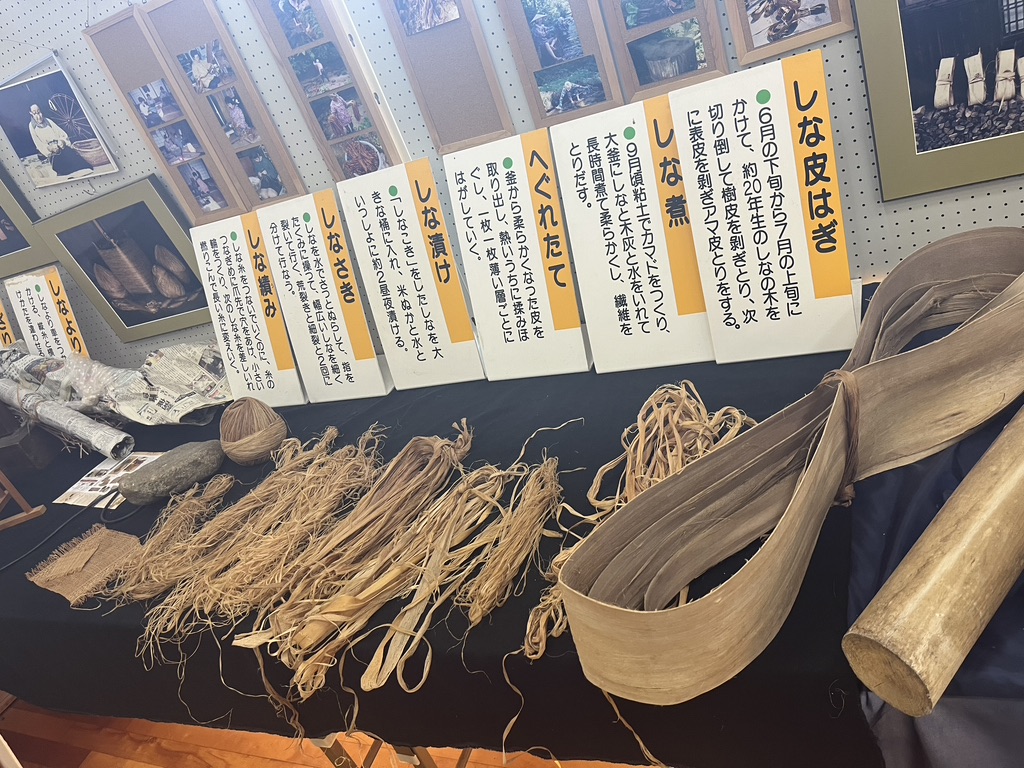
Shinaori This was my first exposure to this handwoven fabric. It is made entirely from the inner bark of the shina tree, or Japanese linden. Is that the same as the linden trees here in the US? My quick search leads me to say no. There are several types of linden trees. We saw a display on how these fibers are prepared for spinning and weaving. The inner bark is quite a thick section that must first get shaved down, perhaps similar to the way split oak baskets are prepared, but of course, going finer and finer until you have fine fibers like flax or ramie to spin. The sequence of preparation in this photo starts on the right and moves left.
We enjoyed another bright workshop space with views of the neighboring rice fields. It was a perfect day. At the front the room was a display of a traditional living space for those who worked weaving shinaori in the past. This turned out to be a common display in many of the places we visited. The current workshop might be quite modern, but there was often a preserved area that depicted how past generations of weavers would have lived and worked.
I enjoyed this workshop the most of the various techniques we tried. The linden fibers felt wonderful–sturdy and yet pliable. I loved the resulting fabric with its many subtle color changes. Several of us asked if we could purchase this yarn, and we were sad to learn that it was not for sale. It was a joy to weave!
Busy weavers working with shina fiber, or linden tree fiber.
There were items for sale at most of the workshops we attended. I was so smitten with this fabric I wanted to buy many things–most of all the fiber itself.
I treated myself to a hat! I’ll be wearing the most unusual hat of anyone in the Caribbean next winter, as well as here during the New England summer. Lucky me!
I also happened to do a search on Habu Textiles’ site for this fiber, and they have it. I was shocked to learn that it costs a dollar per yard. Hmmm… I think the prices of the finished goods in the shop were quite reasonable. I couldn’t afford to weave any of them myself at $1/yd. I’m so glad I indulged, and I love my woven sample.
Again, we had to weave in two separate groups. While one group was weaving the other group shopped and walked around the village, which seemed quite remote. I have since learned that there are only a handful of villages that continue this tradition of weaving with this fiber. There was interesting information here. Our workshop was in Sekigawa, one of only four remote mountain villages that continue this tradition. Outside the workshop some of us found a small shrine in the village. It was a memorable experience to be in such a remote area of Japan.
Shrine in the village of Sekigawa, where shinaori fabric is woven.
The next day we took the bullet train from Sendai to Hachinohe, where we visited Lake Towada and Hirosaki, at the northernmost area of the main island of Japan.
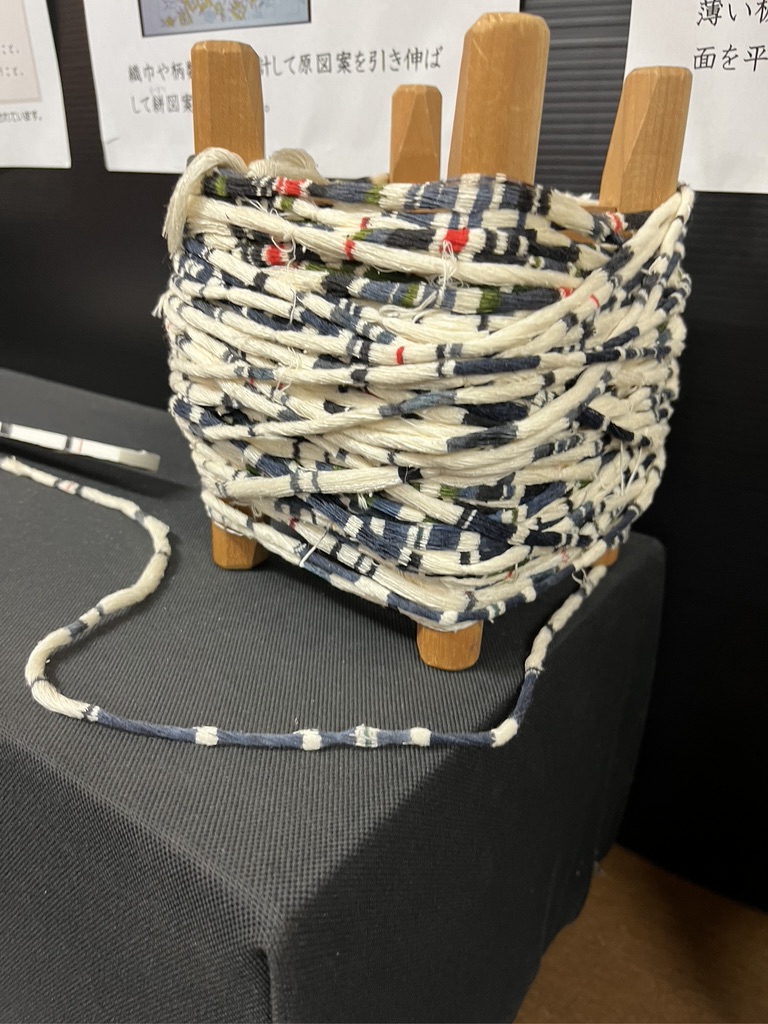
Nanbu Sakiori no Sato Sakiori is a form of rag weaving, and this Japanese tradition shows the height of what can be done with rags as weft.
Sakiori weaving at Takumi Studio, Hirosaki
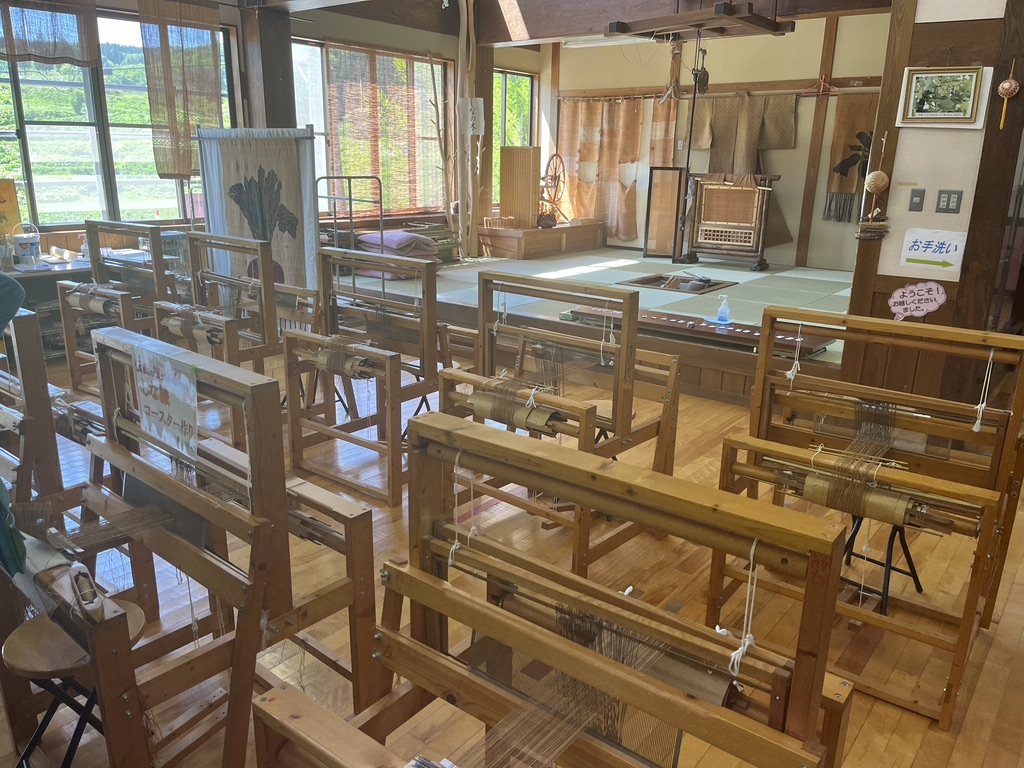
The looms here were also partly backstrap in nature. There were two shafts on these looms, and the curved beam at the back of the loom controlled the movement of those shafts through the use of the braided cord that leads from the curved beam to a loop the weaver puts around her foot. As you can see, it is a large studio. Still, we broke into two groups for weaving. This was probably due to the number of staff available to guide us.
Here you can see a woman working on her own project. You can see the braided cord that goes around her foot, and you can see the backstrap she is wearing. The warp is striped and the woven fabric has subtle coloration due to the printed fabric strips used for weft.
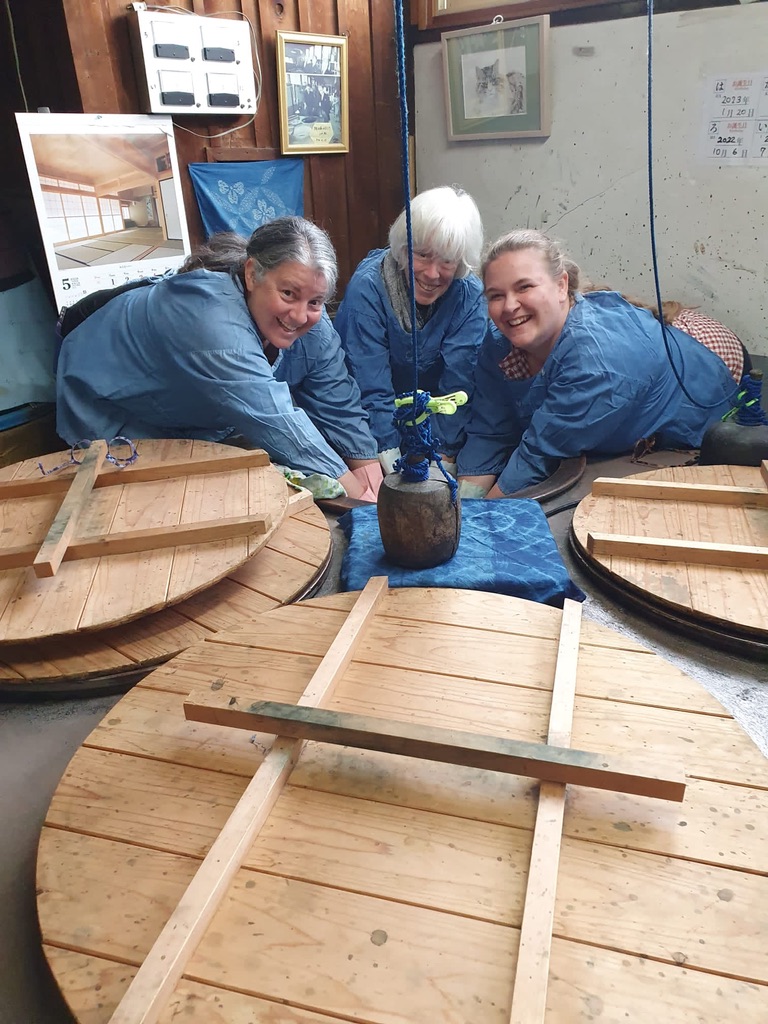
Every loom had different warp on it, so it was fun to see what each of us got as an end result. We also had baskets full of fabric strips to choose from. There was a man who seemed to be in charge of the whole operation. He stood next to the woman who was traveling with her mother and was not a weaver herself. There was a bit of a learning curve to using these backstrap looms, so it was a hurdle for the daughter. I happened to be sitting next to her as the enthusiastic man would yell to her, “Tension!! Bang! Bang!” He sounded quite aggressive or maybe even angry as he yelled at her, but I’m certain he was trying to encourage her. It was frightful and funny at the same time. Many of us will remember this for a long time. “Tension! Bang! Bang!“
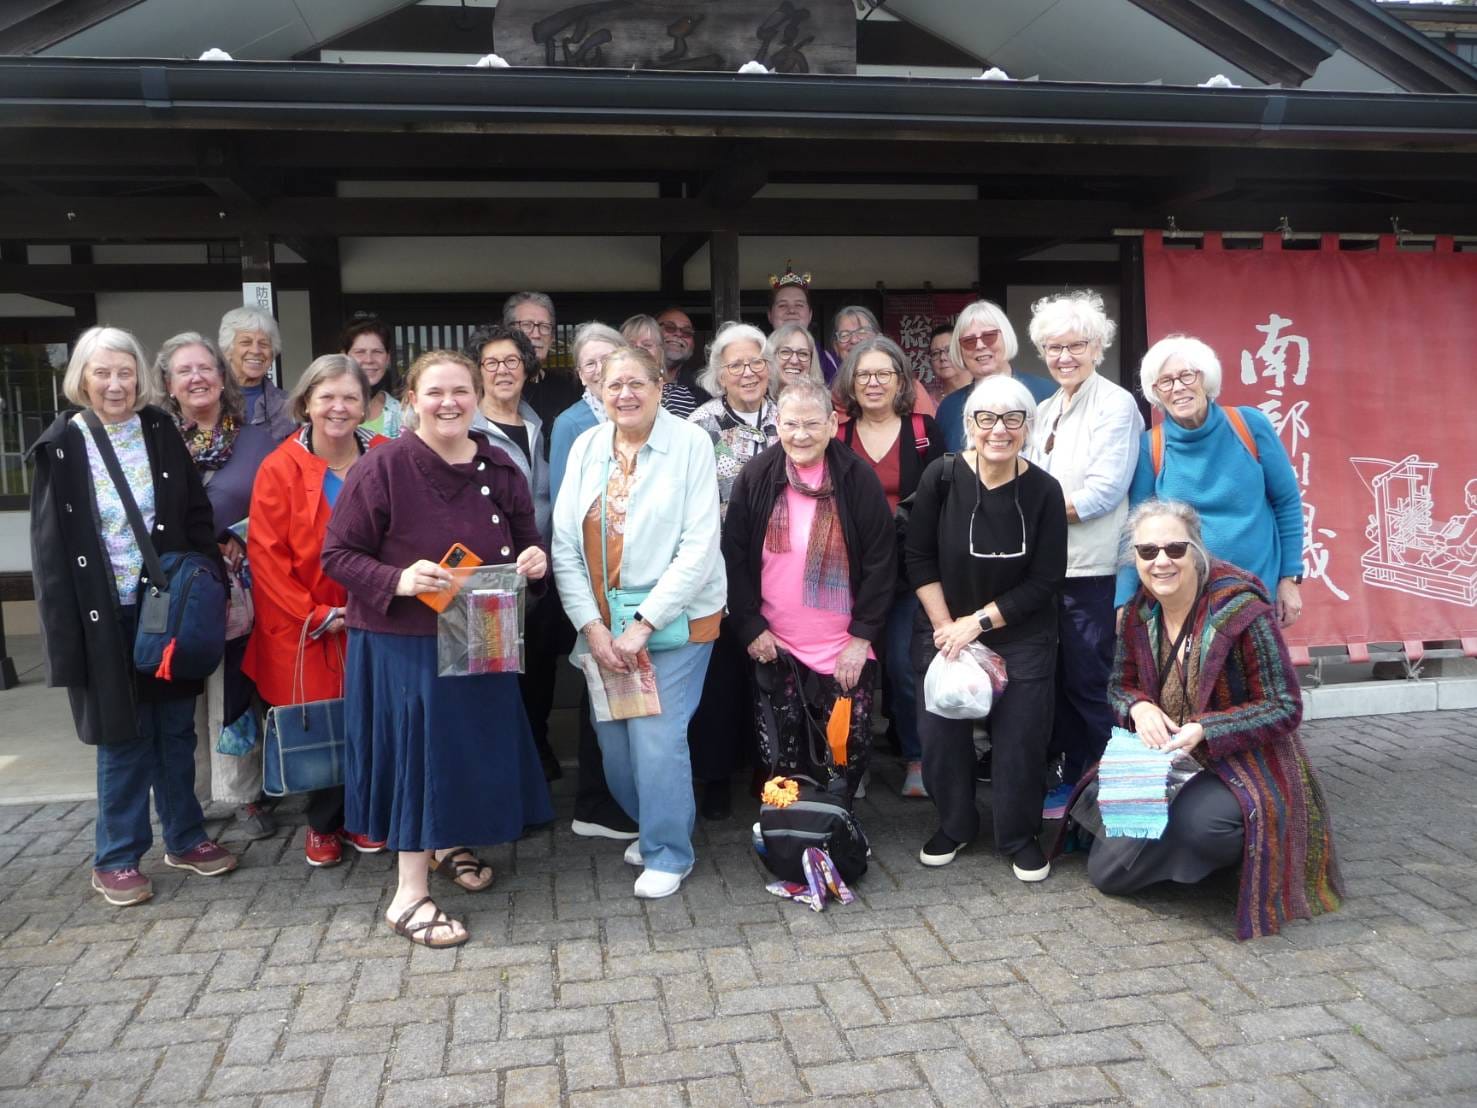
I was so busy weaving I did not get enough photos! –and how I regret not getting a photo of Bang, Bang! man. This photo was taken with Sara’s phone, of the whole group at the end of our Sakiori weaving session.
Sara, Joan, and Daryl in the front. Kari (in the red coat) is behind Sara, and I am to the left of Kari. It was a wonderful day for weaving!
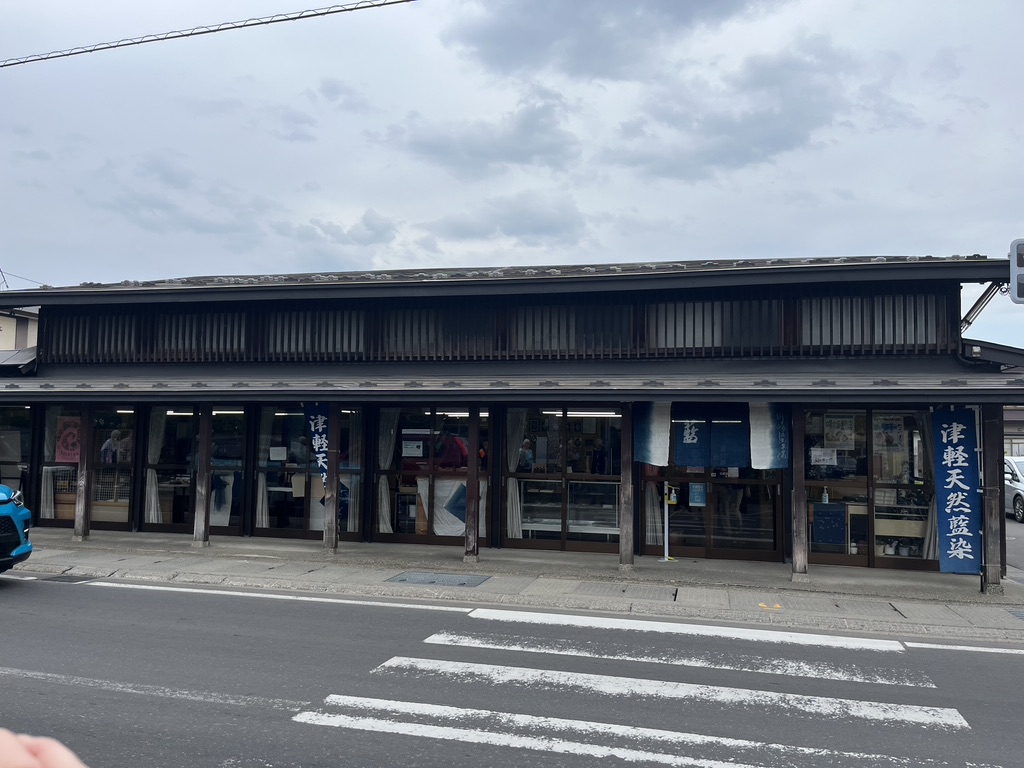
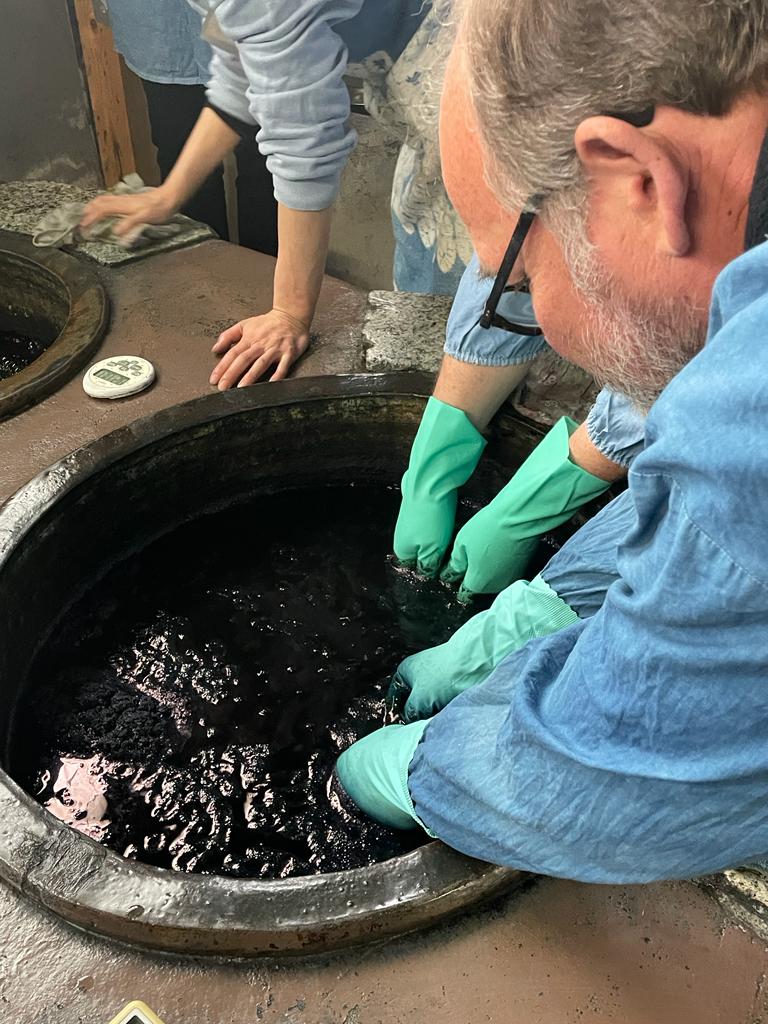
Shibori Indigo Dyeing: Our last participatory workshop took place in Hirosaki at the top of the mainland island. Here is the workshop entrance from the busy street in the center of town.
This place is well known and popular. The whole time we were there, whether shopping or dyeing, the shop was full of Japanese customers.
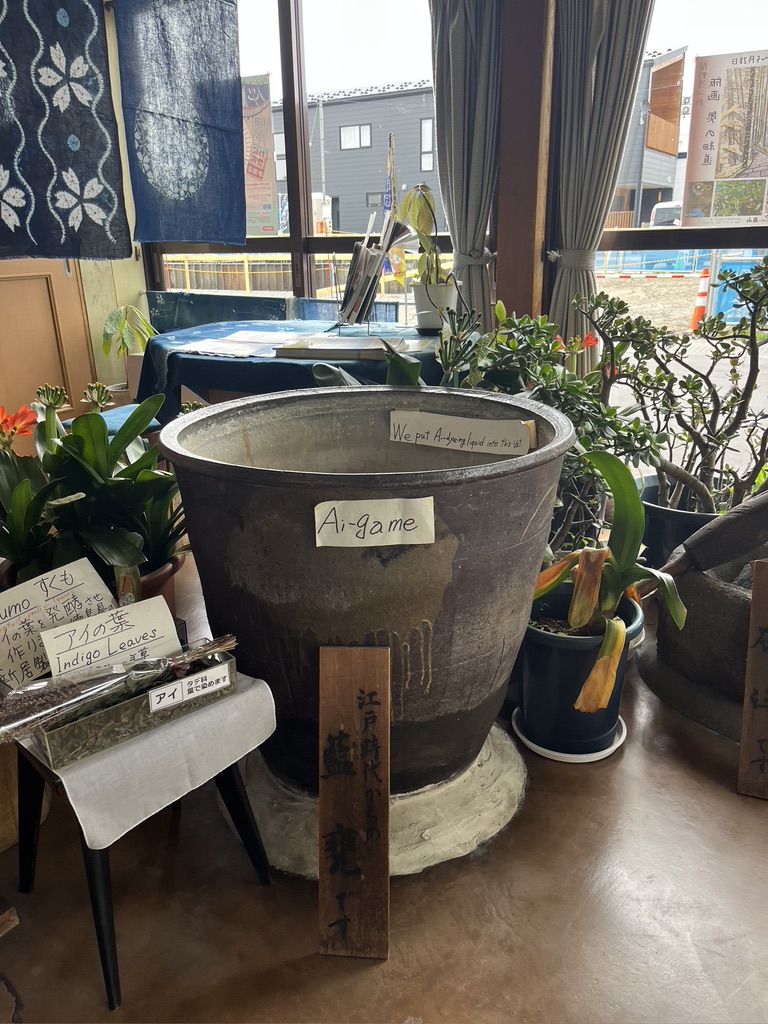
There was a display of the items used in making the dye and using the dye. Here is one of the large dye vats not in use. To the left of the dye vat are some dried indigo leaves. It is in the showroom.
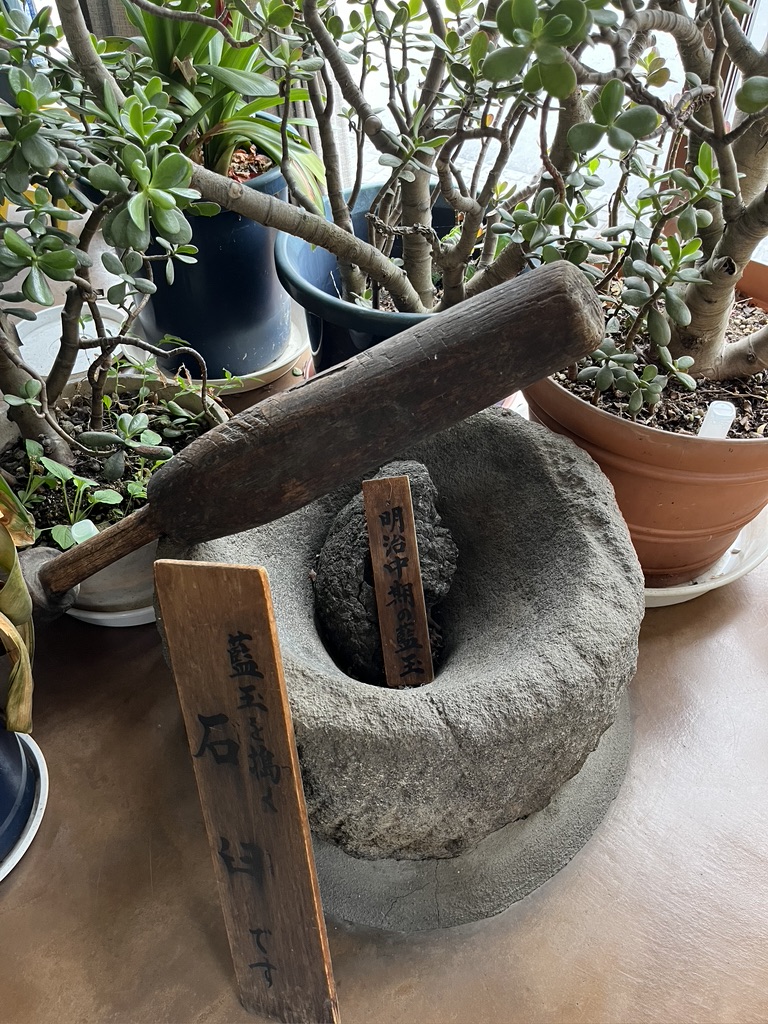
Also in the showroom is a large mortar and pestle that was used to grind the indigo cakes.
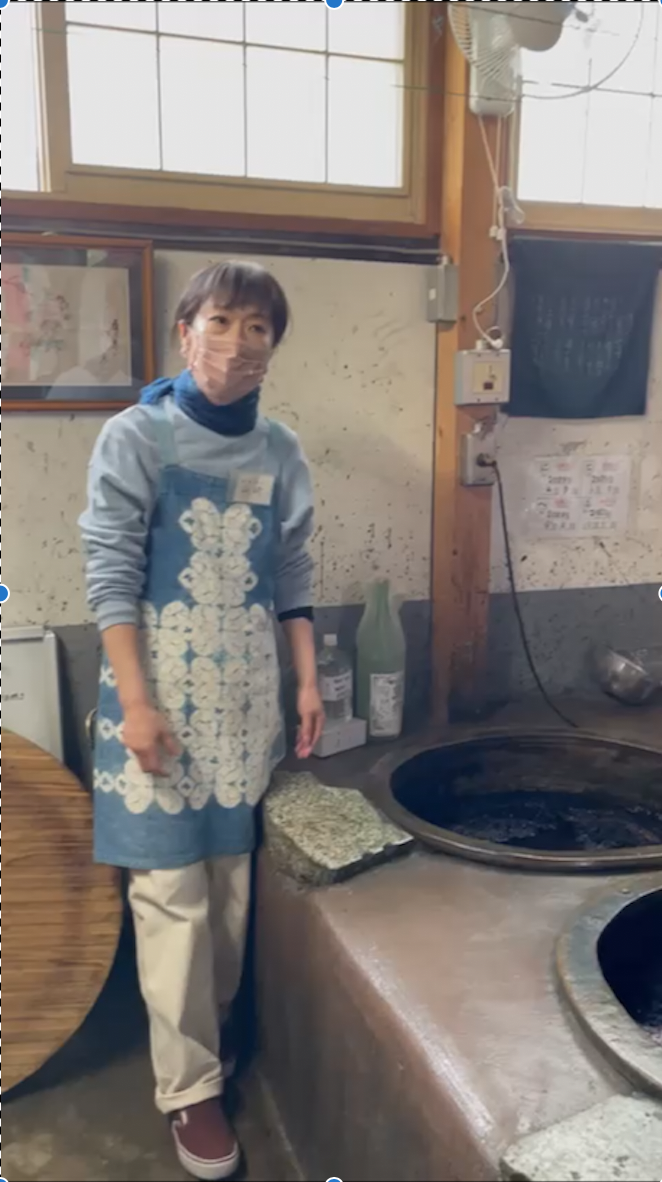
This is where the fun takes place. We were each given an apron to wear and waterproof gloves. The workers were wearing such creative aprons. This makes me think about what I’d like to do with my indigo vat at home. Indigo dyed aprons might end up as part of future gift giving.
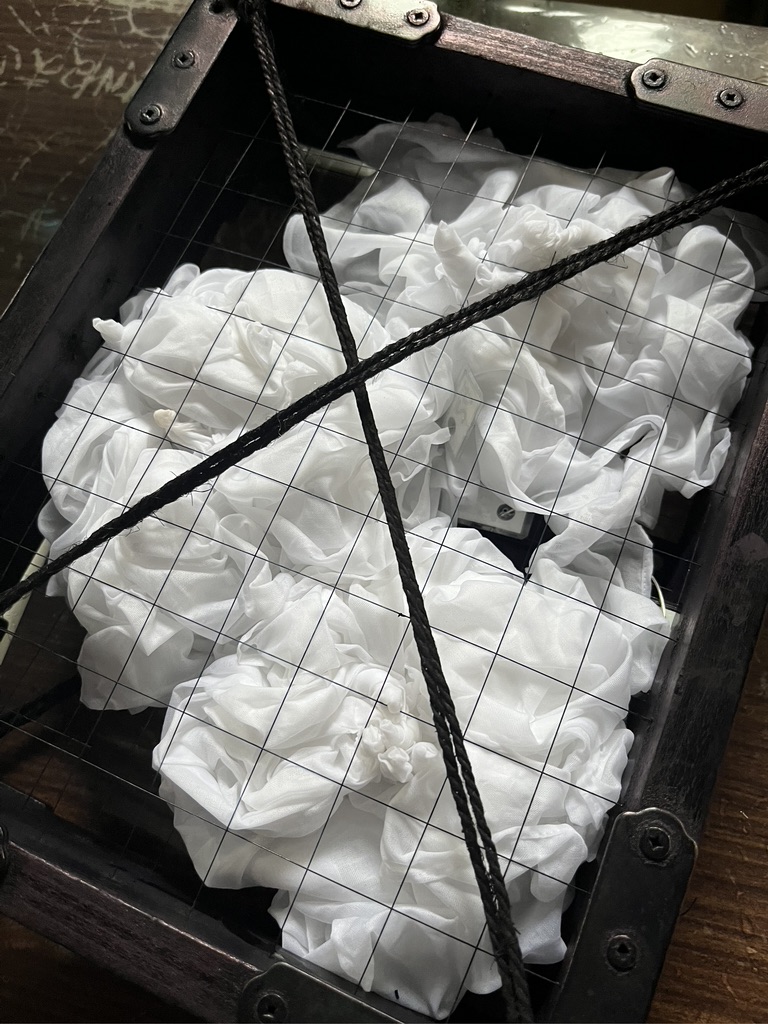
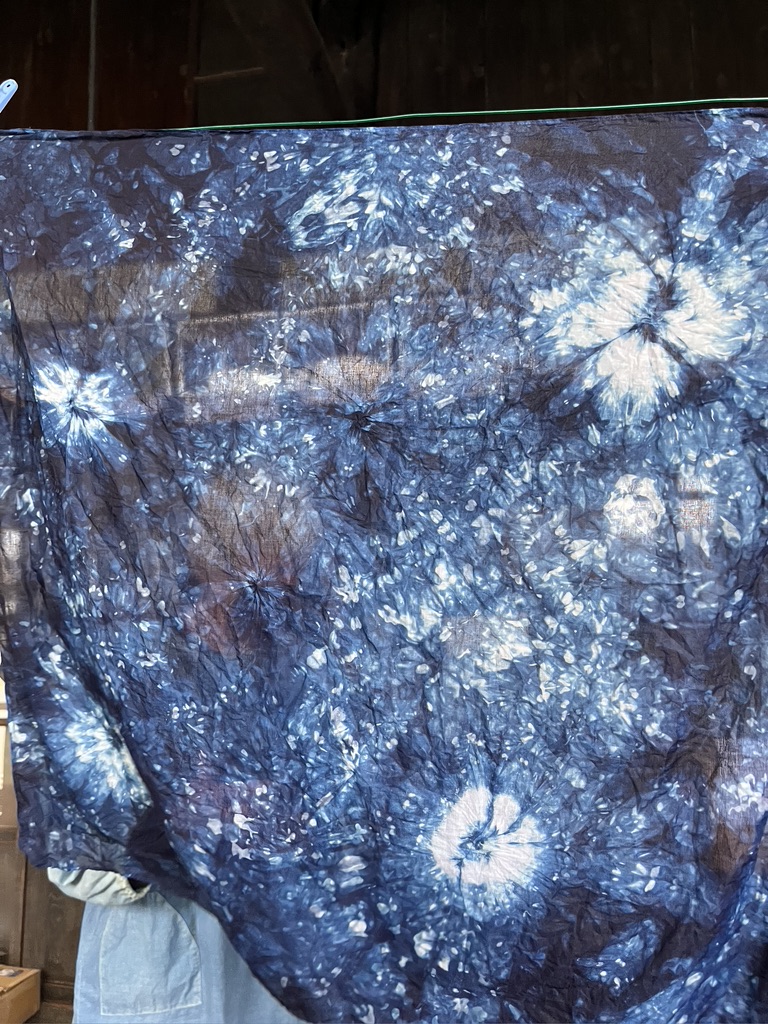
We had a few options on how we wanted to dye our scarves. I chose the technique I’ve always called sand dollars, but these dyers called it fireworks. In the past I’ve always used a chopstick or bamboo skewer to make a point in the fabric and then wrap a piece of seine twine around the skewer a number times. I then remove the skewer and use it to make another sand dollar in a different area of the fabric. In this technique we simply took our wet fabric and twisted a section with our fingers. It held in place as we did another section until we had as many twisted areas as we wanted. Then we ‘scrunched’ the whole fabric together and placed it in a wire cage. Three of us did this together and shared the wire cage.
Wet cotton scarves twisted and scrunched, then placed in a wire cage, ready for the indigo vat.
Each vat had a heavy wooden cover which was removed. The indigo was at room temperature.
While we held our pieces in the vat we tried not to move which would introduce oxygen into the vat. The cages were dipped three times, for 2 minutes each dip.
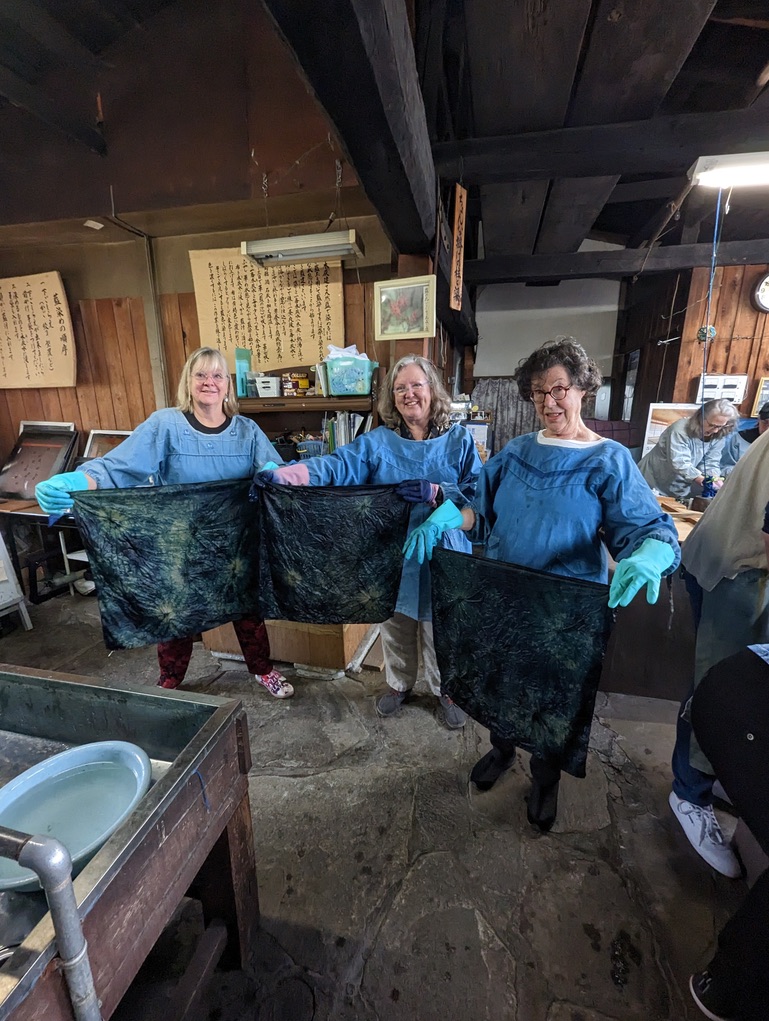
Once out of the vat, we watched the magic of our pieces turning bluer and bluer as we waved them in the air.
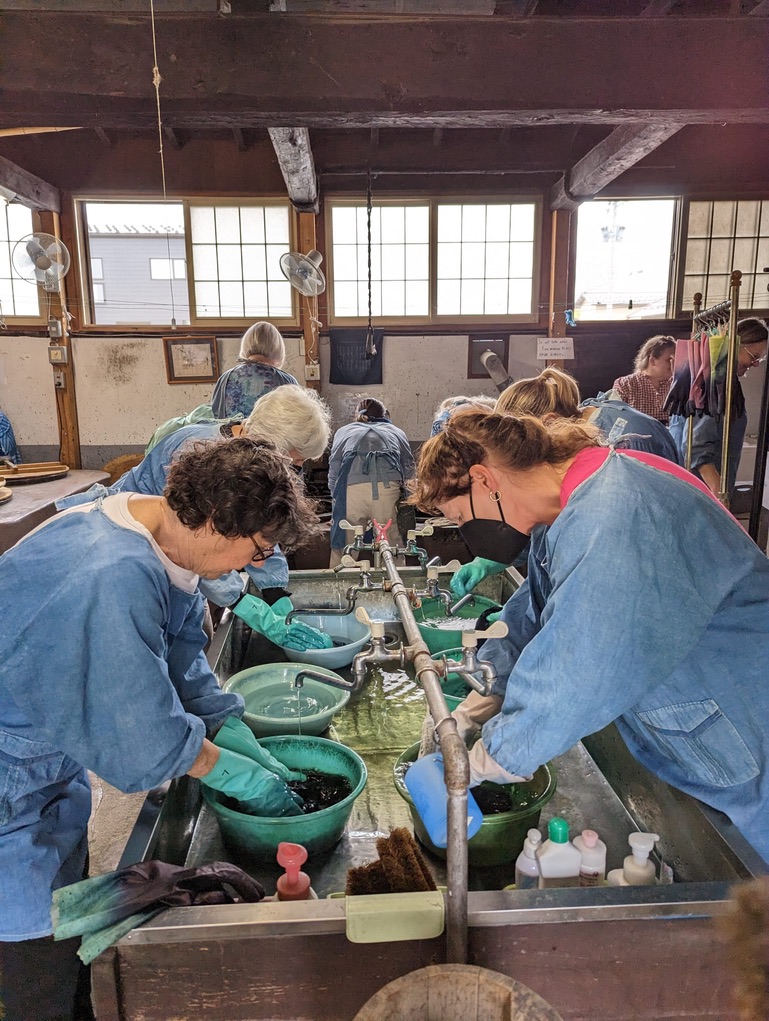
Then came the rinsing party at a clever set up with multiple sinks and drainage.
The lightweight cotton fabric dried quickly on a line in the studio. We shopped while our scarves dried. I bought a scarf and an indigo dyed skein of traditional cotton used in sashiko embroidery.
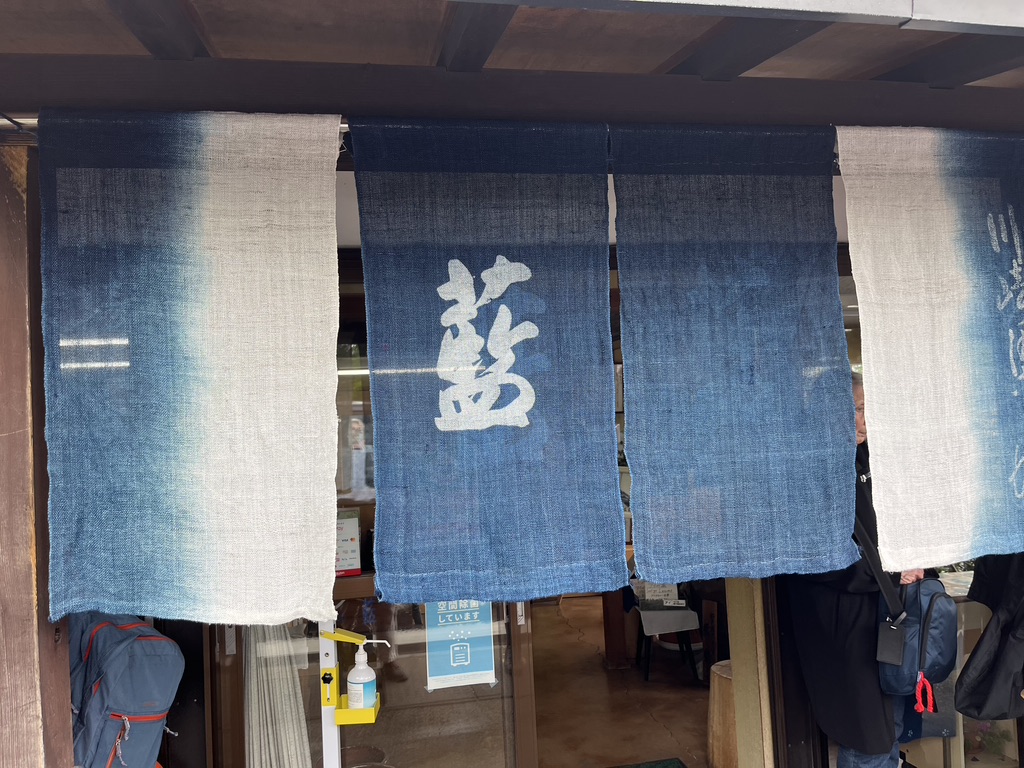
The traditional noren (curtain) at the entrance to the building.
Each of these experiences is a treasure to me. The ability to weave some small item that is a part of Japanese history, and the ability to learn the origin and uses of these traditional works, has been far beyond what I ever expected. Most of my learning has come from books or from taking a class with someone else who has learned from a primary source.
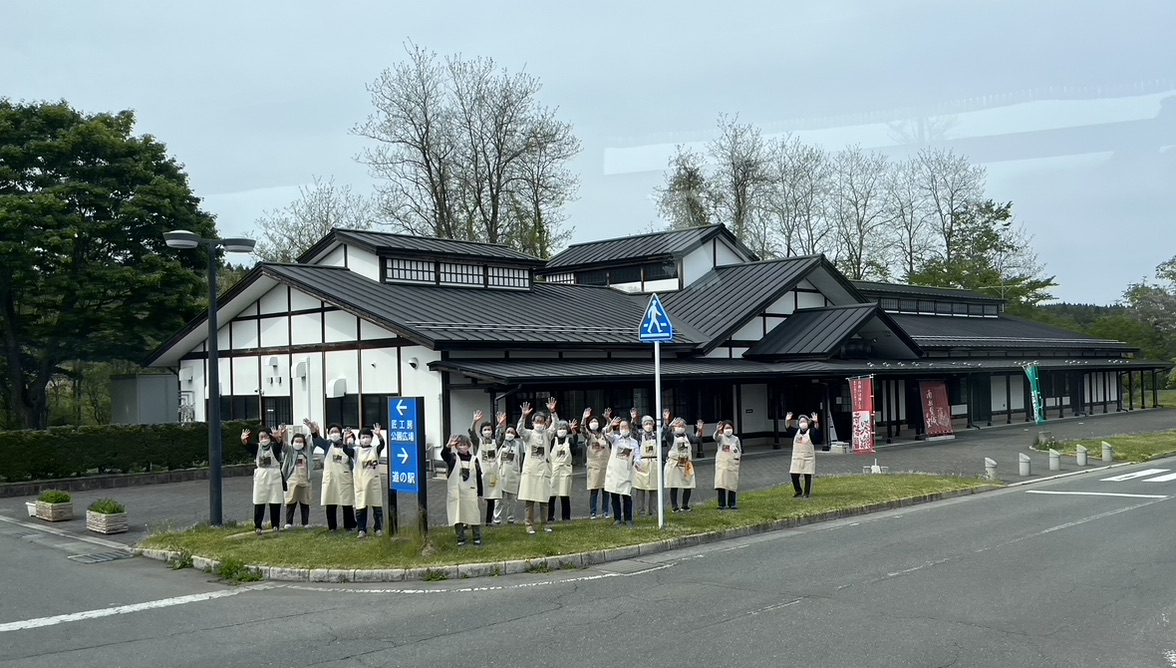
One cultural tradition from this trip that I hold dear is the act of bowing, and the way all the workers we visited came outside to bow and wave goodbye to us as we left their presence. It even happened at large hotels. The staff would come stand beside our bus and bow and wave to us as we headed off into our future. Eventually these thoughtful goodbyes brought tears to my eyes. Wouldn’t life be sweeter if we all bowed to each other in salute? This particular incident happened at the Sakiori workshop. I remember these weavers with affection, along with everyone who crossed my path on this journey.
Now that I’ve been exposed to an entirely different culture and learned a few things from primary sources, I don’t want to stop. There are so many places to see, so many techniques to learn from all over the world. In my next post I’ll focus on images of the country and the museums and shrines we visited.
Time is so fluid, sometimes so insidious. Some days time moves so slowly and those slow days pile up while I’m thinking about what I’ll do with time when…. when I get home, when spring comes, when I finish this project…
“The bad news is time flies. The good news is you’re the pilot.” Yes, but as someone else said, “Youth is wasted on the young.” I’m a much better pilot now that I’ve got so many decades under my belt, and so little time left! This was better said by Machiavelli: “The more sand has escaped from the hourglass of our life, the clearer we should see through it.” I’ve got time on my mind because of the slow winter when I kept dreaming of things I’d do when I returned home. Now I’m here and time is flying at lightning speed. How I want to slow it down.
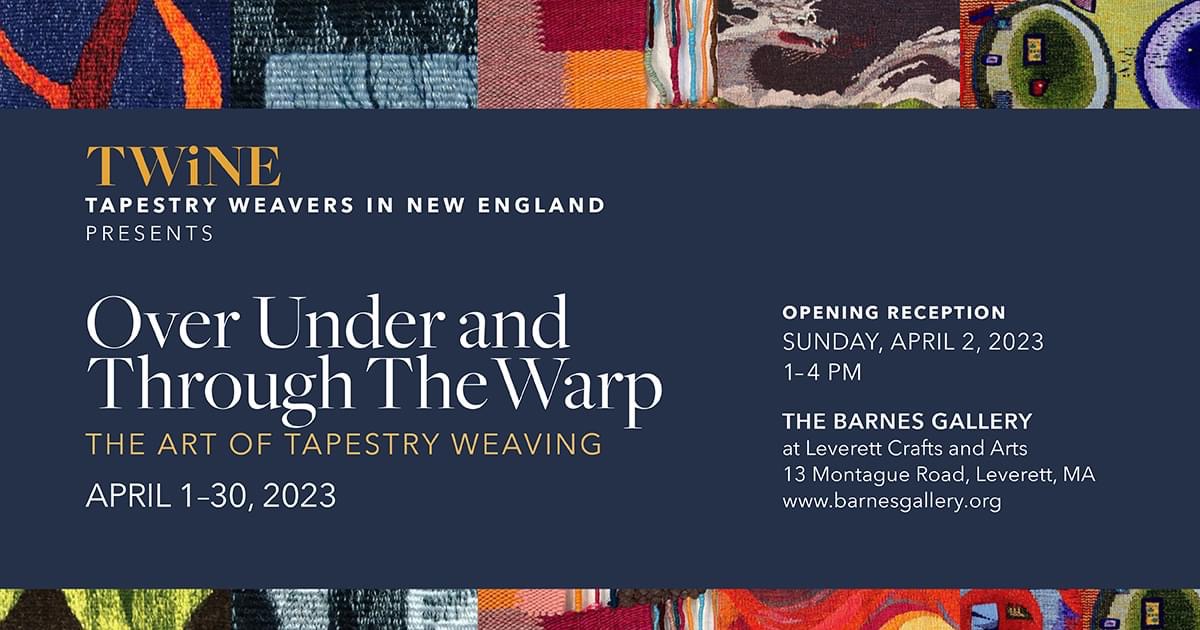
The TWiNE exhibit ends today. It has gotten a lot of traffic over the month that it has been on view at the Barnes Gallery in Leverett, Massachusetts. I gallery-sat last weekend when about 12 people visited over the afternoon.
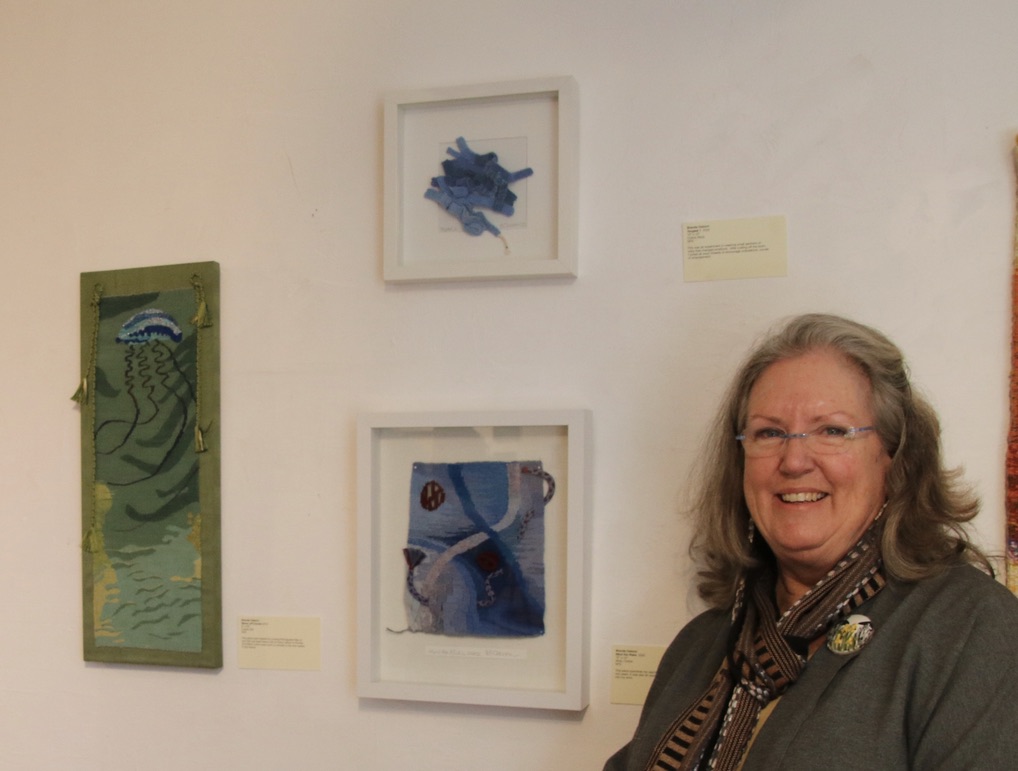
My three small pieces in this exhibit: Clockwise from Left “Blown Off Course,” “Entangled,” and “Mind the Risks.”
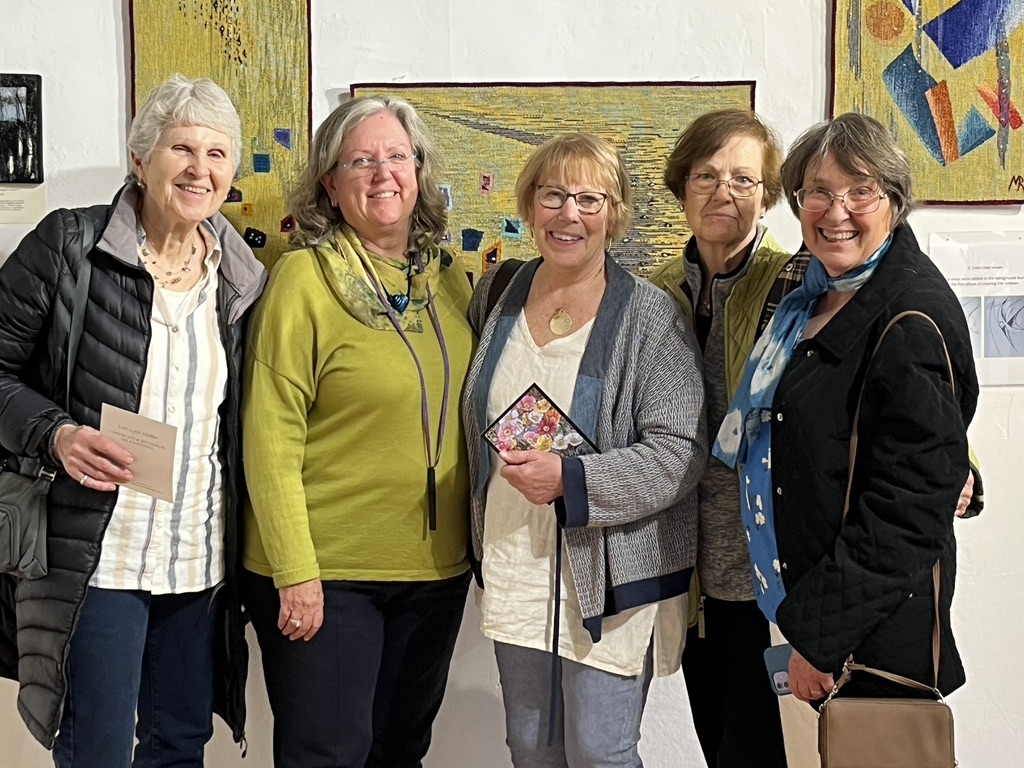
I was particularly thrilled to have some of my friends from the Connecticut guild stop by. It’s a commitment to drive to Leverett and these friends made a day of it. Lucky me that they chose the day when I’d be there. I hadn’t seen these friend since I left last fall to spend the winter living aboard Pandora. Behind us are three stunning tapestries by Minna Rothman. The photo was taken by my dearest, oldest friend who also came to visit the gallery that day. On top of the five friends, there were seven or eight other visitors. Someone did a great job promoting this exhibit!
I had planned to jump right into so many things when I returned home. High on the list is finishing the paper placemats that I left behind last fall. I had carefully retrieved the weft out of the first placemat when I inadvertently ran out of weft. I need to dye it in order to keep going, but I cannot find my indigo kit anywhere. This happens every time I reorganize things in my studio! I have no idea where it can be, and so the project sits waiting on my smaller loom.
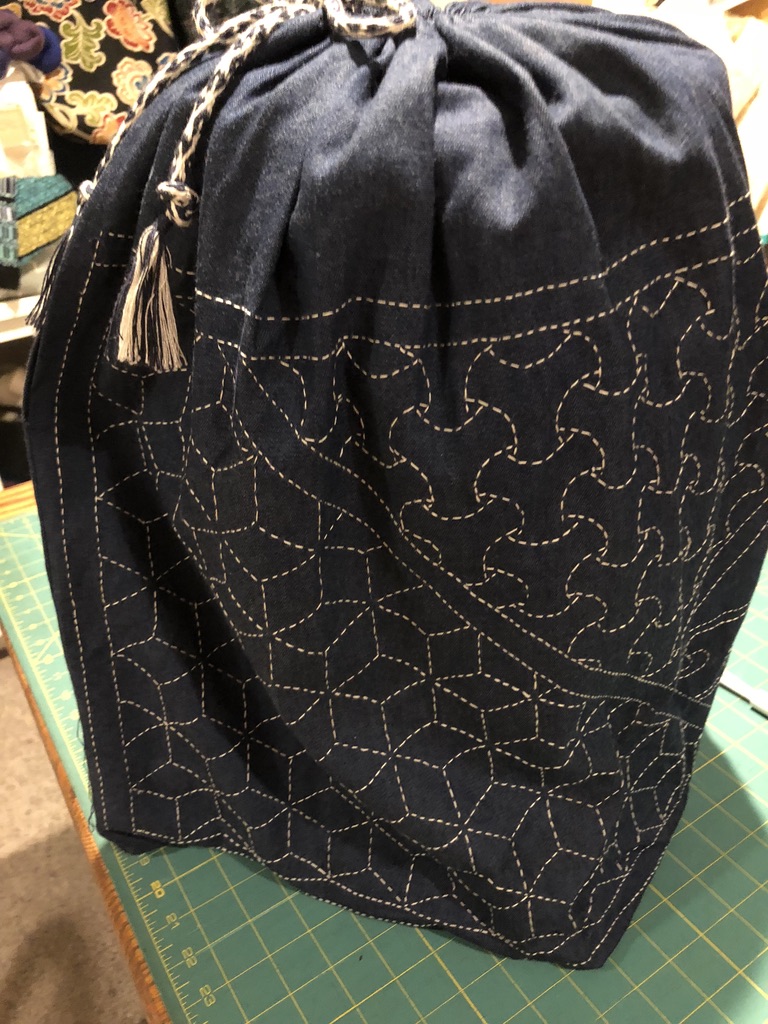
To keep busy while I forage for that indigo kit I’ve been doing some sashiko embroidery. This is a project I made more than 25 years ago, when I knew nothing about sashiko and there were no Japanese fabrics or traditional sashiko threads available. I just used some denim fabric, probably from JoAnn’s, and I have no idea where I got the thread. It is thinner than the sashiko threads I can find now, but at least this thread had a wonderful matte finish so it looks quite traditional. Somehow I found these traidtional patterns and transferred them to the fabric before I began embroidering. I have no idea how I did this or how I found about sashiko back then. I made this bag to hold my marudai, and I made a kumihimo draw string for the bag.
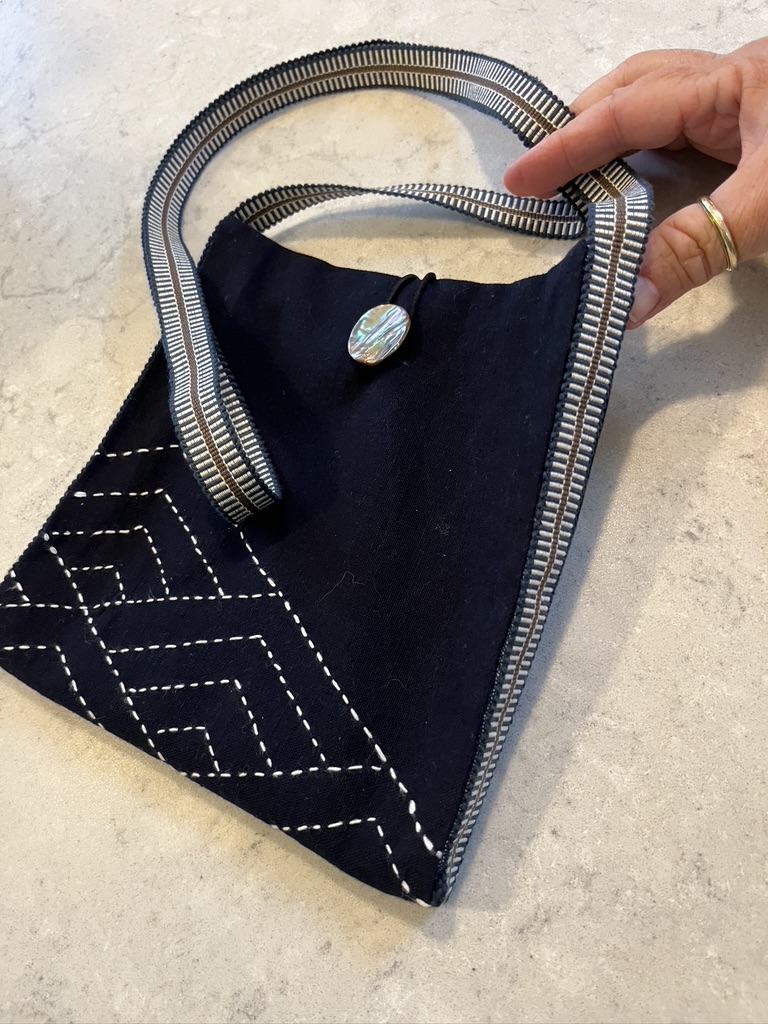
Fast forward 25+ years and I have returned to this technique. Now there are books galore on the subject and even online shops that carry kits. What a world! Last fall I took an afternoon online class through Tatter on making this small cross body bag. The teachers were two Japanese sisters from California, Marico and Toshie Chigyo. My stitches are far worse than what I did a quarter century ago. I wish I’d had the option of a cream thread rather than this blinding white. I wish I understood how to transfer the pattern to the fabric. I used a bone tool to impress the fabric, but the impression was not sharp enough for my aging eyes. One of my weaving mentors (Sr. Bianca from the Weaving Center in Tarrytown, NY) gave me this sage advice. She noted that when I did the large bag for my marudai I was a beginner who worked slowly and carefully. I should have had that attitude in returning to this technique. I am still a beginner and should have worked slowly and carefully yet again. She says it looks like I worked this piece as if I knew more than I really do! It’s so true. I also think the pattern is out of proportion to the size of the bag. I should have reduced the size of the sashiko pattern. Next time. And I will take it slowly (speaking of time!). And... I realize I can make my own flat woven braids on my taka dai for future little bags. What a thrill!
Here is a kit I bought from Snuggly Monkey. In highsight, I how know that I prefer sashiko done on indigo cloth with light thread. This kit has a printed design that will disappear when the fabric is soaked in water. It felt like cheating, but I realized I needed some practice. This seemed like an easy way to get that. I have no idea what to do with this little project. It looks like a pillow cover, but I don’t want that! I am considering making it the bib of an apron. I’ll have to back it with much sturdier fabric for an apron–maybe blue mid weight linen.
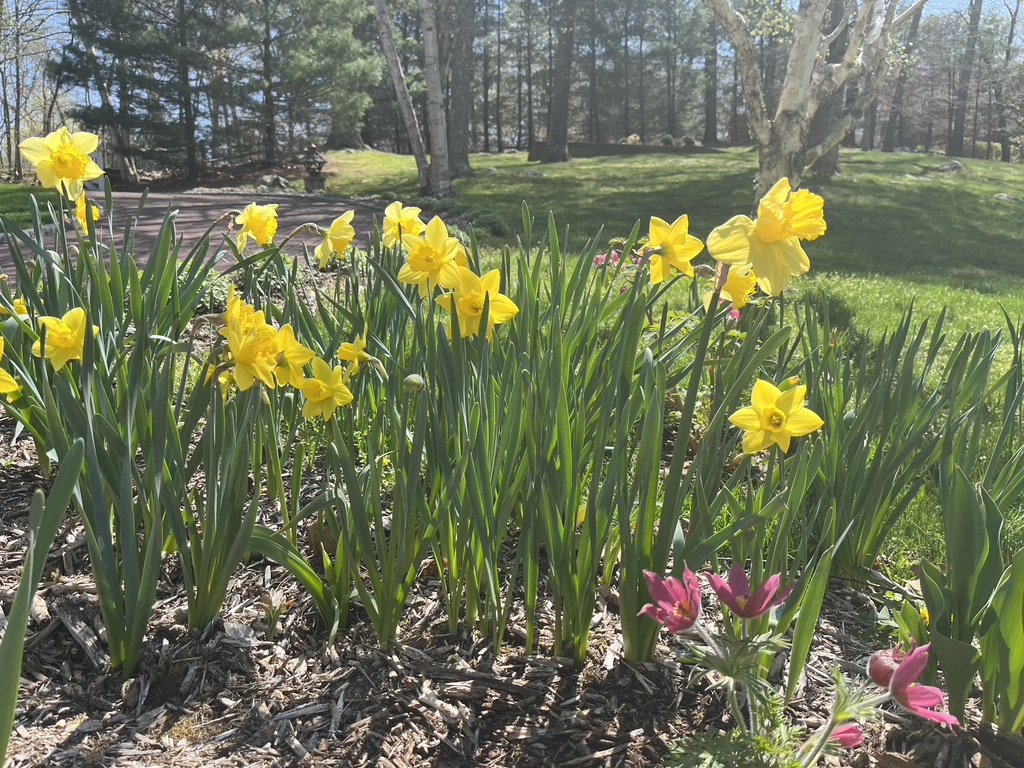
And the spring gardens are a great distraction to me right now. Spring always passes much too quickly. If only winter could be shorter to allow for a longer spring!
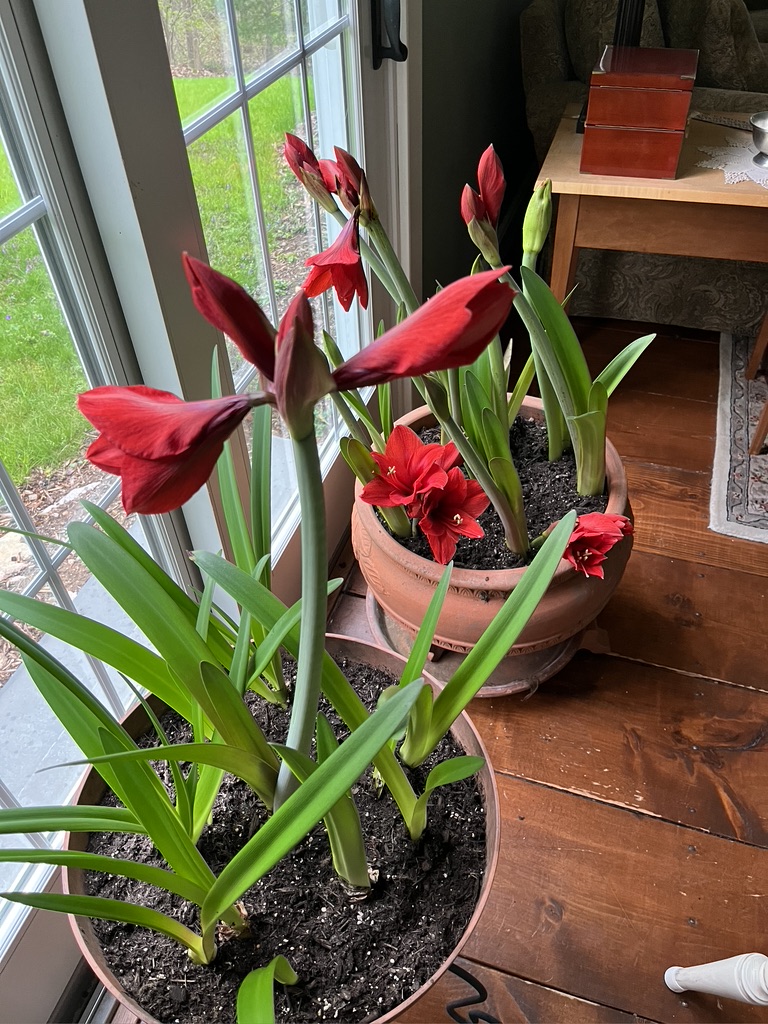
Last fall Bob repotted our collection of amaryllis into three different pots. It looks like he got all the reds together, in spite of not knowing which bulbs were red vs. all the other colors we have.
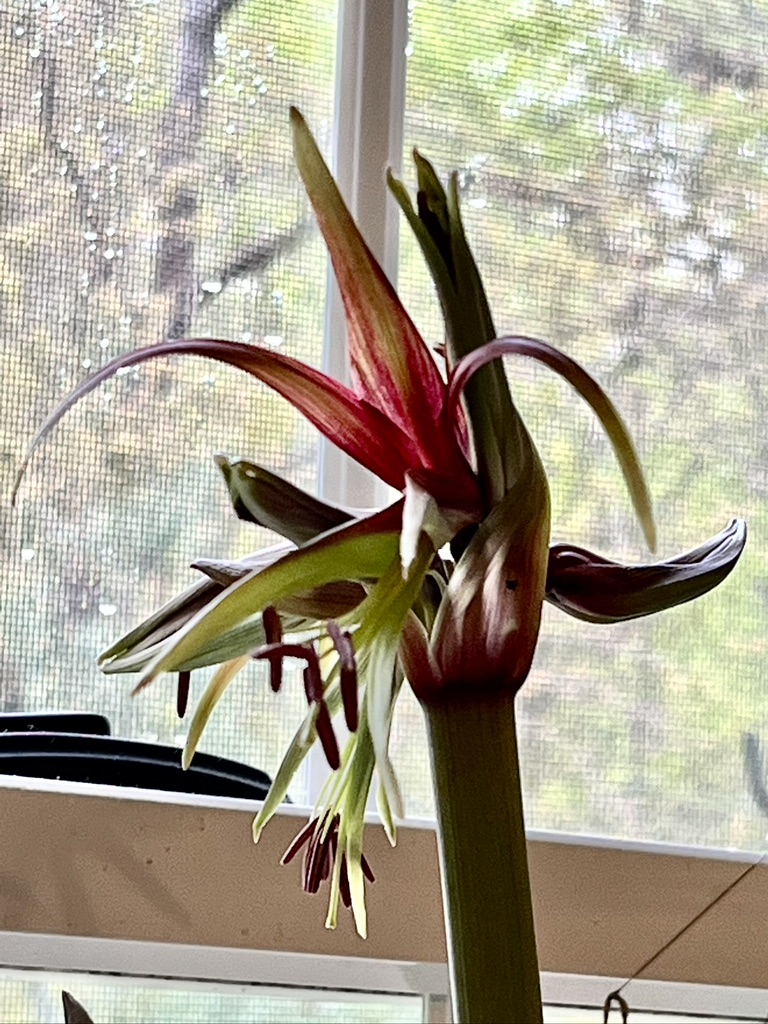
This morning my newest amaryllis bulbs are about to bloom. These are two bulbs labeled “Chico” and “Wild Amazon,” the only bulbs we have with labels. I don’t know which one this is. I love the varieties that are less hybridized and showy. These look quite exotic with flowers that are a mix of green and burgundy. Tomorrow it should be fully open.
And so time marches on…sometimes far too fast for me, and sometimes drudgingly slowly. It’s Sunday morning, and shortly I will drive back to Massachusetts to the Barnes Gallery for a business meeting of the TWiNE group and then the job of taking down the exhibit. Tuesday I leave for Japan. Yes! Japan! I’m going on a textile tour! I registered for this last November and the time has dragged on and on waiting for the the moment to leave! Now it’s just days away.
This tour is being led by Tom Knisely and Sara Bixler. Will I get a chance to tell him of my paper placemat saga? I hope so! We will be visiting a sakiori workshop, kasuri dyeworks, a workshop where kimono fabrics are woven, and various other sites. When we are not visiting textile workshops we’ll visit gardens. It’s the perfect tour for me and a weaving friend who is also a weaver and a gardener. Last week I discovered that two other good weaving friends will be on this tour! What an amazing time we will have, and especially by being together! I haven’t seen these friends since I moved to Connecticut, 11 years ago. I hope time will pass slowly during May. I want to savor every moment of it.
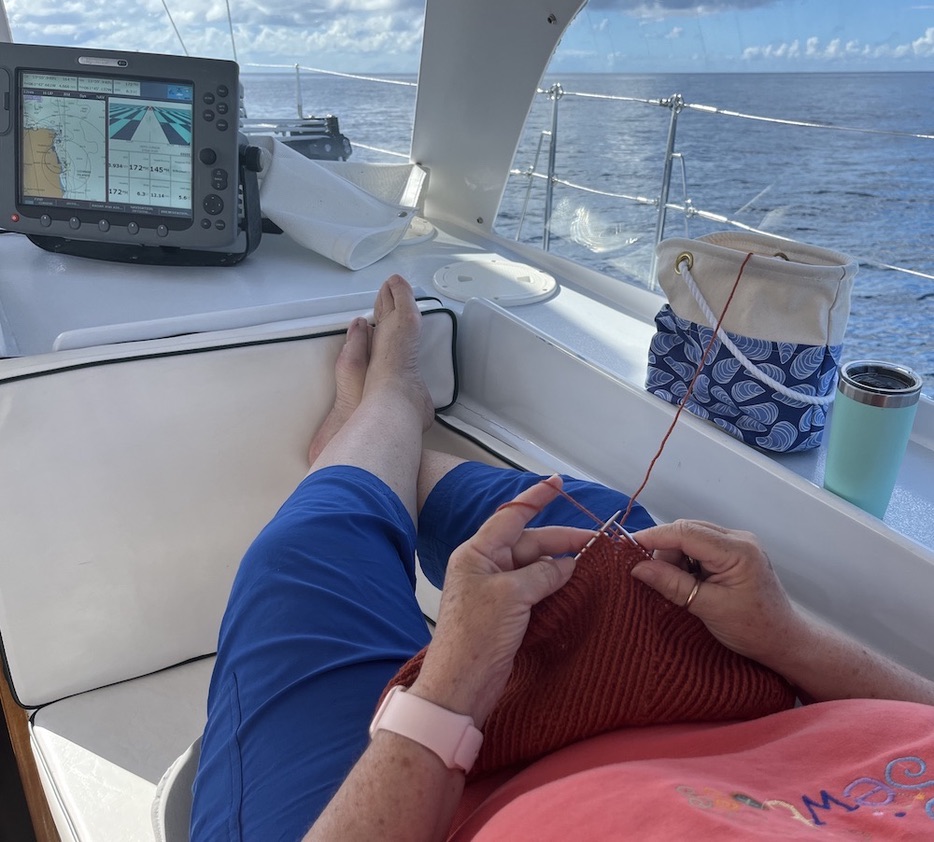
Today is the last day of March, and even in the Caribbean it is going out like a lion. Tomorrow I will start the new month (fully spring!) by flying home to New England. I’ve been counting down the days for the entire month of March. I’m now at that final number: one day to departure.
Twice a year my life takes a sharp turn from living in a house surrounded by my looms, my spinning wheels, my taka dai, my dyepots, while surrounded by good friends and family, to living on a boat with very little space, no looms aside from a copper pipe loom, a newly acquired tiny e-spinner, knitting and embroidery, and a few friends that are not often in the same anchorage I am. I take stock. Each year in winter I take stock of the things that consumed my time at home, and now at the beginning of spring I take stock of what I managed to accomplished while living on a boat. It’s my semi-annual retrospective of my goals and my priorities.
Meanwhile, the first things I’ll do on my return are thrilling events I’ve been thinking about all winter. Tomorrow my guild’s biennial exhibition will open. I won’t be there, and I don’t have anything in that show, but I am looking forward to seeing all the works when I visit early in the coming week. I will meet my oldest friend there. For several years she had a sculpture studio at this location, the Farmington Valley Arts Center. It feels like a different lifetime when I used to visit her there. I would drive from NJ, where I lived at the time. She had a son, and I had two sons, so getting together was a rather complicated endeavor at that time in our lives, but it was important to both of us to spend time together. I expect we will reminisce about that other life we had decades ago while also seeing the works of many of my dear weaving friends.
The postcard for the Handweavers’ Guild of Connecticut biennial exhibition
On April 2nd, the day after I return home, I’ll drive up to Leverett, Massachusetts, to see an exhibit of tapestries by the Tapestry Weavers in New England (TWiNE) that will be on display for the month of April. I’m excited that less than 24 hours after getting home I’ll be reconnecting with good friends at this event! Due to the generosity of one of my friends, who offered to hold my pieces for the entire winter, I have three pieces in this show.
Looking back is always a bittersweet endeavor, and I don’t think I’m alone in feeling that. When I left home in December I had one more placemat to weave on my Japanese paper weft project. The biggest hurdle about that is the weft for that last placemat had to be unwoven from a previous previous placemat that was not the color I wanted. I will take that weft and re-dye in an indigo vat that I need to make. I am excited and intimidated about dyeing the re-used paper yarn to get the color of blue I want.
Neither my Caribbean tapestry or this sweater got finished this winter, but they both made progress. That’s all I can say, and I must make peace with progress instead of completion. As this sweater grew it got hotter and hotter to hold it in my lap while knitting, which is the main reason I set it aside.
When it became clear that I would not finish my Caribbean tapestry or the sweater above, I dug out an embroidery I started more than a year ago. I bought this design because of the sheep, no surprise! And that’s all I had finished when I put it away. I have enjoyed the few days that I spent embroidering the poinsettias and snowflakes. Wouldn’t it be nice to have it finished for the holidays at the end of this year? Not holding my breath.
In an effort to look on the bright side of my not-finished Caribbean tapestry, I plan to take it to the TWiNE show on April 22, to demonstrate weaving while I sit the gallery on that date. I’m glad I found a bright side to this disappointment.
The only thing I actually finished this winter was the hot water bottle cover I made from Kate Davies recent design group called “All Over,” a collection of stranded knitted designs. I think there will be some chilly nights at home ahead when I can use it! (Also I finished spinning about 100 grams of merino/silk hand dyed fiber…but I’m not counting that because finishing a spinning project is only the beginning of whatever project the yarn is meant to become!)
Along the way of making projects and fulfilling (or not fulfilling) goals, there were plenty of wonderful distractions, like knitting underway while listening to an audio book, which was only calm enough to do one time, when we sailed down the western coast of Guadeloupe.
Drying laundry while Bob writes a blogpost.
Lunch with friends overlooking one of the pitons in St. Lucia.
So many tropical flowers and animals
Months of beautiful views
And one of my favorite visuals: windows and shutters
Look at the view out the window at the back of the room with the open doors.
This is the kitchen at Fort Napolean on Terre de Haute, Les Saintes–another great room with a stunning window and the stark reality of getting water in the 19th century fort.
And speaking of kitchens, I often enjoyed making dinners onboard. I made a version of Isabella’s quiche (from La Brasserie in English Harbour, Antigua). It’s pretty close to hers–incredibly deep and creamy.
I was overjoyed to find mushrooms–all the way from France!–in Fort de France, Martinique. That called for chicken supremes in mustard/cream sauce with mushrooms. It was a good evening!
It was a winter full of lemons and limes. Everything is better with a little lemon or lime, and fresh herbs which grow in abundance here.
In the balance of things accomplished and things experienced, I guess there was a healthy dose of each. I would have loved more time to work with my hands and experiment with some ideas that are burning a hole in my brain! —but— it’s hard to give up the amazing experiences that kept me from working. The weather did not cooperate much this year. There was too much wind which made travel difficult and working at anchor very difficult. I live on motion sick meds every time we sail to a new location, and that takes a day or so to get out of my system. I am not patient waiting to feel better. On the bright side I listened to some wonderful books. At the top of that list would be Elizabeth Strout’s My Name is Lucy Barton.
In retrospect I wish I had more work to show for my time here, and less days feeling the drag of mal de mer. But on the bright side, and thank heaven there is always a bright side, I am filled with ideas to pursue at home and some great memories of time spent with sailing friends and Bob.
It’s been a challenging couple of weeks in this part of the Caribbean, with lots of wind and lots of rocking and rolling. I have not been able to weave or knit, and sometimes not even able to read! Luckily I have a long queue of audio books that I often neglect. I was able to close my eyes and listen to a relatively new book, Stolen, recently published in English. It’s written by Swedish author Ann-Helen Staestadius and translated into English by Rachel Wilson Broyles. When I went to find the link I saw that it will soon be a Netflix film. It was good on a number of levels and it helped me pass the time. I am not a patient person when it comes to waiting out bad weather in order to get some work done! Basically, I am not patient when waiting for anything! It’s odd because whenever I demonstrate any kind of fiber work, people always say that they’d never have the patience to do any of that. Well, there are plenty of things I have no patience for doing! Waiting is just one of them!
My mood has gotten darker as each day passed with no way to work on any of the projects I brought onboard this year. Poor Bob. For two days, in Ste. Pierre, the rolling was so violent that we had to lock our cabinets and drawers so that the things inside, bashing against the cabinets doors in one direction, then bashing against the hull, and back again, would not come flying out of the cabinets. We’ve had that happen on passage in the past. One of our drawers once came flying out of its cabinet in the galley, sending forks and spoons and knives flying. We had not noticed that drawer when locking down everything before a passage. These are things we prepare for when we are sailing. This is the first time we’ve had to batten down our cabinets while at anchor.
But, on the bright side, we’ve had some beautiful sunsets. In the Caribbean it’s a tradition to blow your conch shell right after the sun falls below the horizon. Don’t have one? That’s a priority when you spend time in this part of the world. Bob got his during our first winter in the Bahamas. It’s nice tenor conch. Smaller conchs have higher pitches; bigger conchs have a lower pitch.
Since color on different monitors is so varied, I wonder if the green flash will look green on other devices than my own! I hope some of you will weigh in on what you see.
Back in Dominica, we took a tour of parts of the island with our friends from sailing vessels Kalunamoo and Roxy. It was an interesting day. I have always enjoyed taking photos of loved ones taking photos, as you may have noticed over the years. Here is Lynn from Roxy taking a photo in the foreground, as I took the same photo. Maureen and Bill from Kalunamoo are in the front, followed by Bob and Mark (from Roxy.) We’ve been cruising friends for more than a decade at this point.
This is the coast line we visited on the Atlantic side of Dominica.
The hard, smooth coastline here is hardened clay.
There is a rather interesting stairway carved into the rock. I can’t imagine it’s natural, but what do I know? Not much! Mark could not resist climbing down these steps. I was holding my breath too tightly to take a photo, and he got back up safely.
After Dominica we sailed to Ste. Pierre, and somehow managed to spend two nights there, which is where we had the worst rolling we’ve ever experienced. We decided to escape to Fort de France for the beginning of Carnival, but the anchorage was too crowded for us, and it was pretty roll-y there as well. We tried to anchor six times, and in the process bent our stainless steel spade anchor. That will cost a pretty penny to replace, and until we get to Le Marin to do that we have to be pretty careful about anchoring. So, we headed across the bay to Trois Islet. It’s been windy, but the three islands and shallow waters have lowered the waves to a chop. This is the village of Trois Islet–quite charming. This is the Saturday open air market in village square.
When Bob writes his next post there will be some stunning photos of the Martinique Yolo regatta which took place here in Trois Islet, as well as great photos of Carnival in Fort de France. We took the ferry there for Sunday’s festivities. Today is the last day of Carnival, but I’m happy to stay aboard. Our friends from Kalunamoo and Roxy have gone to see the last day’s parade.
And on Pandora, small things are happening. Our little unidentified succulent plant is making babies on the edges of its leaves. Can you see them on one of the inner leaves, to the right of center? Quite fascinating!
And here is my almost non-existent progress on my “Amphora” sweater from Purl Soho. It’s only grown about 3″ in length on the body, below the sleeve stitches that are waiting on spare needles. Slow and steady….can you see the swirls that create the increasing shape of the yoke? That’s what drew me to knit this design! You might have to ‘bigify’ this image to see the swirls.
When we get to Ste. Anne, the harbor should be reliably calm. Fingers crossed. In the meantime, we may stop at Anse d’Arlet for a night or two. I hope it will be calmer than where we’ve been the past two weeks.
News from home: the wonderful volunteers in TWiNE (Tapestry Weavers in New England) have been hard at work toward an exhibition of members’ works that will open on April 1, the day I fly home. I hope to get there shortly after the opening! If you’re in the area around Leverett, Massachusetts, I hope you will visit this exhibit.
So…although there hasn’t been a lot work accomplished here over the past weeks, there have been quite a few good scenes. Hopefully there can both from now on into March.
Gallery Exhibit at NEWS Conference, July 20-23, 2023. First place “Miscellaneous” for a Nantucket style basket, with 2 special awards for “Best use of Historical Inspiration and Best Use of Off-Loom Weaving.
OVER, UNDER, AND THROUGH THE WARP: The Art of Tapestry Weaving, April 1-30, 2023, The Barnes Gallery, Leverett, MA. www.barnesgallery.org. An exhibition of works by Tapestry Weavers in New England (TWiNE). My works “Entangled 1,” “Untitled 1,” and “Mind the Risks” are in this exhibition.
TINY BUT MIGHTY Unjuried, small format tapestry exhibit, hosted by American Tapestry Alliance at HGA Convergence, July, 2022 Knoxville, TN
INTERLACEMENTS: Artistic Expressions in Weaving. Juried Biennial Exhibit of the Handweavers’ Guild of CT. River Street Gallery, 72 Blatchley Ave., New Haven, CT.
March 30 – May 5, 2019. Awards: 1st Place Wall Hangings, HGA Award for Outstanding Fiber Art.
CROSS SECTIONS: Works in Fiber by the members of North Adams Fiber Artists. Sept. 7 – Oct. 8, 2018.
Opening reception, Friday, Sept. 7, 5pm – 8pm. Gallery hours: Fridays, Saturdays, Sundays, 12pm – 5pm.
A CELEBRATION OF FIBER ARTS: Arts Center East, Vernon, Ct, October 11th — November 7th. Opening reception Oct. 11th from 2-4pm. Gallery is open Thurs–Sunday from 1-5pm. “Sunset on Wilson Cove” and “Hudson River Idyll” are both there for this exhibition.
AWARDS FROM NEW ENGLAND WEAVERS’ SEMINAR: for “Sunset on Wilson Cove”: 1st Place Tapestry and Transparency, Judges’ Choice, People’s Choice, Textile Arts Center “Best in Tapestry,” Rebecca Dea Award for First Time Entrant. NEWS 2015.
NEW ENGLAND WEAVERS’ SEMINAR: gallery exhibition, Smith College, Northampton, MA. July 9 – 12, 2015.
“THE WEDNESDAY GROUP” at Garnerville Arts Center, Garnerville, NY. May 30 – June 4,2015.
“CONTEMPORARY HANDWOVEN TREASURES,” 2015 Biennial Exhibiton of Conneticut Guild of Handweavers, Lyman Allen Museum of Art, New London, Ct; April 4 – 26.
www.lymanallyn.org
“POSTCARDS FROM HOME,” Invitational Gallery Exhibition of small tapestries by artists in Scotland, Ireland, Denmark, Australia, and New England. Northlight Gallery, Stromness, Orkney Island, Scotland. March 25 – April 25.
August 2015, Torshavn School, Faroe Island, Scotland.
“A LIVELY EXPERIMENT,” Gallery Exhibition of the Handweavers Guild of America (juried), Rhode Island Convention Center, Providence, RI. July 16 – 19, 2014.
“SMALL FORMAT TAPESTRY: Untitled/Unjuried,” sponsored by American Tapestry Alliance at HGA, Convergence, University of Rhode Island Feinstein Campus Gallery, Providence, RI. July 16 – 19, 2014.