
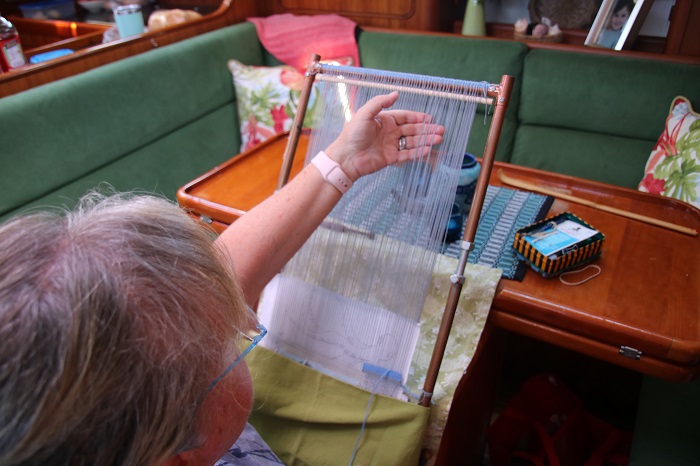
I’ve written this short tutorial for a friend who would like to start weaving, although we are far apart at the moment and not able to visit during these strange times of the Covid-19 pandemic. At the moment I am living on a boat, far from home, so I do not have access to the loom or the materials that I’d use to do this. Since I do not have access to my studio, I am using a loom that already has a project in progress on it. I’ve covered the work in progress so it will be less distracting, but there is a bit of my cartoon showing in the photos I’ve taken. Try to ignore it! Also the warp is fairly fine at 12 ends per inch. At home I have a sample loom set at 4 ends per inch which makes the techniques far easier to see.
Hopefully when I return home, I will replace these photos with new ones taken of my sample loom with the big, fat warp at 4 epi! I hope my friend finds this useful, and I hope you do too!
Winding a Bobbin: In order to begin weaving, you need to fill a bobbin with weft yarn. There is a left/right orientation to doing to this, and in the photos below I am showing it being done for left-handers since I am one myself, as is my friend.
Although the photos show winding a bobbin for a left-hander, the description is written for either handedness. With the bobbin in your dominant hand, you want to turn that hand in an outward motion so that you do not cause any wrist strain. Start with the bitter end of the yarn parallel to the bobbin’s neck, with the rest of yarn facing upwards over the top of the bobbin.

Make a wrap or two with the yarn in the direction that will allow your dominant hand to turn outward. Then wind the rest of the yarn onto the bobbin by turning your dominant outward over and over again, while your non-dominant hand guides the placement of the yarn.
Doing this allows the yarn to wind on with no extra twist. Winding bobbin with a left or right orientation allows the yarn to spool off the bobbin properly for your handedness.
Some people have hand and wrist injuries that may make this procedure uncomfortable. If so, you can use your non-dominant hand to wind the yarn on the bobbin in a ‘round and round’ motion. This does put some added twist into the weft yarn, but saves any discomfort.
How to hold the bobbin for weaving: Always hold the bobbin in your dominant hand, no matter which direction you are weaving. Making the effort to master this will enable you to weave consistently and to weave faster in the long run. In the beginning one direction will be easier than the other. Although I am not the type of teacher who gives ultimatums, I will tell you that I never break this rule myself.
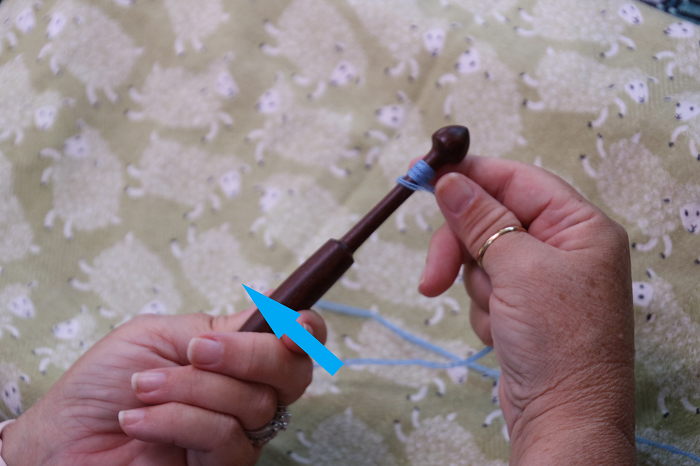
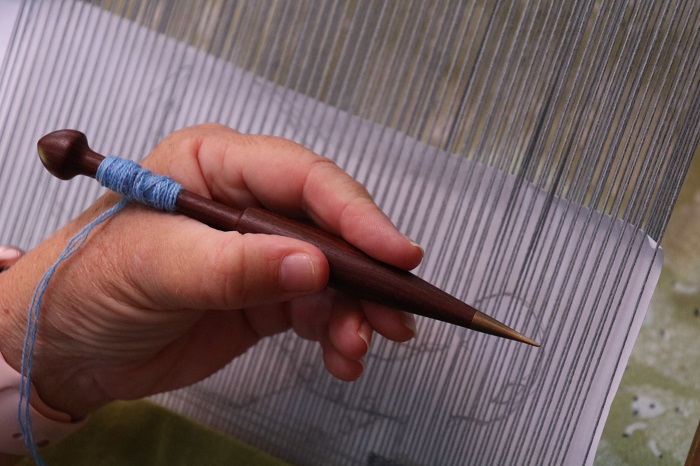
Hold the bobbin in a similar manner that you would hold a knife: with your index finger extended down the shaft of the bobbin and your thumb nearby, as shown. The rest of your fingers curl around the bobbin for support. In this position you can beat in your weft using a motion that comes from your arm.
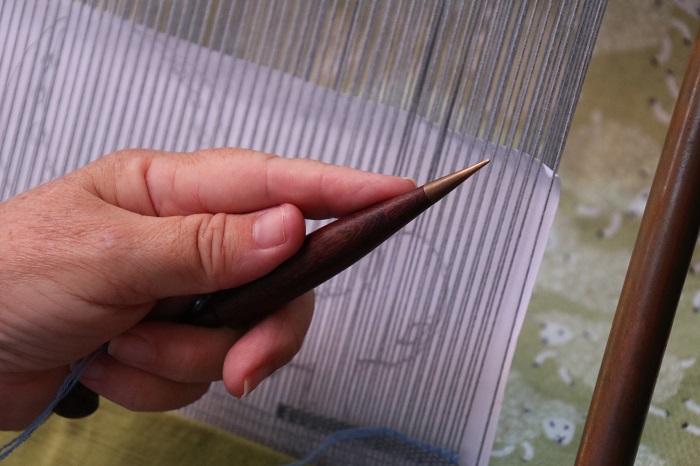
I’ve seen students hold the bobbin as they would hold a pen or a pencil. When you use the bobbin to beat in the weft in this position it is far less effective. It is a weak way to beat in the weft. Do not hold the bobbin this way!
You will pick up weft threads with your non-dominant hand and use your dominant hand to pass the bobbin through the shed you have created, putting the head of the bobbin in first. Keep the bobbin in your dominant hand as it exits the shed.
–Do not make a bubble of weft! Meaning: do not make a curve of weft before beating. Leave the unwoven weft rising up from the fell of the cloth at about a 30-degree angle. Holding that weft with your non-dominant hand, beat the weft in place with the point of the bobbin (in your dominant hand), while adjusting the amount of weft in the shed as you beat toward the last warp thread in your shed.
–In one direction of weaving you will be picking your shed in the direction you are weaving, and this will feel logical and normal. Going the other direction you will have to pick the shed in the opposite direction of your weaving. It may seem awkward at first, but with practice it will start to feel as normal as the other direction feels. Keeping the bobbin in your dominant hand will make for more consistent tension and better-looking weaving. The hand that is picking the shed will quickly learn to go in both directions. Trust me on this!
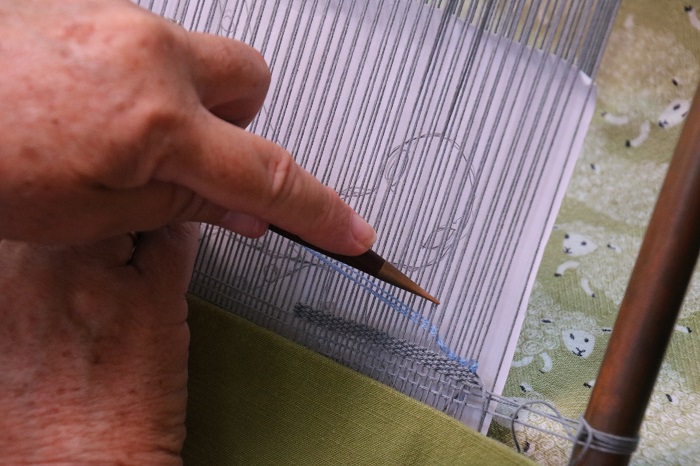
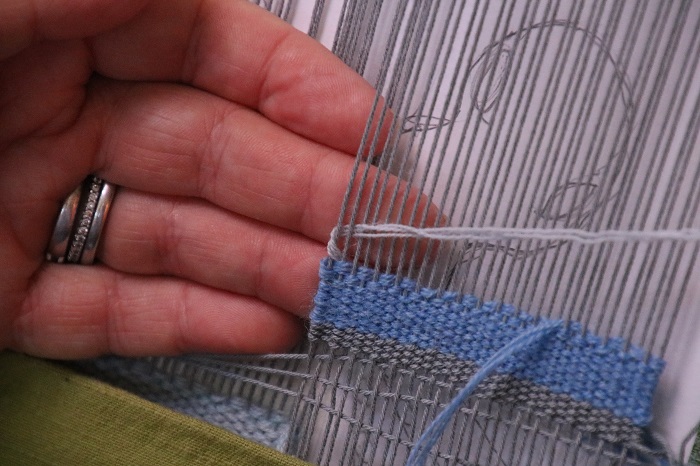
Begin Weaving: Based on the loom you are weaving, you will have some kind of foundation weaving before starting your woven design. On the copper pipe loom I am using I have a scaffolding of warp yarn going across the warp as well as a section of foundation weaving using warp thread as weft. It looks a bit disheveled because I have just added it to a project that is already underway. For a real project I would also have added a row of double knotted soumak in thread before starting the weaving for my project. These are procedures for warping a copper pipe loom, which needs its own tutorial. To start weaving you need to put a half hitch of weft around the first warp thread of the area you plan to weave.
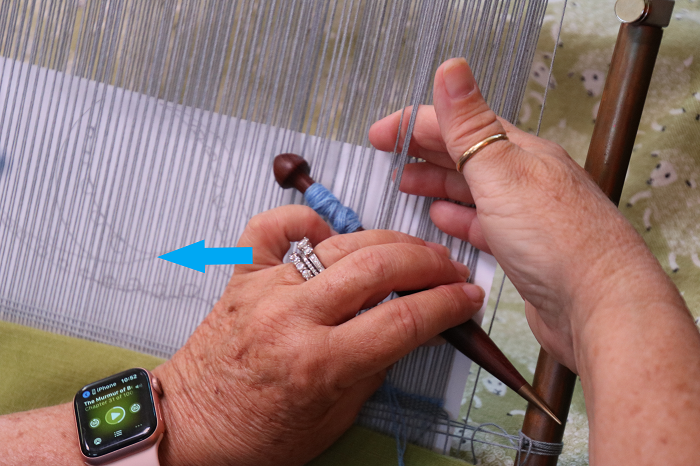
In the photo below I am pointing to the selvedge where I will begin weaving. The two outer warp threads show a high and low. The edge thread is a low, which means it is not covered by the foundation weaving. The second thread in is a high; it is covered with weft of the foundations weaving.
The bitter end of the half hitch always goes under the weaving that will commence. It will lie between the fell of your foundation and the first row of weft. Later when you hitch off in order to start a new bobbin of yarn, that bitter end of yarn will also lie between the fell of your woven cloth and half hitch you are making. In this way, the half hitch will always be well secured by the weft rows that pile up on top of it as you weave.
I have placed the bitter end of my weft between the first two warp threads. To begin weaving I will bring the bobbin around the outermost thread as well as behind the second warp thread which needs to be a low. In other words, I will pick up both the edge threads and put the bobbin behind both of them. That will give me a covered edge thread and uncovered second thread, which matches what I need to weave to continue the plain weave I established in the foundation weaving. After picking these two thread together, I can continue across the row picking every other thread, as normal.
–During weaving you will only pick 1” or less of warp threads. If you pick more than an inch of warp you are likely to have tension problems, especially as a beginning weaver. Your practice warp is set at 8 ends per inch. To pick a 1” section of warp you will only pick up 4 warp threads at a time, pass the bobbin and beat, then pick up no more than 4 more warp threads. Repeat. This is the other ‘rule’ that I never break.
–Selvedges are a little fussy. In reality you need to have slightly more tension as you turn the weft around the last warp thread. This may not be a noticeable difference that you can observe, but eventually you will feel it. Too much additional tension will pull in your selvedges and the weaving will get distorted at the edges. Too loose tension at the selvedge will cause some bumps and bagginess. This is true of the shapes you’ll make in weaving. Small shapes need a bit tighter tension than large shapes. Getting your tension just right takes practice, practice, practice!
–While weaving, it helps to pay attention to the space between your warp threads. If a section of warp is getting closer than the original sett you will begin to have trouble packing in the weft. That area of weaving will start to rise higher than the rest of your weaving. When it gets too tight you will begin to see warp threads through the weaving. This is called ‘lice’ because it looks like little white spots. (I guess medieval weavers immediately thought of lice, rather than some other small white dotted thing, like snow flakes or grains of salt.) In normal weft faced cloth, the most recent pass will have some warp showing because there is not yet enough weft to cover the warp. After two or three passes of weft the warp should be completely covered, and there should be distinct weft beads covering each warp.
–There are simple solutions to warp space problems, especially if you catch the problem early on before you start to get warp spots showing. Try using your bobbin to strum across the warp before continuing to weave. In the next few picks of weaving use the tip of your bobbin to go a bit deeper into the warp as you beat in the weft. The tapered tip of your bobbin will spread the warp a bit if you put the tip in deeper than you’ve done in previous passes. If you need a bit more adjustment, you can take both hands and pull on that section of warp threads. You’ll be pulling horizontally across the warp, each hand pulling outwards to pull the warp threads apart slightly. Continue weaving paying close attention to the area that got too tight.
–The warp in my photos is sett at 12 epi and the section I am weaving a section 3″ wide. At this sett, that is a bit wider than I would normally weave with one bobbin. I would weave this space with two bobbins of the same color weft. To weave with multiple bobbins in any given row you must weave each section of the row in opposite directions. That is called weaving in opposing sheds.
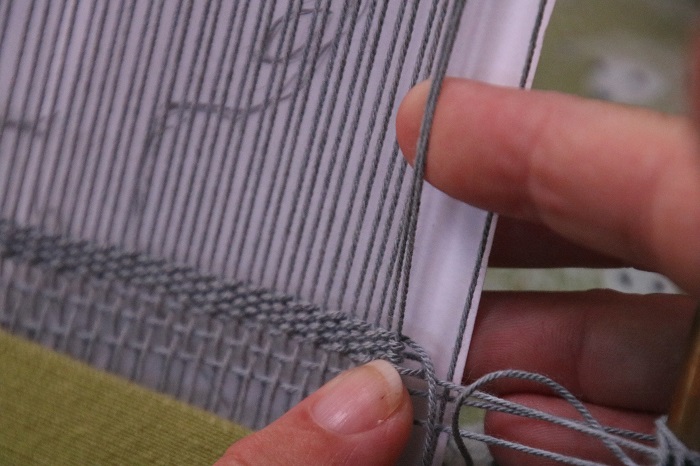
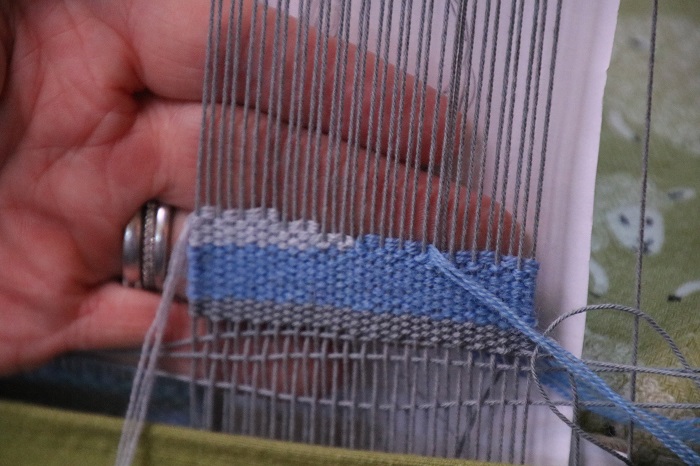
My initial weaving was done in the open shed with the bobbin going right to left. Your loom may not have an open and closed shed, but you can check which shed you used to weave with the first bobbin. You need to go in the opposite direction with the second bobbin in that same shed.
I am holding the open shed in this photo, and it matches the weaving in the shed that goes from right to left. Therefore, to start a second bobbin, I need to weave left to right in the open shed in order to be going in the opposite direction. To do that I will start my 2nd bobbin on the left side of my warp and weave in the open shed toward the right.
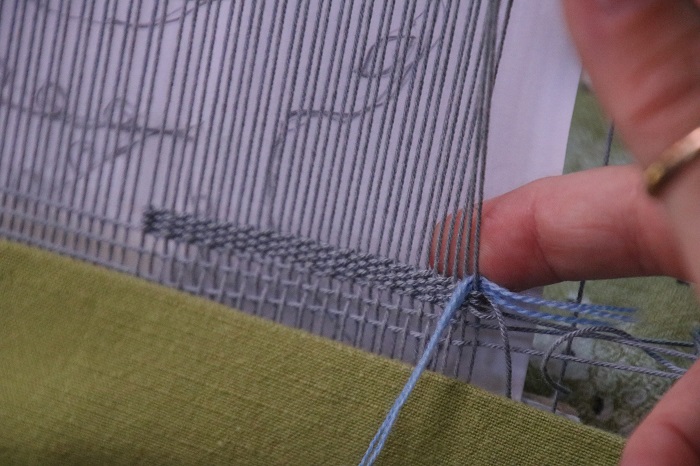
I will demonstrate this now using a different color of yarn to make a small angled shape. As you can see the final warp thread needs to be covered since in the shed below it was an uncovered warp (a low). To hitch on, I put the bitter end of the weft between the first and second warp thread to the back. I then picked up both the first and second warp thread and placed the weft behind both threads. This allowed the first warp to be covered (a high) and the second warp to be uncovered (a low). Also the hitch lies between the previous row of weaving and the new row which will secure it in place. Now I can weave across the row picking every other thread, as normal.
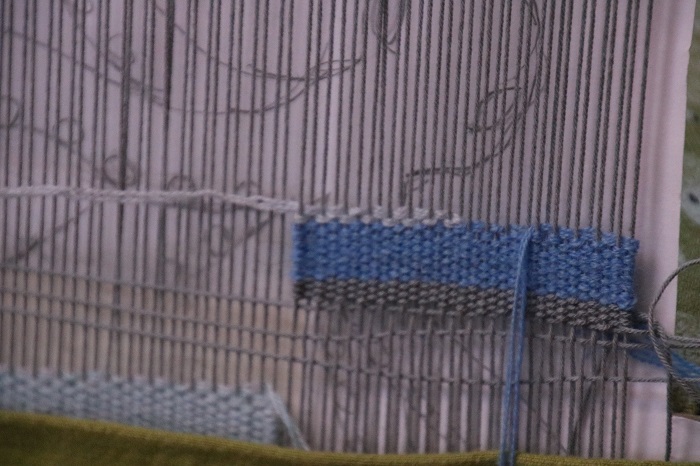
If you notice I have worked the second bobbin to place where I wanted to turn to make a new shape. When I turned the weft to complete the pass, the warp thread where I turned is covered, which is called a ‘high.’ You may need to open this image in a new tab and enlarge it to see that I turned on a high, or covered the first warp of the new row. When I weave the first color to meet it I should turn on a low, which will be an uncovered warp thread. This will maintain the high/low plain weave structure across the whole warp.
If you look closely you can see that the plain weave high/low is constant across the warp. This will allow me to weave the dark color to meet the next turn of the light color.
Here you can see the first pick of the next pass of the dark color. The weft is on an angle, not bubbled (!), and I will beat it in place with the bobbin in my dominant hand.
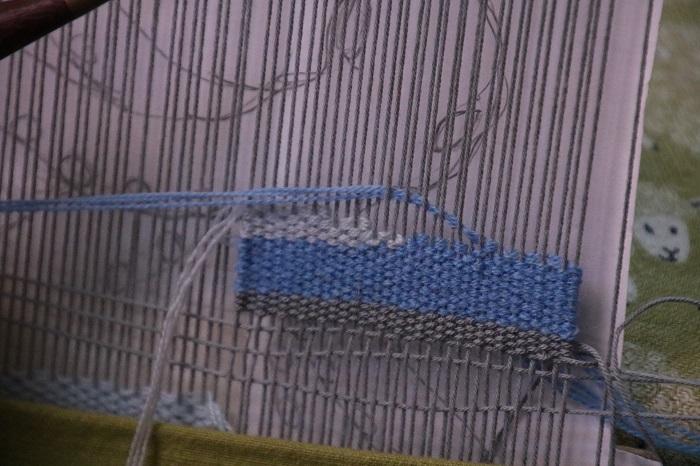
Here I have completed both shapes, and the wefts have now returned to the place where they each began. I can continue to make this angle or do something else.

–Let’s look at the selvedges. On the right where my weaving started, the selvedge thread is a high because when I turn the weft around it that thread is covered by weft. At the other side of this warp, you will see that when I turn the weft around that last thread it is not covered in the new pick. It is a ‘low.’ Take note of how this makes the two selvedges look quite different from each other.
First Exercise: The first sample to weave is to make a warp about 4″ or 5″ wide, set at 8 epi. Put in whatever foundation is required for the loom you are using, then begin to weave with one bobbin across the entire warp for about 2 inches.
After that, divide the width of the warp in half and weave one half with one bobbin and the other half with a second bobbin. Don’t try to work completely across the warp with both bobbins. Weave one shape and then the second. Don’t forget that the second shape must be woven in the opposing shed from the first shape. Do this for another 2″ – 3″.
Keep a close eye on the selvedges for both shapes. You now have 4 selvedges. There will be slit between each shape. As you weave the internal selvedges that fall in the middle of the warp, try to keep the weft from taking up more than half the space between the warp thread where you are turning and the warp next to it that will be the selvedge of the second shape. Weave until these two shapes are about 1″ – 2″ high.
Next divide the warp in four sections across the width, in order to weave 4 squares across the warp. Complete each shape before moving to the next bobbin. Keep track of how to do this so that each shape is woven in the opposing shed from the shapes on either side. Make each shape in a different color from its neighbor.
Let me know how you get on with this little exercise!