ArgoKnot

Lace

National Day for Women in Cuba

Our first trip into downtown Santiago de Cuba happened to be a national holiday for women so the city was hopping. Men and women clogged the streets, children were not in school, street vendors were selling flowers and candy, and there was such an air of festivity all around us.

The streets are old and narrow, and the sidewalks even narrower! It’s a given that pedestrians do NOT have the right of way, so you step into the street at your own risk. Very few intersections had traffic lights and even fewer had the little walk/don’t walk signal. The sidewalks were so narrow that many times you had to step out into the street just to move through the crowds of pedestrians. It was a great day to see this city in full swing!

OLYMPUS DIGITAL CAMERAWe had been advised to change our money at a Cadeca (a money changing facility) because the lines at any bank would be frightfully long. As it turns out there were lines at the Cadecas as well, but they were somewhat shorter. It was all very 3rd world and communist. The lines form outside these establishments, on the hot and narrow sidewalks. There is a guard who lets someone into the building each time someone leaves the building. Inside there is a shorter line, and another guard signals the person at the head of the line to move to next free teller. It took us about 20 minutes to get to a teller, and when I saw a couple of banks later in the day I can see that we made the right choice.

Now here is the funny thing about money—the exchange rate seems to be whatever the Cuban government wants it to be. The US dollar is .87 to a Cuban CUC, and I feel quite certain this not supportable in the world market. We had read in two guide books that there was an extra ‘tax’ on US dollars and it is better to have either Euros or Canadian dollars to exchange. We opted to bring CAD with us. Well 1 CAD is .55 a Cuban CUC, so we have only half the money we thought we had to spend here. Yikes! We should have brought Euros, which have an even exchange rate. Because we are from the US we cannot get any funds from our banks, and we cannot use our US credit cards, even the one that we got for use outside the US. When we returned to our boat last night, we took a hard look at what we have and made a budget. I think we can just get by!

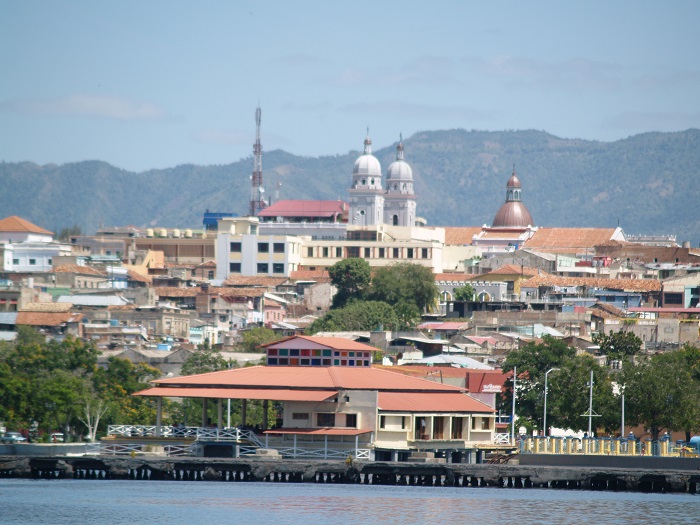
Like many old cities Santiago de Cuba has a public park every few blocks running up Aguilera Boulevard from the harbor up the steep hill that eventually leads into the rural Sierra Maestro range. This is the oldest part of the city, crowded but beautiful, with old colonial architecture. Santiago de Cuba is known for having the unspoiled colonial architecture, along with the oldest surviving building in all of Cuba, the house of Diego Valazquez, built in 1522.

OLYMPUS DIGITAL CAMERA
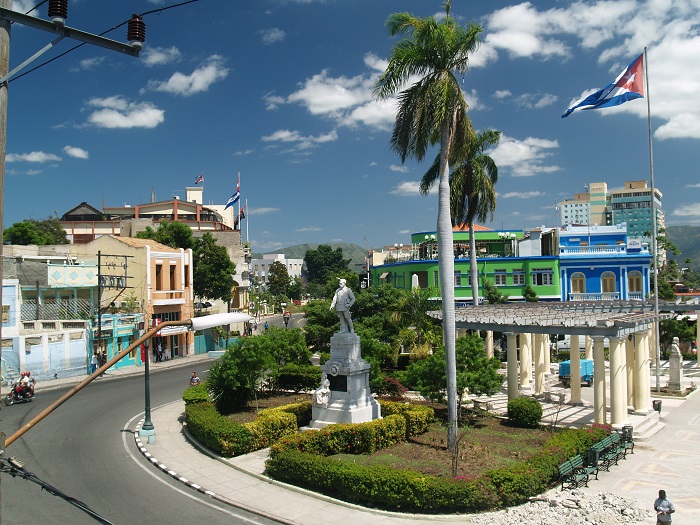
And it is also known for having the most motorcycles in Cuba, and this is what pedestrians must take care to avoid when walking about the streets. It is amazing how many motorcycles there are, most with no mufflers. They dart in and out of traffic, so that you can never be sure when you step off the curb that one might not suddenly cross your path. The streets were full of interesting vehicles and all seemed to love honking, all day… old American and European cars that had been repainted many times. We’ve heard that the engines are most likely no longer original, but a mixture of whatever can be found and refurbished. Many of these cars have Russian or Eastern European engines. There were plenty of small Russian Lados on the streets, and our driver, Noel, shuttled us about in a car with an unrecognizable name from Czech Republic that was 30 years old . Many of the American cars, being so much larger, had been converted into ‘buses’ by removing the back seat of the car and adding on something like a pickup truck bed on a larger scale. There were benches back there that could hold 10 or 12 people, and these vehicles seemed to be getting a lot of business. I was very glad to have a driver with a car! He’d been recommended to us by a Canadian couple who were just leaving this port when we arrived.

This Carmen Ghia is now a taxi. Tempting…but quite small for taxi, don’t you think?
3-8-16b 009
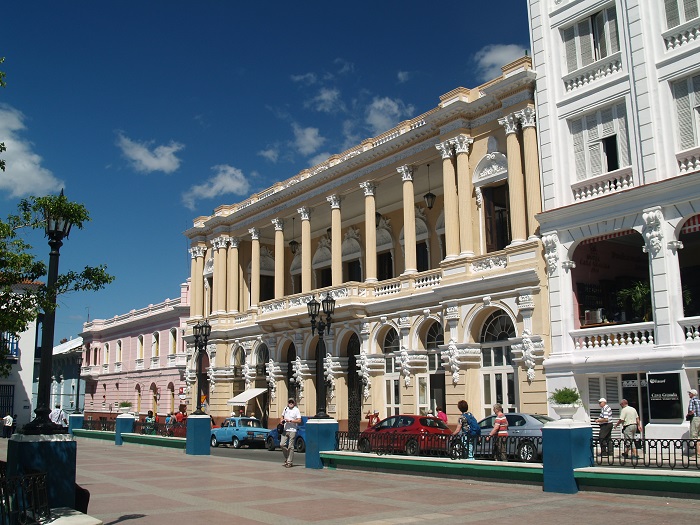
We had planned to spend our day walking through the historic district, having lunch at the Casa Granda Hotel, then touring the Casa de Diego Valazquez. But just walking around took longer than we expected, and by the time we got to lunch—roughly 3-ish—which also took longer than we expected, we decided to relax on the balcony of this stately old hotel at a table overlooking the square with a delightful breeze blowing straight up from the harbor. So we never made it to Valazquez’s house. We will definitely get there before we leave.

OLYMPUS DIGITAL CAMERA
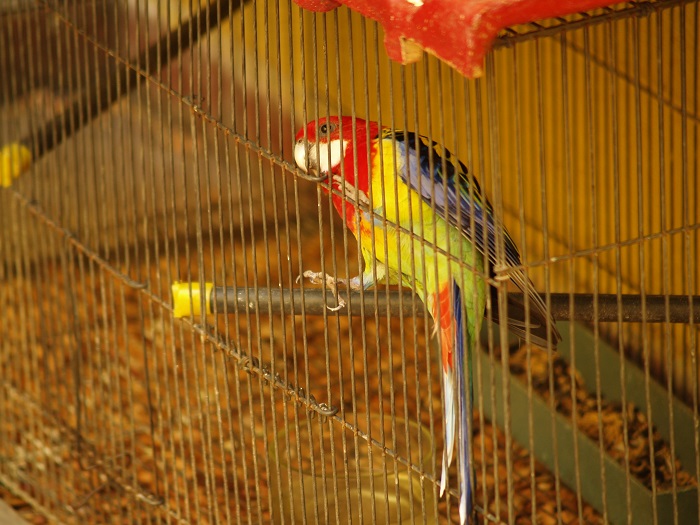
Earlier in the  morning we stopped at a café and had a wonderful Cuban coffee with steamed milk. After that we walked along the Jose A Saco Boulevard, which is for pedestrians only (thank heaven!) and has many shops and street vendors selling crafts from woodworking to leather work (very little textile handwork). It was fascinating to us that so many shops sold exotic birds. I wonder if Cubans keep birds for pets the way we keep dogs and cats. I’ve never seen so many colorful parrots and lots of other beautiful birds that looked like variations on quail or guinea hens.

OLYMPUS DIGITAL CAMERAThe shop entrances are a bit high off the street, maybe just above knee height, and there are the tiniest little cement block steps to enter these shops. There are no railings to hold on to, but sometimes a metal bar in the wall that you can grab if you are feeling unsteady on your feet. I am always feeling unsteady on my feet! Only one person at a time can go up or down these tiny steps so that seems to manage the flow of who is coming out or going into the shops.

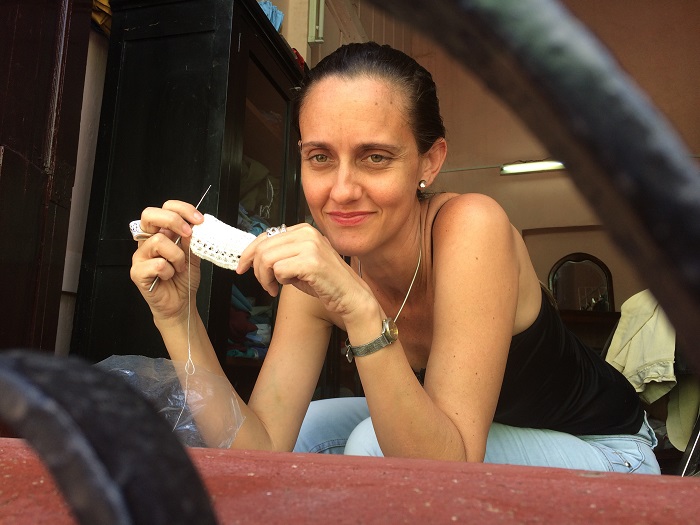
The highlight of my day—and probably the biggest reason why we did not have enough time to see the Valazquez museum—was that I saw a woman sitting in a large unglazed window doing some very fine crochet work. Her window was next to a shop full of men’s wedding shirts. I went into the shop thinking I could access the room she was working in from there….but no. There was a door that probably led to where she was, but it was closed. So I went back out on the street and talked to her from there.

3-8-16d 013First I should say that I had already questioned a few people, and then tried to confirm my knowledge with Noel, about the Spanish words for various types of handwork. Crochet is crochet, ‘tejer’ is knitting, ‘bolillo’ is bobbin lace. Noel, our driver, said that many women do handwork but that he is not familiar with names of all the things they do. He said his grandmother had been doing ‘tejer’ for about 75 years, and he confirmed that it is knitting by saying it has two needles rather than one. I said that I had been doing ‘tejer’ for over 50 years, and he found this amazing. It made me think that his grandmother is probably only a bit older than 75, and that he did not realize how young many women are when we learn these techniques.

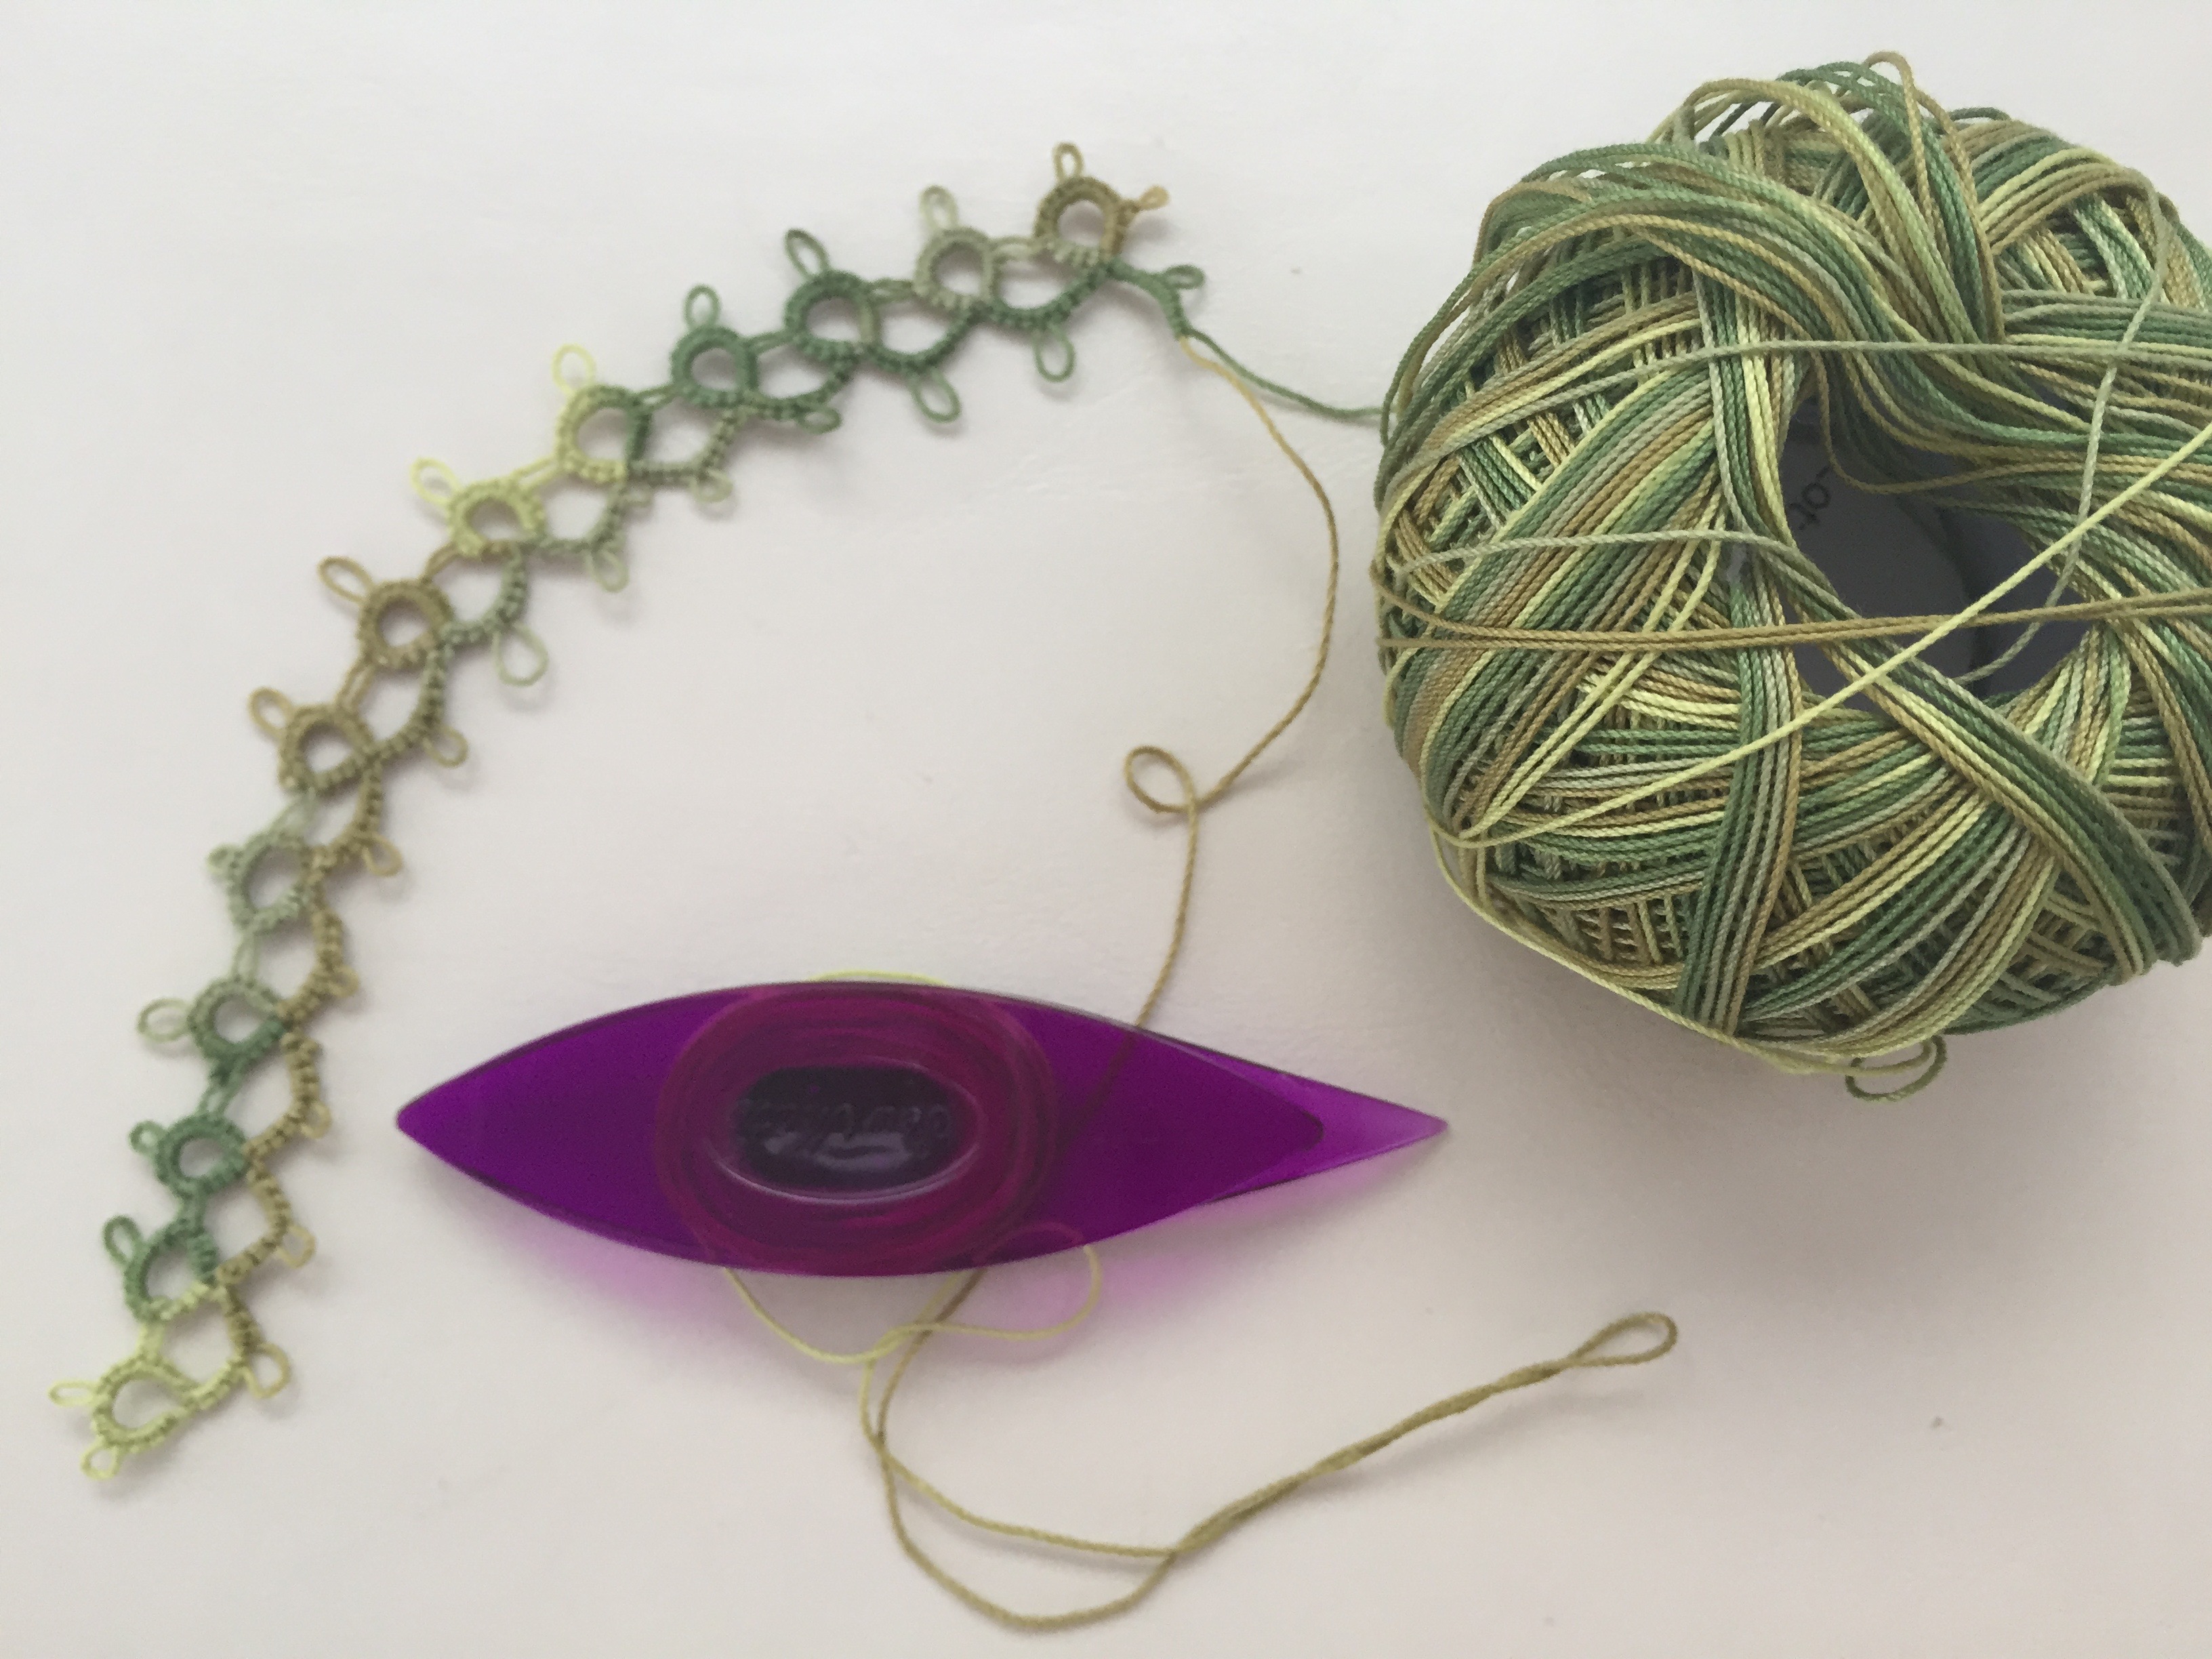
So I tried to have a conversation with the woman doing crochet in the shop window. I asked her if ‘muy mujeres’ did crochet in Cuba, and she said yes! Most women do lots of ‘projects’ in their homes. I was quite enthralled to learn this. I took out my tatting-in-progress and asked her if this called ‘frivolite.’ Yes, it is.

3-8-16d 015

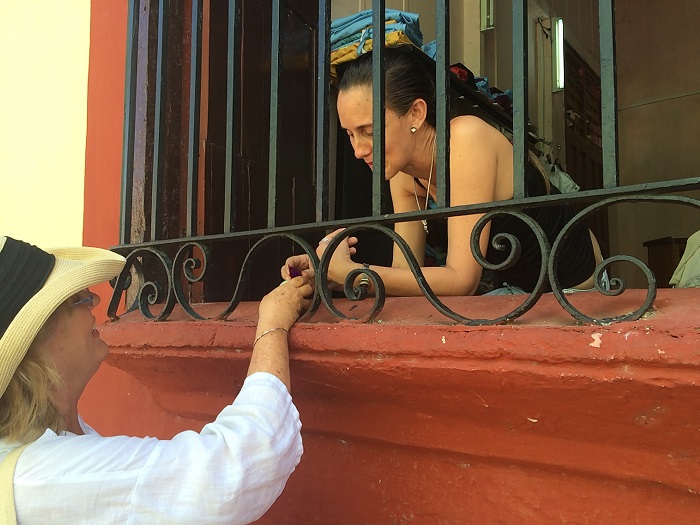
After a few more minutes of struggling to communicate, the crocheter called another woman over who spoke English very well. Her name is Noelise, and the crocheter’s name is Maria Estar, and they both work at a local school for textile handwork. I immediately thought of the lace school in Via de Conde, Portugal, and thought that I may have hit pay dirt here in Santiago de Cuba.

Noelis asked to see my tatting and said something like many women in Cuba want to learn this. I was not certain if that meant that no one knew how to do but want to learn, or if it is a popular thing to do. She said the handwork school was closed for the national holiday celebrating women, but that it would be open today. She has invited to come to see it this morning , so that is the focus of my day! She said she will wait for me at the location where I met her yesterday, and she’ll take me to the school. Her last words to me were, “I will wait for you tomorrow!” So charming!

So I don’t plan to dawdle this morning! I have a lot to learn!

Change of Plans

Today was the day we’d planned to sail to the Berry Islands in the Bahamas, to Great Harbor Cay which has a rather nice marina. Anyway, as luck would have it the weather window is not great, with winds from the east that are low enough for motoring, although this landlubber doesn’t do well motoring straight into waves stirred up by 15 mph winds. And the window is short. By tomorrow the winds will be much stronger, so we decided to wait for what may prove to be a gentler and longer weather window at the end of the weekend. Beside, we don’t have our funds for Cuba entirely set in place, and Bob has one more form to submit for our permissions for Cuba. Every time we think we’re finished we hear about one more thing….we wonder if this is truly the ‘last’ thing—sending our forms to the Coast Guard.

In the meantime, Bob has checked that he has all the necessary courtesy flags for the countries we’ll be visiting. The other day he spread them all out to photograph them, and my heart jumped! Are we really going to all those countries??? That will be quite off the deep end for me–all that ocean in between each island, each passage requiring sailing overnight.

So, in case these flags are unfamiliar to you, I’ll name them, clockwise from upper left (the center flag is our yacht club burgee which we’ll fly in each country):  Cuba, Jamaica, Cayman Islands, and Bahamas.  Like I said, YIKES!!

1-19-16a 012

I’m finally to the point of enjoying the process of tatting. It has become quite relaxing for the most part. I still can’t get my picots even and I still have some awkward moments, but less and less. I do a little each morning while having coffee and then again in the evening after dinner. It’s definitely easier in the morning in good sunlight! I now have 50 rings and 50 chains!  I have a little gadget to measure the distance for even picots, but I just cannot manage that thing yet! With the ring around one hand and the shuttle in the other hand, where’s my 3rd hand for that little gadget??

And speaking of tatting—I just love having beautiful accessories for all my projects. I have some wonderful, handmade bags that people have given me over the past few years, and I love to keep my little projects in them. The felted bag is from Latvia. The embroidered bag is new this week! It’s from France and was sent to me by a wonderful friend in England who knows how much I love special little textiles of any sort. It’s very special to me, and now it holds my tatting project. The knitted bag is also new, and was given to me as a kit by another friend who knows me well. She knew I’d love the bag, and she also knew I’d want to knit it and embellish it myself.

IMG_1935

Lastly, I have a picture of Bob and our friend Linda who now lives in Florida. When she moved down here over a decade ago, we gave her an offshoot from a banana tree that we bought back in the early 70s, when Bob and I were newly dating. It’s an OLD banana tree now! Linda’s offshoot has now grown bigger than ours ever did. It is very happy in Florida and has spread into a little grove of banana trees in her tropical garden. The day I took this photo there were at least three pendulous flowers, with more bananas than I could count! You can see one of the flower stalks right behind Linda on the left side.

1-19-16a 006

So, while we’re not sailing (which is mostly fine with me!) we are enjoying the sights of Florida and I’m becoming a better tatter.  Nattering and tattering…


A Quiet Day Onboard

It’s anything but quiet outside today, which is exactly why I’m hiding down below.  We’ve had gale force winds since last night, and squalls bringing horizontal rain.  The wind in the palm trees is quite dramatic, reminiscent of Winslow Homer’s paintings of the Bahamas.  I don’t know how such tall skinny trees can withstand these winds.

IMG_1908

 We are anchored in a little ‘teacup’ harbor called Middle River, in Ft. Lauderdale.  It is surrounded by elegant, Florida-style mansions, and each house has a dock with a large powerboat tied up to it.  There are too many of us cruising sailboats anchored in the middle of this little teacup, and when the winds are this strong no one feels safe.  All the boats are on the verge of tangling so no one got any sleep last night—perhaps Bob and me most of all since we dragged rather dramatically in the late evening.  It was odd because we’d already been here overnight with no incident.  This anchor has surprised us twice now so we did not sleep worrying about dragging yet again.  Anyway, no loss of life, and no damage to anyone—but until this front gets through here we will not feel safe.  If any of us should drag too far we will be tangled with the large mega yachts on the docks.

IMG_1910

 Knowing this dramatic weather was coming, I had planned to make the warp for my next tapestry today, but it’s a bit too uncomfortable in this much wind to attempt that.  It’s better for me to sit still, so I’m trying my hand–for about the 6th time–at tatting.  Tatting is such a simple technique!  It’s just making slipknots that slide along a loop, which gets closed to make a ring, or slipknots that slide along a straight cord that gets pulled tight to make a chain.  Rings and chains are all you need to know, along with a little embellishment called a picot.  A picot is a pair of slipknots that are not pulled tightly to the previous slipknots.  By leaving a small space between sets of slipknots you get decorative little picots when you pull the foundation ring or cord at the end of each ring or chain.

Making these little elements is still so awkward to me that it feels like some kind of hand torture!  I keep dropping the shuttle, and/or I keep turning the work the wrong way as I tat.  The little picots that occur throughout the rings and chains are not consistent–but I forge ahead.  I am going to attach this little bit of frivolity to a V-neck T-shirt I own.  I think it will be quite feminine, in spite of its irregularities.

IMG_1911

 I have to thank my lace guru Mary for showing me the fundamentals of tatting (she’s not the first, but clearly the most successful at getting me to understand!), and I hope she will not take it as a slur against her teaching if she ever sees this pathetic little length of lace.  I just know that someday it’s going to feel natural to do this.  I have a memory of seeing my great aunts’ hands flashing back and forth as their tatting grew while I watched. Surely, it’s in my DNA somewhere.

And during the breaks I’ve been taking (to give my hands a rest and assuage my rising frustration) I’ve been reading The Paper Garden which is about an 18th c. artist who did not make her first truly original artwork until she was 72.

Today being my 60th birthday, this book is resonating with me.  Long before Mary Delany made her first unusually constructed botanical image that became known as the precursor to paper collage (she called what she made ‘mosaiks’), she had spent years painting in watercolors, drawing, and embroidering in cross stitch and other techniques.  She was also quite good at the piano.  She was no stranger to creativity.  She loved fashion and often designed her own gowns (made by others) before embellishing them herself with lavish floral embroidery.

I’m certain I’d feel quite connected to her even if I weren’t struggling with my novice attempt at tatting.  The fact that she surrounded herself and her home with beautiful things made by her own hand, and always had a garden wherever she lived, connects me to her with my own love of filling my home with handwoven and embroidered textiles, and having fresh flowers and greenery in the house from my gardens.  But since I am tatting, it’s that particular thing that makes me think of her every time I pick up the shuttle.  I’m embellishing a simple little t-shirt that I’ll wear on any given day—she embellished stunning 18th c. gowns that she wore on any given day.  What a difference three centuries makes….yet it still connects us.

Memories of Lace Weekend….

It seems like a year ago that I spent a wonderful weekend at the New England Lace Retreat in Wareham, MA–but it was mid-May–just 6 weeks ago.

FullSizeRender (2)

My photo makes this house look rather imposing!  It was actually very inviting, full of lovely antique and vintage furniture.  Those two large windows on main floor of the front are two generous ‘parlours’ where our classes were held.  To the rear was a large dining room where we had our meals.  For three meals each day someone would ring a bell to invite us to gather in the dining room.  My bedroom was on the 3rd floor, the window all the way to the left in the photo.  Since my room was in the corner it also had a side window with a lovely view of the pond.  This house sits right on the the bay side of Cape Cod.  It is quite a spot!

There was a wonderful glass enclosed porch at the right side of the house (not visible in my photograph) where we could congregate to work on our projects.  Some people chose not to take a class and spent their time on the porch working on projects they brought with them from home.

 During the weekend I learned a bit about Idrija lace from Allie Marguccio, who also gave a stunning presentation on her apprenticeship in Slovenia. In this photo our revered teacher, Allie, is the top most person on the right.  Can you find me in the topmost left??  My good friend and amazing lace mentor, Mary, has been obscured behind two heads on that top row with me.  Mary!  She has the patience of Job with me,  and she is a very accomplished lace maker.  I’m sorry you cannot see her.  A number of the women in this photo are in my Ct. lace group, and they have all been very supportive of my lack of knowledge!  What a great group of women, and what a great weekend we spent together!

FullSizeRender (1)

Here are a few photos of Allie’s work in Idrija lace.  Be prepared to be stunned!

FullSizeRender (3)

I’ve never seen a lace covered box before.  And how about this lovely heart surrounding a flower and the necklace in progress on Allie’s pillow?

FullSizeRender (4)

You really need to see a close up of the heart project! This project is a good example of both the wide tapes and narrow tapes used in Idrija lace.  The wide tapes are made with whole stitch and the narrow tapes are linen stitch.

FullSizeRender (5)

What intrigues me most is using this lace to adorn clothing.

FullSizeRender (6)

With that in mind, I am making a small project that can be used to edge a neckline.  I don’t think I’ll ever use this project on a garment, but it has been a good learning exercise.

IMG_1039

That is my new bolster pillow for making Idrija lace, and my new bobbins which are bigger than the bobbins used for the types of lace from northern Europe.  I am enjoying working on a bolster.  And here is a close up, showing why this project will never be used on clothing.  It’s not ready for prime time….but I have learned a LOT!

IMG_1040

As you can see, Idrija lace is a tape lace, using linen stitch for the narrow tape.  The tapes get connected with ‘winkies’– a new term for me–which are loops that get ‘sewn’ together. “Sewing” is the term used when you take one bobbin’s thread and put it through the loop of its partner bobbin.  You can see ‘winkies’ where the tapes are coming close together. Not something I can show here, but if you are a lace maker you will know what I mean!

Allie’s husband Tom makes the bolster pillows which are stuffed with sawdust and are quite heavy, and he turns the pretty bobbins.  Allie makes the cotton covers.  You can find them both here.

Allie share with us a good website for ordering traditional Idrija patterns from Slovenia. So many patterns to look at, you will need a couple of hours to peruse them all.  I have ordered a number of patterns for embellishing clothing, and I hope I’ll be ready to tackle one of them when they arrive!

Directions for a handwoven tote bag

8-SHAFT HUCK LACE TOTE BAG

IMG_1480

 This fabric is based on a well-known huck lace pattern that is available in a number of places.  It is included in the The Best of Weaver’s Huck Lace, edited by Madelyn van der Hoogt, on page 12 in the pattern section (by Ruth Morrison), and in the project section starting on page 51.  This pattern is also used as the end plate on the right-facing page at the beginning and end of the book.

 You can also consult Madelyn van der Hoogt’s informative digital workshop on lace weaves which you can preview here: http://www.interweavestore.com/weaving-lace-with-madelyn-van-der-hoogt.

Here is my version of this project:

Warp:  16/2 linen (Bockens Lingarn) in five colors:  1 spool each, 125 grams
# 522 black
# 485 purple
# 4060 dark green
# 40 bright turquoise
# 2030 lemon yellow

The tote fabric requires about a yard of fabric, and each napkin requires ½ yard of fabric, so plan your warp length accordingly.  I wove one yard for the tote and 2 ½ yards for five napkins.  I put on a 5 yard warp to allow some sampling and loom waste.

Weft:  16/2 linen in #522 black, 2 spools (in addition to the one used for warp)

Sett:  20 epi, width in the reed about 17.5” (finished width about 16.5”)

Threading:  There are 7 repeats of the huck pattern with 4 extra plain weave threads in black at each selvedge.  I also threaded two threads together for the first thread at each selvedge.  Total warp threads:  365 ends

Weaving:  to balance at 20 epi

The full pattern repeat is 50 threads.  Each color stripe is 45 threads with 5 black threads at the beginning of each pattern. I placed a stripe of five black threads at the beginning of each repeat to emphasize only one column of the flower motif, as in reality there are two columns of staggered flowers.  (Unfortunately, all huck looks geometric until it is wet finished.  So my flowers look like diamonds in the drawdown.  Consult the detail photo at the end for what happens after wet finishing.)  By having a small black stripe of 5 threads, I minimized the appearance of the staggered flowers so that one straight column of flowers would stand out.  I chose to do this in order to better coordinate with the mug I was using as inspiration for the tote.  At finer setts the staggered floral motif shows up well, but not at the sett I needed for fabric that would be sturdy enough for a tote bag.

Finishing: Off the loom, I machine washed the entire length of fabric in the washing machine on ‘normal’ setting, warm water.  After smoothing the fabric by hand, I let the fabric air dry and then steam pressed it before serging the edges between all the cuts.

Huck Lace Lunch tote final as woven (this link will bring up the pdf file)

Screenshot huck lace tote bag final as woven

In this drawdown I have also included 4 extra plain weave threads at each end of the warp. You might add even more. Huck lace gives a lovely scalloped edge to fabric when it is not bordered by plain weave; however, at such a loose sett of 20 epi I found that the scallops look rather clumsy.  They are lovely at finer setts, but for this project I wish I had used a plain weave border, so I’ve included that here.

The drawdown should be followed until the end of the yellow stripe, then worked in reverse color order back through the blue, green, and purple.

The mug that inspired the tote bag:

Weaving mug exchange

 SEWING THE TOTE BAG

 Materials Needed:

 Tote bag fabric:  15” x 27” plus extra for straps if using this fabric
Lining fabric:  15” x 27” plus more for pockets and possible straps
Pockets from lining:  2 pieces, 7” x 15”
Light Weight fusible interfacing:  14” x 22”
Fusible Fleece:  14” x 22”
Cotton webbing straps if you don’t wish to use handwoven or lining fabric for this

  1. Cut pieces to size.
  2. Fuse the light weight interfacing to the wrong side of your handwoven tote fabric, centering the interfacing so that there is ½” margin on each long end, and 2 ½” margins at the short ends.
  3. Fuse the fleece to the wrong side of your lining fabric, centering the fleece as you did with interfacing on the main fabric.
  4. Sew the pockets:  place right sides together and sew around pieces leaving one short edge open.  Turn right sides out and press, pressing under ½” seam allowance that did not get sewn.  Top stitch around all 4 sides, which will close and finish the edge that was left open for turning. Place the pocket on the right side of the lining fabric about 4” down from the raw edge of one of the short sides.  Sew along the outer edges and bottom of the pocket, attaching it to the lining.
  5. Then top stitch a pocket divider, either by sewing directly down the center of your pocket, or by sewing 1/3 in the distance on the long side.  I opted for the 2nd choice so that one pocket would be larger than the other.
  6. Fold the lining (with attached pocket) in half along the long edge, right sides together, and sew the side seams.
  7. Make a flat bottom for the lining as follows:  with the wrong side of lining facing out, position one side seam so that it is in the center of the fabric, and so that the end of the seam forms a triangle at the bottom of the tote:

tote bag square bottom Measure 2 ½” up from the point and draw a sewing line across the bag that should be 4” across.  Sew across this line.  Repeat this on the other side seam.

8.  Repeat this process of folding the long edges of the main fabric in half (right side together) and sewing the side seam.  Then repeat the process for making a flat bottom for the main fabric.

9.  Put the lining inside the bag, with the right side of the lining facing inward and the right side of the main fabric facing outward.  Turn the triangle flaps on both lining and main fabric so that they face into the bottom of the bag.

10. Fold down the top edges of the lining and main fabric toward the inside of the bag, and so that each fabric is now folded along the edge of either the interfacing or the fleece.  Match the edges and pin.

11. Make your handles.  If you are using the handwoven fabric your handles will only be about 16” long.  Take the hand fabric and press ½” in on the long sides.  Fold in half and top stitch along the pressed edge and then around the entire handle to finish.

12. Insert the handles into the pinned top edge of the tote bag so that each end of each handle is about 1/3 in from the end of the bag.  The finished bag is about 13” wide.  Divided in thirds (4 1/3”), you would place your handles to center on 4” and 8 ½” roughly.  Pin the handles in place with at least 1 ½” down in the seam.  Top stitch around the top of the bag.

FOR NAPKINS:

I wove 18” of huck lace pattern with 2” of plain weave at the end of each napkin.  I wove two picks of a contrasting color of weft in plain weave between each napkin. I turned under a hem at each end so that the plain weave was not showing on the face of the napkin, and hemmed the napkins by hand with black thread.

IMG_1477

Scroll to Top