Typically Maine, the weather changed every couple of hours yesterday, and the sights made me think about trying to capture the essence of a place in imagery…..which made me think of Joan Baxter’s tapestries. She has mastered conveying a sense of place for Scotland, with tapestries that are full of mists and myth and mystery. After 15 summers in Maine maybe I am getting a sense of this place….also a place of mists as well as brilliant sun and sharply focused views.
As we sailed out of the Basin and Cundy’s Harbor yesterday, the sky behind us grew very dark, and shortly into our trip we were overtaken by a squall. Twenty minutes later the shoreline and islands glowed in the fresh new light and sparkled from the rain. We were headed to Snow Island, and just as we approached we saw an eagle soaring overhead! He (she?) landed on a rock right nearby to dry his wings.
Eagle on Snow Island
In the trees just to the left in this photo was another eagle! We could not get the two birds together in one photo!
After anchoring another quadrant of the sky darkened, and another squall passed through. The quality of light is decidedly Maine to me, and something I’d like to capture in a future tapestry.
Approaching Squall
Can you see the eagle in the lone tree just right of center in the photograph? All in all, we saw three eagles at Snow Island.
Before heading to Snow Island I spent a good part of the day working on another sweater…. Deborah Newton’s “Greenhouse Tank” which is in the current issue of Interweave Knits.
Deborah Newton's Greenhouse tank
Deborah Newton is one of my favorite knitting designers. Her designs are lovely and fit beautifully! I am really hoping this will be more flattering than my Plymouth “Kudo” sweater!
I am working this sweater in raw silk from Tess Designer Yarns in a colorway called Bahama Bay.
Deborah Newton’s “Greenhouse Tank” knitted in Tess Designer Yarns “Bahama Bay” raw silk
…or home away from home. My husband and I spend some weeks every summer sailing on board our sailboat Pandora. This year, just weeks before we moved on board I spent a week at Becky’s Vavstuga taking her Vavstuga Basics class. This is an absolute prerequisite for any of her other classes, her way of making sure that students have the same basic training before moving on to her more specific classes. This session’s basic class had five projects: a false damask small table square, a small (30″ x 30″) tablecloth, a dishtowel, a bathmat, and a blanket. I decided that all these projects, except the bathmat, would be used on Pandora!
one of the small tableclothsone of two dishtowel warpssecond dish towel with blue blanket in background
Student Susan sleying reed for Blue blanketIlona working on the green blanket
The block weave projectThe bathmat projectAndi and Patti working together
Becky Ashenden’s lovely studio and student residence is furnished entirely in Swedish style (mostly from IKEA) with her handwovens adorning every horizontal surface as well as all the windows! The whole place could be a scene from a Carl Larsson painting. In our bedrooms we each had a handwoven coverlet for our bed and handwoven curtains. In the main sitting room/dining room/kitchenette, there were wool blankets on the backs of the comfy chairs, a tablecloth on the side table in the sitting area, and curtains on the windows. All the curtains had handwoven tapes as tie-backs. We had breakfast each morning up in the residence dining room. Breakfast was made and delivered by Susan (Becky’s business partner), who brought up a different tablecloth each morning, while wearing a matching apron. I have a new appreciation for aprons!
Breakfast with one of many handwoven tablecloths!
Class started each morning at 9am after breakfast at 8. Monday we made color wrappings for dishtowels and chose the two designs we liked best. Then we began warping for them and also making the warps for the other projects. By the afternoon we were putting the warps on the looms. I will put details of Becky’s Swedish warping techniques on the weaving page. At 11am each day we gathered at a large table in the studio for drafting exercises. All of us except one student were experienced weavers. Some of us had been weaving for decades, and one student had even spent a year at a Swedish handcraft school just like the one where Becky herself had studied. Still, making drafts by hand on graph paper was a useful exercise for all of us!
The studio lights went off promptly at noon signalling lunch. There was one hour to enjoy an amazing lunch with lots of choices served smorgasbord-style. The class information stated that while Becky could not accommodate specific diets, most people on restricted diets could still get plenty to eat. It was true! Each lunch included a platter of raw vegetables, like radish and cucumber, a green salad, a cheese tray, a basket of crackers, a basket of Susan’s still-warm homemade bread, a plate of sliced deli meats and various dishes that were freshly made for that day’s lunch. These main courses included shrimp/fennel salad one day, a wheat berry salad with vegetable and dried fruit another day. It was a feast!
The dining room table set for lunch
Dinner always included the same assortment of platters holding cheeses, raw veggies, sliced meats, etc. And there would also be a hot main course. There was another loaf of Susan’s delicious bread. We loved it so much that we demanded a photo of her with bread before she sliced it! Becky made a fresh dessert each day to serve after dinner.
Susan with her homemade bread, wearing a handwoven apron
The studio re-opened at 1pm each day, so after lunch there was time for a short walk or for perusing the extensive library of weaving books….or shopping in the retail section of Vavstuga! We re-gathered at the table at 3pm each afternoon for another session of instruction which included looking at innumerable handwoven items. I have never seen so many handwoven items in one location. It was exhilarating!
Afternoon class examining some of Becky's handwoven tablecloths
Dinner was at 6pm each evening, and again the studio lights were turned off to bring us all to the table together. The studio re-opened from 7.30 -9 pm for evening weaving.
Gathering at the table
Our days had a definite rhythm because of Becky and Susan’s hard work and organization. After working together to warp four of the five projects, we were all weaving by Wednesday morning. We warped each project in groups of two which made beaming, threading and sleying a breeze. It is really quite enjoyable to warp with another person (and I’m someone who loves the warping process and looks forward to that time alone!). I want to see if I can institute a warping group when I return home in late summer.
Warping mill with view of the Deerfield River
Each day Becky wore a handwoven dress, and we all enjoyed hearing the plans for her summer solstice wedding, including her handwoven fabric design for her wedding dress. She was to be married just a week after our class ended, and I hope there will be photos on her site when she returns! While we did not get to see the dress, we saw the fabric leftovers after the pattern pieces were cut….stunning!
Becky’s studio sits at the entrance to the Bridge of Flowers which is an incredible place in mid-June.
Bridge of Flowers
Students' work on Friday afternoonThe class with our finished projects!Susan and Becky
So…..back to Pandora and my handwoven home on the water…..
False Damask table square on cockpit table
Handwoven tablecloth and blanket from my week at Vavstuga
Ooops! I think I left the hand towel at home, and the bathmat was made for our upstairs guest bathroom.
It certainly is daunting to consider making one of these baskets so I thought I’d record the process as a resource for my future attempts. If anyone should stumble here and find help all the better!
My basket teacher is Judy Flanders, a member of the Westchester Basket Guild (NY) and a proficient basket maker and thorough, careful, patient teacher. If not for her I would still be starting at the DELS website trying to figure out what I need!
Determining the Number of Staves:
1. Measure the rim circumference of the basket mold in millimeters. If you only have access to measurements in inches multiply inches by 25.4 to find mm’s.
2. Measure the width of the staves you have chosen to use (also in mm). To this number add 1.5mm for the space between the staves.
3. Divide the answer from #1 by the answer from#2.
Example: the circumference of my round basket is 800 mm. The staves I have are 6mm wide. Adding 1.5mm to my stave width of 6mm gives a total of 7.5mm.
800 / 7.5 = 106 or 107
This is just an estimate, but it gives me an idea of how many staves to shape. I will add at least 10% to this number, so I will be shaping about 116 – 120 staves.
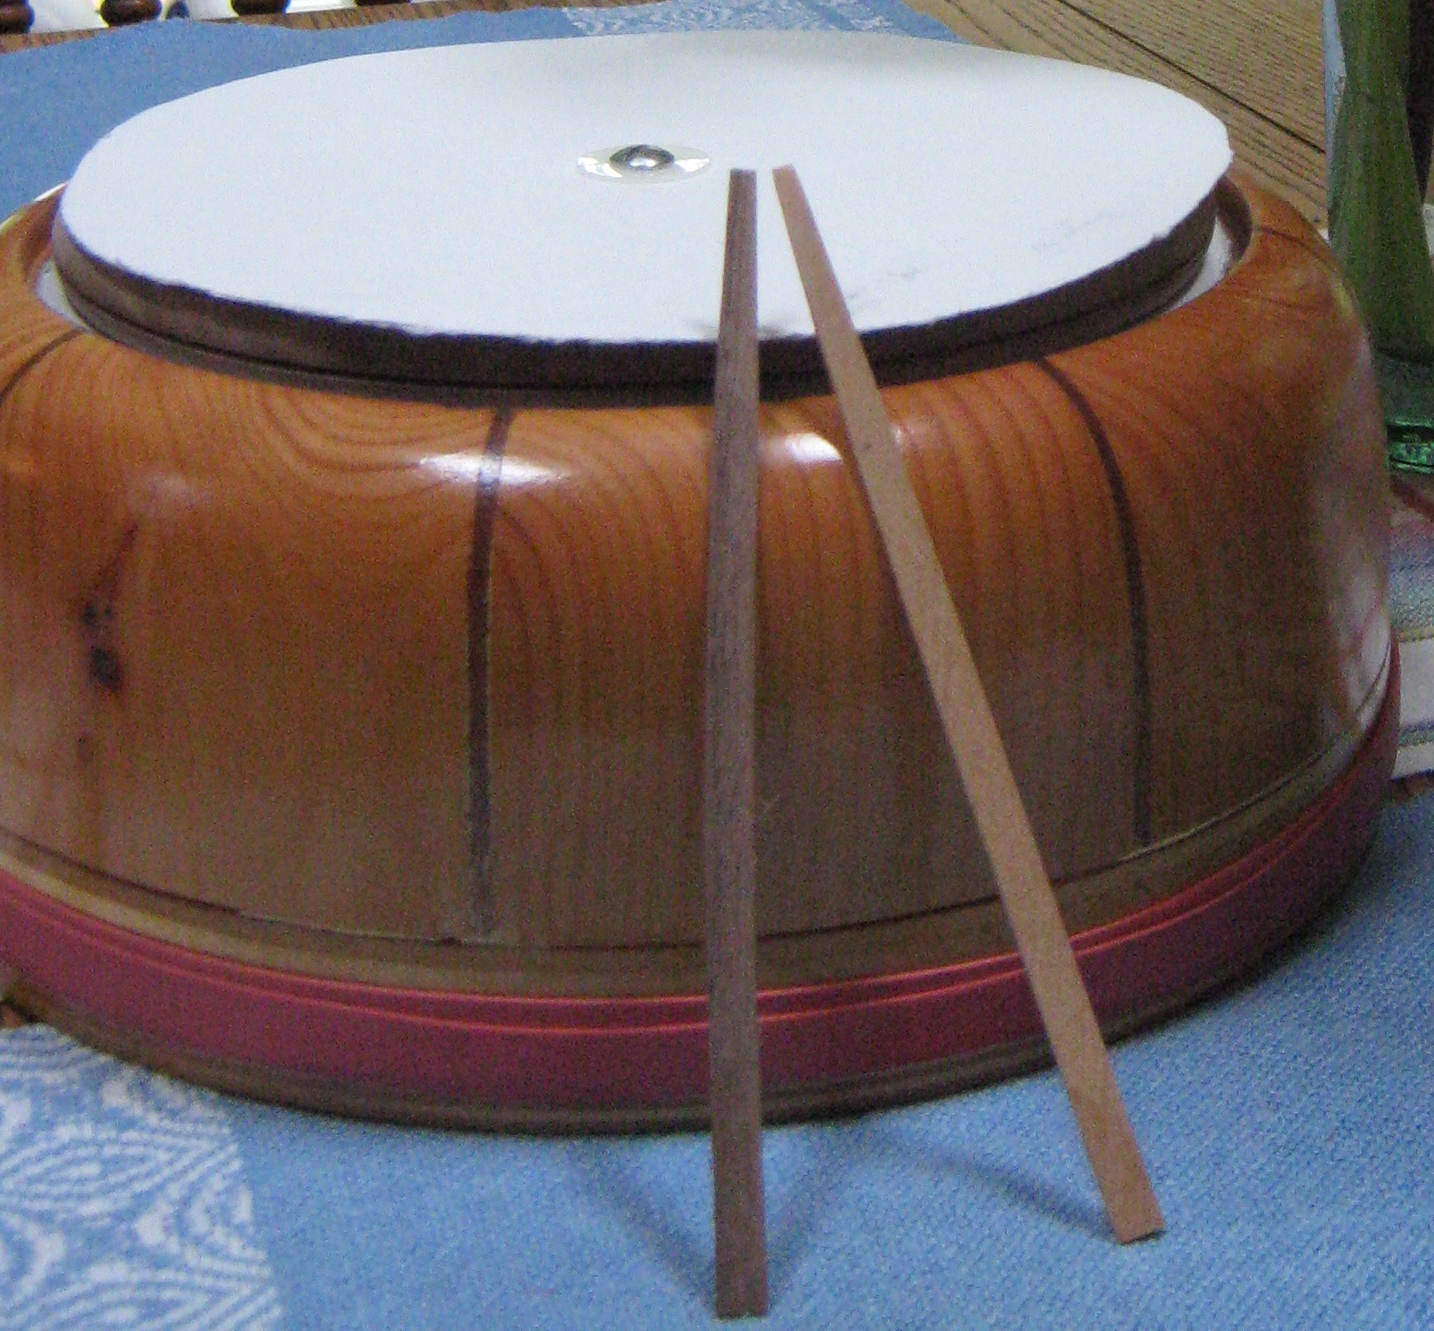
10″ round Nantucket mold with two shaped staves
Preparing the mold: The hardwood on the base of the mold becomes the base of a Nantucket basket, with all the staves firmly attached into a groove. This base needs to be protected during the basket making process. I have removed the screw holding the base to the mold and inserted layers of cardboard that were cut to the same circumference as the base. I have two layers of cardboard between the base and the mold, and one layer of cardboard on the outside of the base to protect it while I’m weaving. I put the screw through all these layers and re-attached everything to the mold. Ready for inserting staves!
Shaping the Staves: the staves are tapered until they reach the shoulder, or curve, of the mold. From that point to the rim of the basket they keep their full width. The length of each stave is about 1″ longer than the edge of the mold. For a round basket all the staves will have the same shaping; an oval basket would require different shaped staves for different areas of the curve of an oval. I am using two kinds of staves on this basket, and there is an example of each in the photo. Both have been tapered. There will be eight walnut staves set at equal distance around the mold creating a dark stripe that matches the walnut base and rim of the basket. These positions correspond to the fine dark lines on the mold in the photo above. The rest of the staves in between these stripes will be maple. I think this will be a striking basket design.
After tapering the ends of the staves that will be inserted into the base, each stave needs to be lightly sanded for smoothness as well as sanded down to a finer dimension in the tapered area. I want to sand only enough to allow the stave to fit snugly into the groove of the base. If the stave goes into this groove too easily and is loose it may come out at some point during the basket’s life which would be a hard repair to attempt. If the stave is too tight it might not fit all the way into the groove which might also cause it to come out at some future point.
I taper the staves using a small hand plane. I learned that the proper technique is to hold the plane stationary and move the stave against the blade.
I can sand the staves using a small sanding stand or using sandpaper on a drill press. I’m using flat staves in this basket (contrast that to the round staves I am using in my Nantucket purse) so I have to sand off just a bit of the sharp sides so that the staves won’t break my weavers as I pull on them during the weaving.
Sanding the tip of stave before inserting in basket base
June 9, 2011
Steam-bending the staves: Last night I began shaping the maple staves that will go between the walnut staves around the mold. I’m making 14 maples staves to go in each of the eight sections of the basket. I presume that will give me a couple extra in each section in case of breakage.
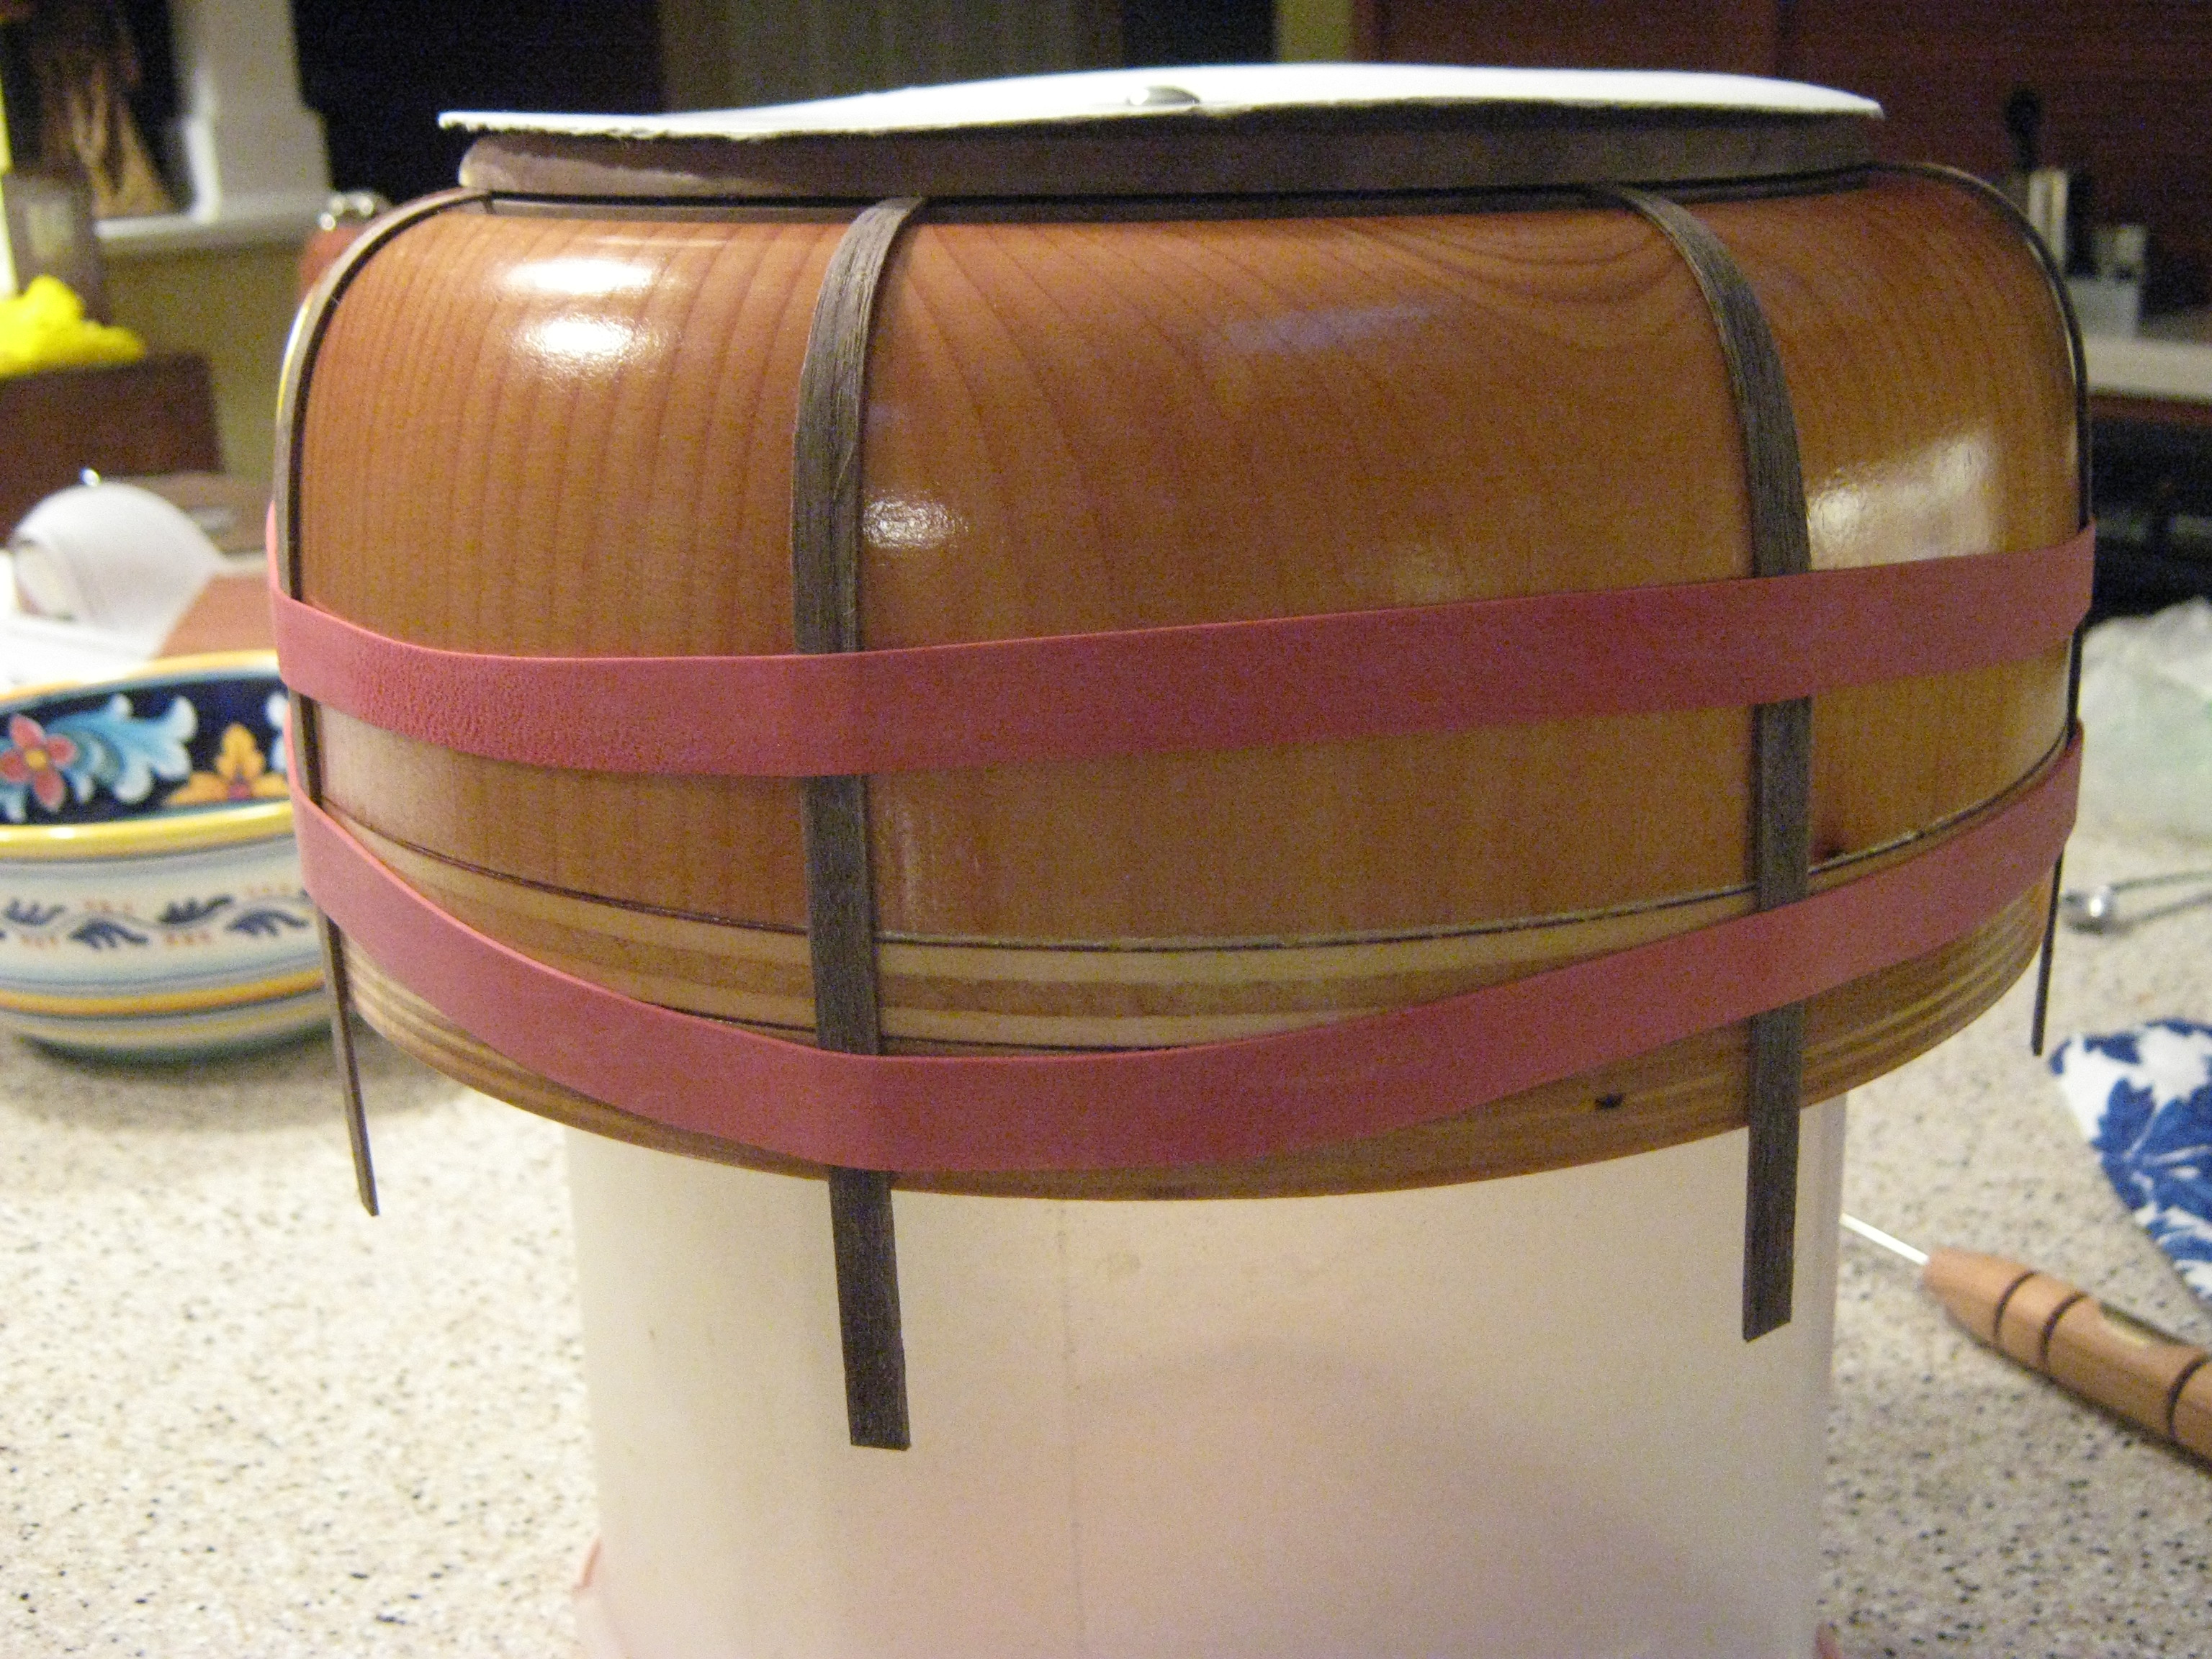
This evening I steamed the walnut staves and placed them around the mold. Steam-bending involves boiling a pot of water (not a food pot! I use a small dye pot) and adding the shaped staves to boil for 10 minutes. After 10 minutes have passed I still leave the pot on the heat as I take out one stave at a time and place into the rim on the bottom of the mold, then quickly but carefully bend the stave to the contour of the mold. After a couple of seconds I pull the rubber bands out around the stave to hold it against the mold. Then I proceed to pull the next stave from the pot of boiling water…
NOTE TO SELF: Never boil maple staves in the same water as walnut staves. Like its nutshells, walnut wood has a lot of tannin and will dye the maple staves the color of walnut!
Thank heaven for these large rubber bands. I wonder what the sailors used traditionally.
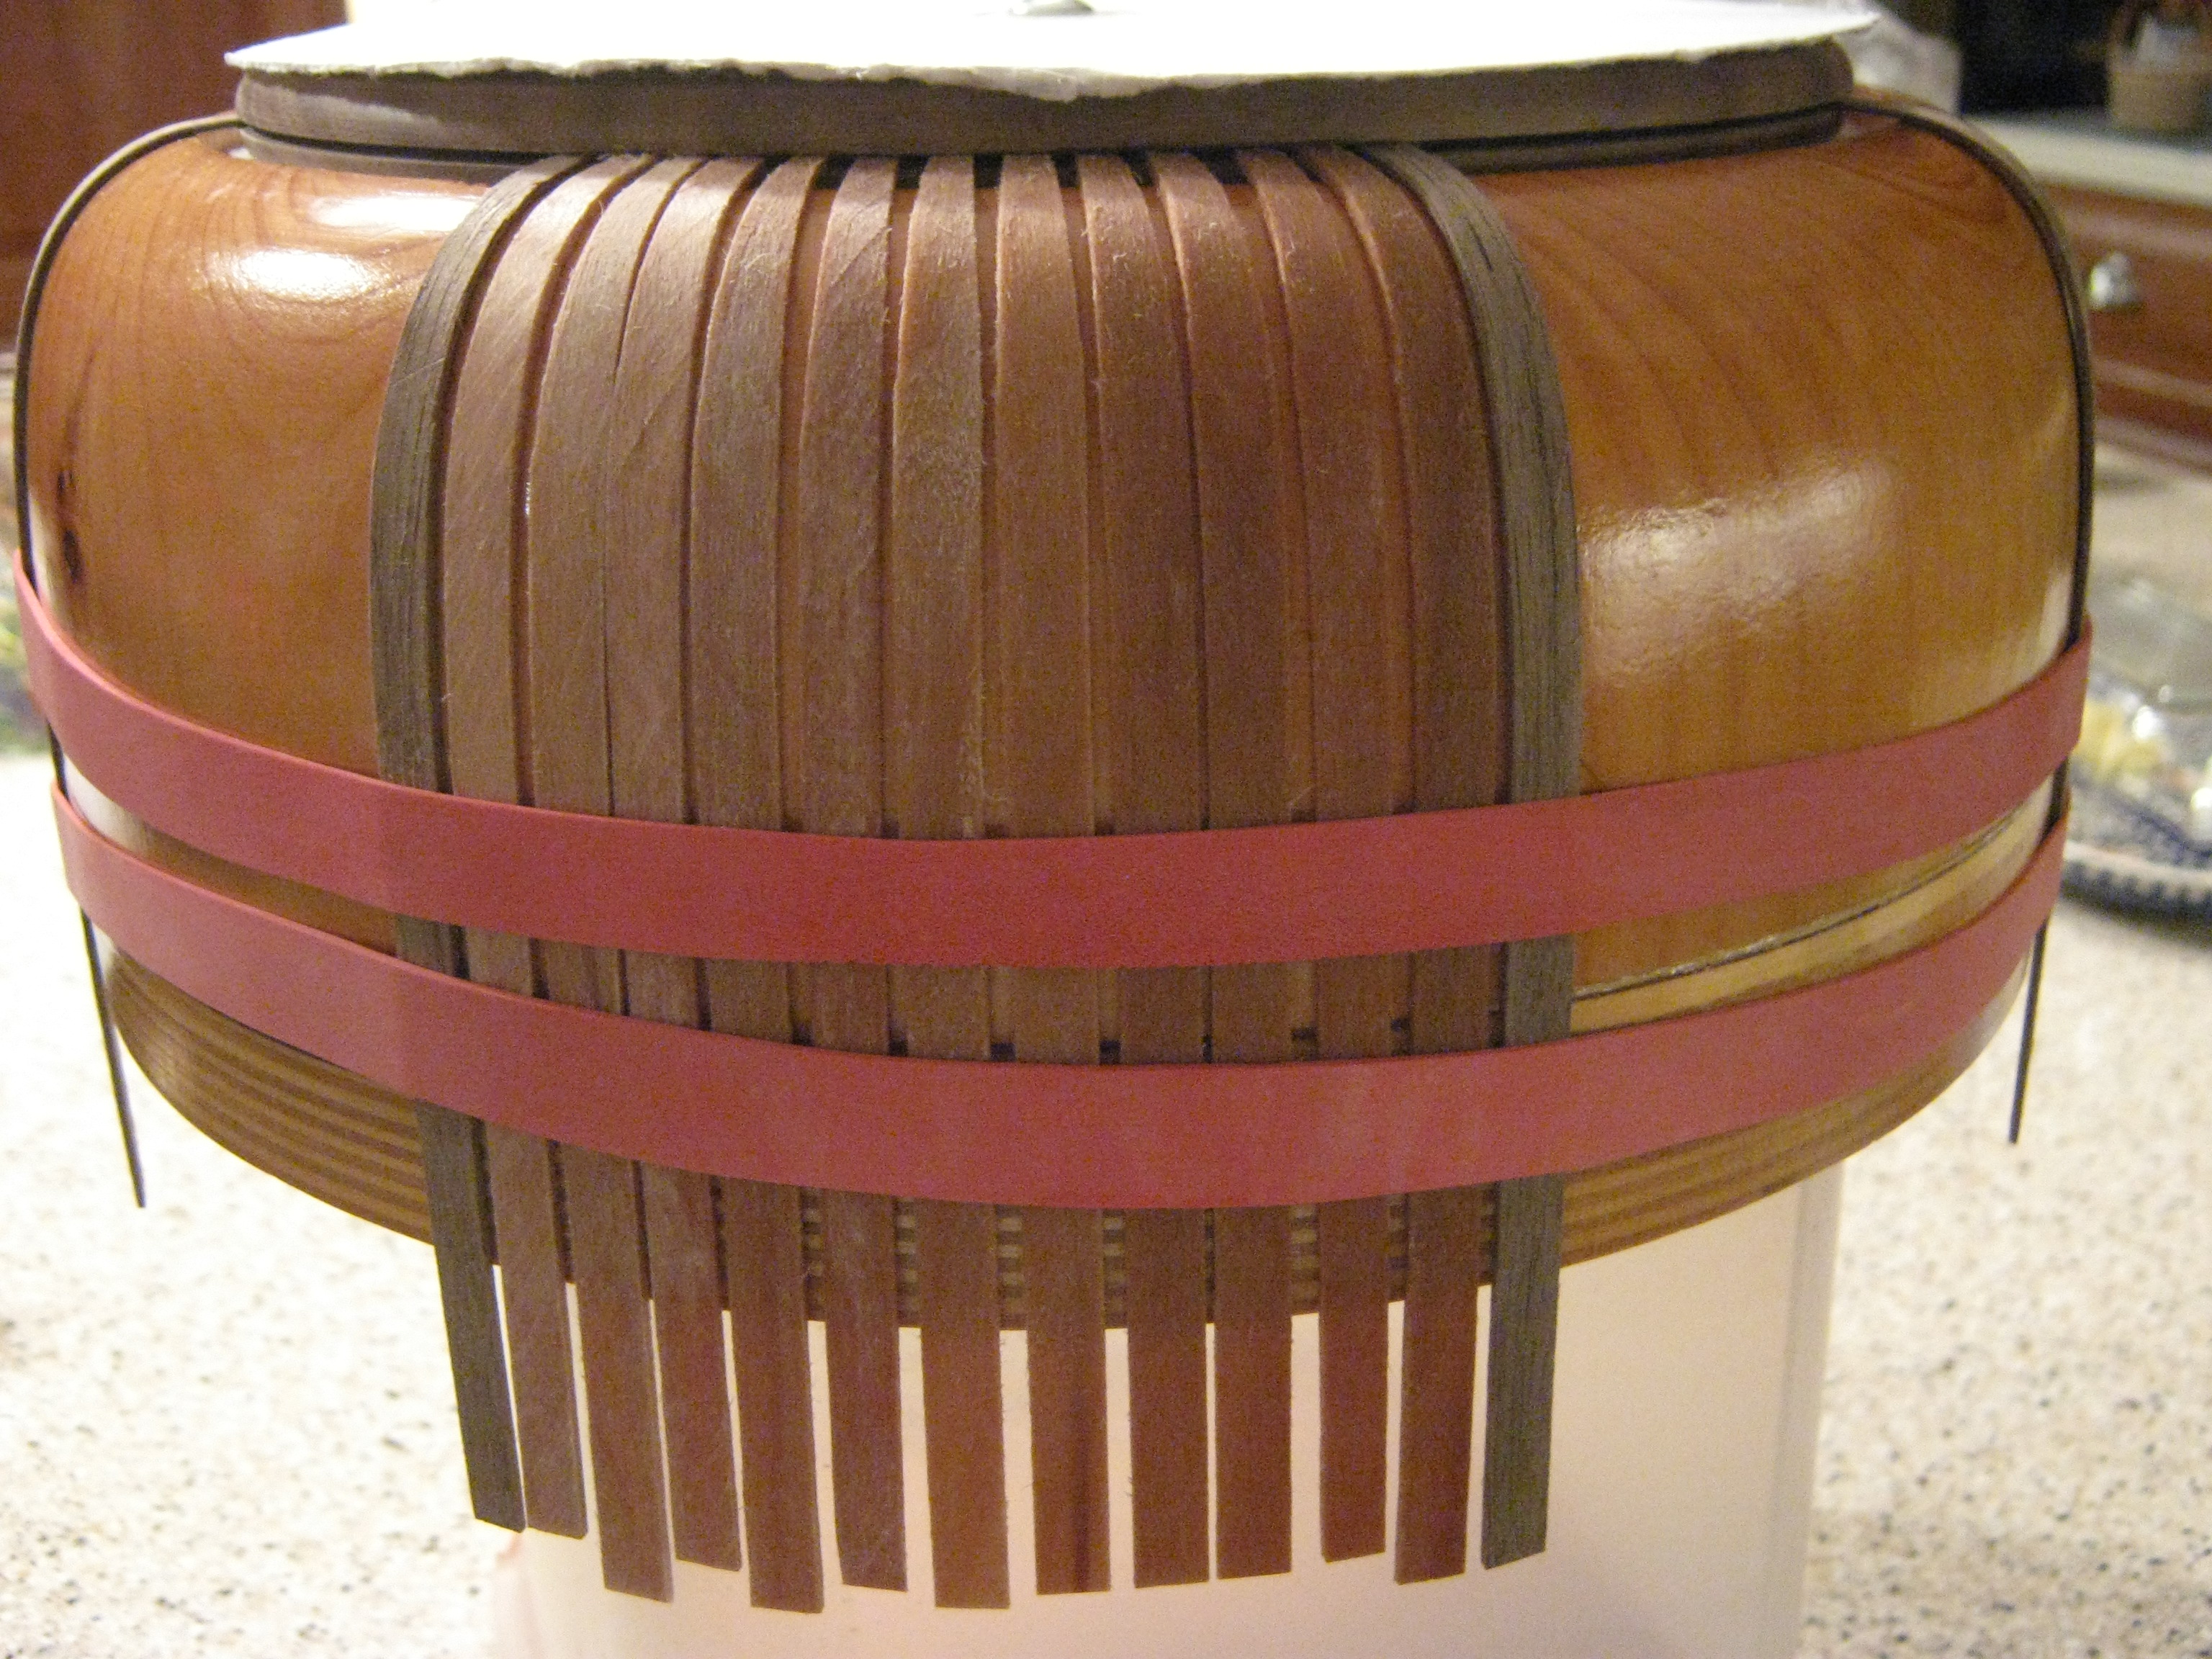
Adding the maple staves
Next, I added one section of maple staves. The contrast between the walnut and maple will be greater when the staves dry.
one section of maple staves completed
Time to check in with my teacher! I only got 11 maple staves between the walnut staves, and I should have gotten 12 or 13. I won’t proceed until I know if this is acceptable!
Document
Block
ClassicUse the classic WordPress editor.Skip to the selected block
4″ Nantucket basket with ebony base and maple rim.
It’s so wonderful to know craftsmen and artists in various fields. If not for the basket makers I know I would never have had the wonderful experience of learning from Anne Lima.
This little basket took three days to make, and I have a long way to go on the finishing. My reward for finishing this basket will be to attach the beautiful maple handle with ebony inlay!Ann Lima is a wonderful basket maker and teacher from Matapoisett, near New Bedford and Cape Cod.
She is the daughter of well known basket maker Gladys Ellis, who designed the “Matapoisett Basket” which combines a number of traditional basket techniques with stunning results!
Anne brought a tray of scrimshaw with her, made by a man whose name I must learn! I had to have this little gem for a future basket.
What an amazing holiday season! On the first day of Hanukkah we had a torrential rain storm that ended shortly before sundown with a double rainbow. A new meaning for Festival of Light!
On the winter solstice we were treated to a full moon with a total eclipse, and in my little part of the world the skies were clear for viewing it!
Christmas arrived quietly but deluged us with snow the next morning. It’s a winter wonderland!
I wish you warmth and safety, and a hot cup of cocoa! This particular cup of cocoa was captured by my son, who made it, photographed it, then drank it…on Christmas morning.