ArgoKnot

Author name: ozweaver

Finishing a Tapestry

The finishing procedure for mounting a tapestry is my least favorite activity.  I think most tapestry weavers would agree.  Yet it has to get done.  I can’t say the results make the drudgery worth it, but the resulting finished piece is a wonderful thing!

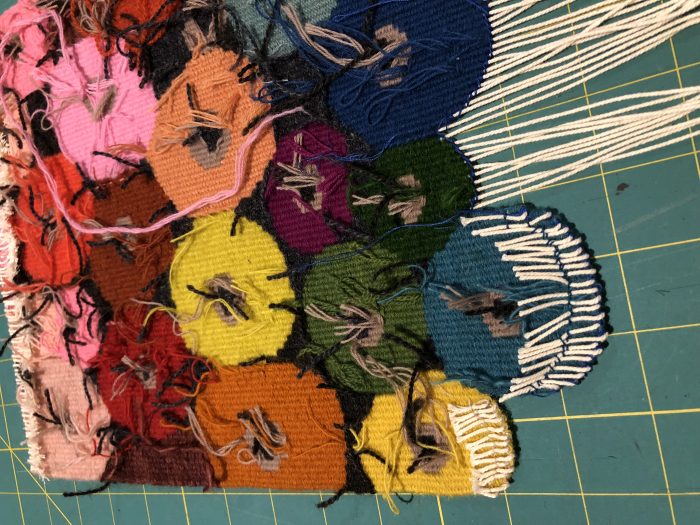
First, I turn the tapestry to the back side and trim the longer weft ends to shorten them.  It looks like I was not yet done doing that on this piece.  With weft ends that sit close to the selvedges on the side, I try to tie them to a weft end that is further in from the selvedge, in order to keep them from sticking out the side and being visible.  If I’m going to mount the tapestry, I can make sure all weft ends along the selvedge edges are well tucked to the back as I sew the tapestry to the frame.

In this photo I am turning down the warp threads along the bottom of my piece and using backstitch to capture and constrict the warp threads on the back.  This is the technique that Archie Brennan uses taught to members of the Wednesday Group. I am capturing two warp threads with each backstitch, and then moving forward by one warp thread as I work my way from left to right across the piece. (I am left-handed.)  I know this is hard to see.

IMG_1139

Here is a video from DMC showing how to do backstitch (right handed).


Imagine that these stitches go around your warp threads and catch a bit of the weaving– just do not let your needle go all the way to the right side of the tapestry.  Just catch a bit of weft while encircling the warp threads that you’ve folded to the back of the tapestry.  When you tighten each backstitch, it constricts the warp threads you’ve captured in the stitch.  When you’re done you can take a small pair of pliers and, while holding the tapestry for resistance, you can use the pliers to pull each warp thread snugly to the back of the piece.  Just be gentle when doing this!

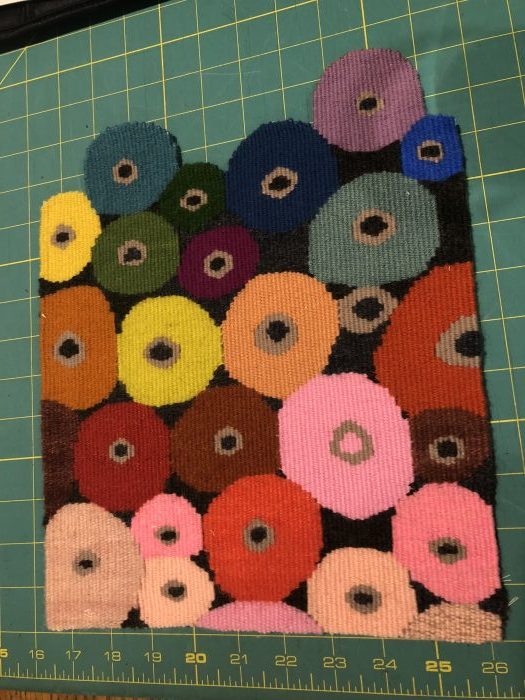
This piece I’m finishing happens to have a shaped edge, so I’ll show you that I still do a running backstitch to capture the warp threads along the shaped edge.  It’s the same as doing a straight edge of warp threads.

IMG_1141

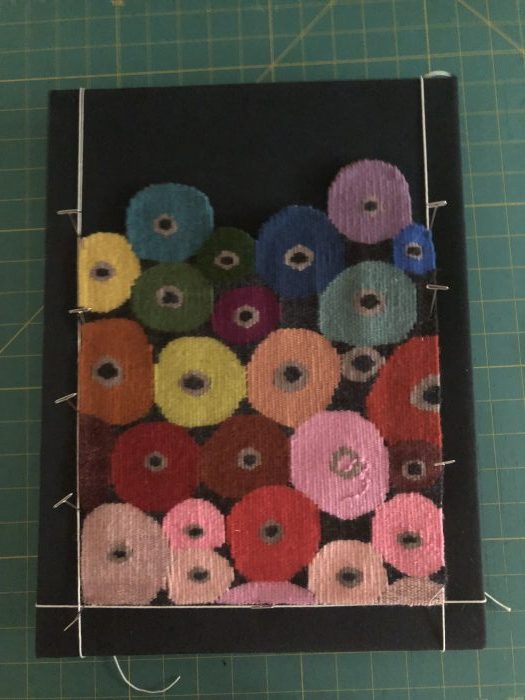
Here is my piece, with both edges finished.  I am using a cutting board with a 1-inch grid as a work surface.

IMG_1143

After measuring my finished piece I can decide how to mount it.  In general, smaller pieces hang better if mounted in a way that keeps them firm and stationery.  I often use stretcher frames for paintings.  I buy them from art supply sources.  Where I currently live, Jerry’s Artorama is my closest choice, and I can order them online without having to drive there.

I have skipped showing how to cover your stretchers with fabric.  This is an individual choice.  I usually use two layers of fabric.  My outer fabric is usually linen.  This has two benefits:

1.  Two layers of fabric will protect your tapestry from any damage that could happen from coming in contact with wood.

2.  Two layers of fabric allows you more choice for your outer fabric.  It is no longer necessary to find something quite as sturdy if there will be two layers.

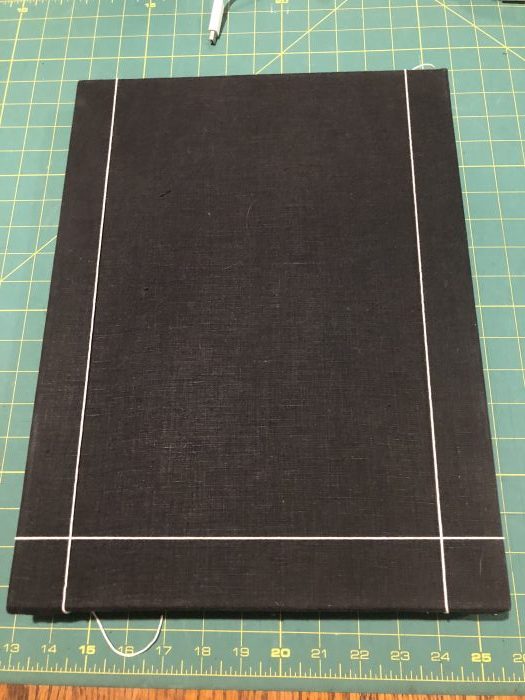
Linen is my preference because it’s a sturdy, natural fabric that works well with the varied weft materials I use in my work.  For this piece I’ve used a medium weight, navy blue linen.  Underneath it is a layer of heavy natural linen.  My husband does a great job of stretching the linen on the frames for me.  He gets a neat edge.  I will add that you want the tucks of fabric in your corners to be at the top and bottom of the piece.  When the tucks, or folds, are on the sides, you will see them when the piece is hung on a wall.  No good!

IMG_1192

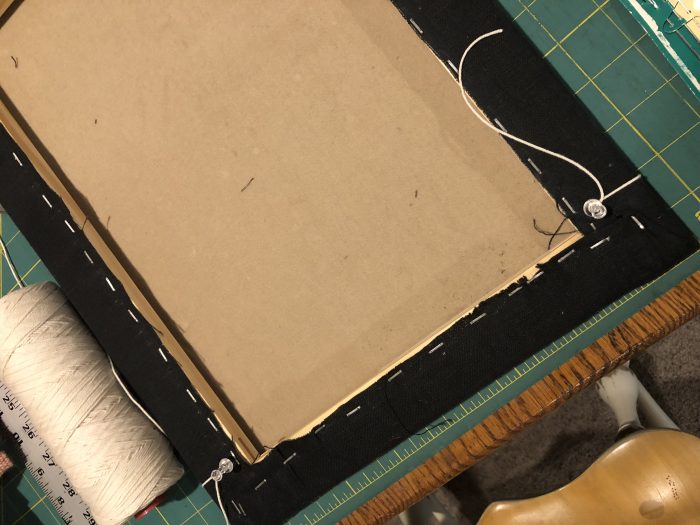
In the photo above, and the one below, I am making guide lines to help me place my tapestry on the frame.  This is what Susan Martin Maffei taught me, and I think it’s brilliant! As you can see, on the back of the frame I have inserted push pins at the borders of where I want my tapestry.  For this piece I want the tapestry to fit 1″ away from the side edges, and 1.5″ inches in from the top and bottom.  I make these measurements on the back of the frame and insert a push pin in each corner at that spot.

Then I can take some tapestry warp and wrap a line from the pushpins on the back across the front, both top and bottom, and across each side.  When I’m done the front looks like this.  I still have one guide line to add at the top of this frame.  The warp thread is tied to a pushpin, then wrapped the front of the frame and tied to its coordinating pushpin on the back.  Now I have guidelines for sewing my piece to the frame!

IMG_1193

With the guidelines in place I can now pin my tapestry to the frame.  I have used t-pins for this.

IMG_1195

I prefer to use a curved needle for sewing the tapestry to the frame.  I also use thread that matches the weft, and that means that I may have to change thread color a number of times during the sewing process.  I catch a bit of tapestry and insert the thread through the backing fabric.  It’s slow….

IMG_1196

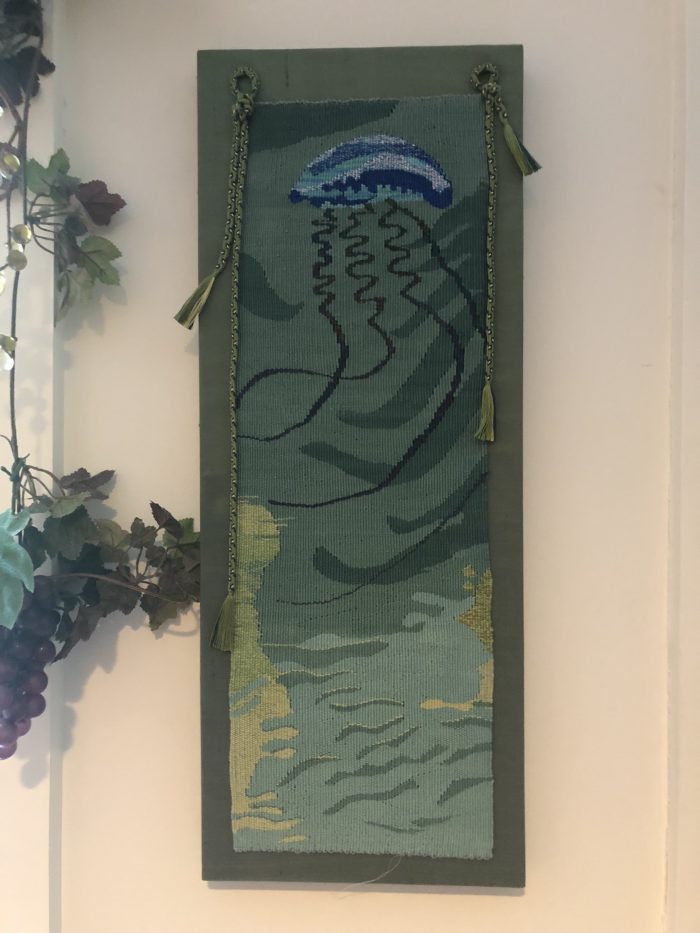
When done, I add a hanging device on the back, which is usually two small eye screws and a length of picture hanging wire.  Done!

IMG_1415

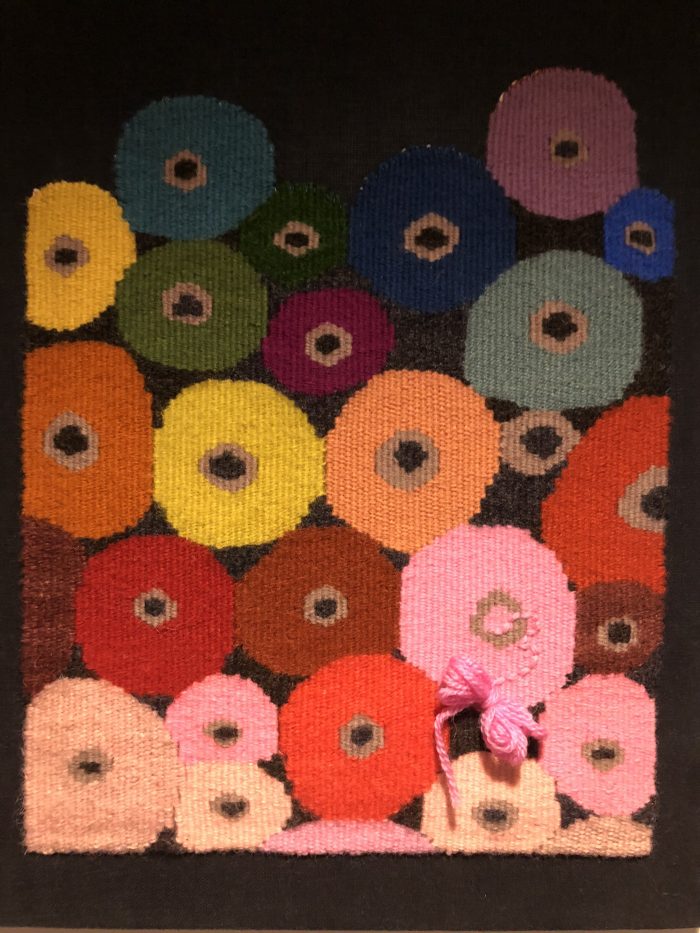
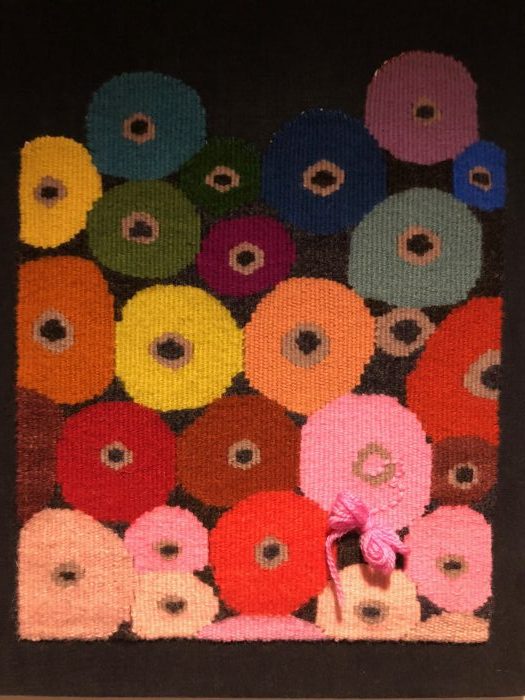
You may notice a butterfly of yarn and some ’embroidery’ on the piece that wasn’t in the photos previously.  Originally I used the ‘flying shuttle’ technique to weave in something resembling a lowercase, cursive ‘z.’  Then Susan Martin Maffei and a few others in the Wednesday Group asked me to consider hanging the whole piece in the other direction–with the shaped edge at the bottom.  After some time I removed the flying shuttle ‘z’ and left that extra weft hanging on the back of the piece.  A couple of years went by.  This piece was pinned to my big bulletin board.  In the long run, I wanted the piece as it was originally.  So I took that bit of weft still hanging on the back and tried to work it back in where it had been.  Of course, now that is not officially ‘flying shuttle’ anymore, but I feel that it still counts since I’d done it originally.  I finished off with the butterfly.  Don’t you have spools with extra thread/yarn stuffed into the center of the spool?  I have lots of those!

Done!

Some things take a long time to finish.  This little piece was one.  I wove it mostly while onboard Pandora for the winter.  For a couple of years in a row we encountered Portuguese Men of War while we were sailing in warm waters.  This tapestry is from the second sighting.  We were in Lake Boca, on the eastern side of Florida, and a few of these had been pushed into the harbor by strong winds.  I think it was just after a long session of strong easterlies that blew them inshore.  Normally they float up the Gulf Stream (which was our first encounter with them, which is another story entirely).  The one I’ve chosen for this tapestry had been blown into the harbor, and Bob and I motored right near it when we headed ashore in our dinghy.  I spotted this creature floating closer and closer to the dock.  I don’t think it had much longer to live in the murky harbor water.  It was strange to see this, when I associate these creatures being in the clear, pure waters of the ocean.

It is mounted on green dupioni silk that matched the murky green harbor water.  I felt it needed a braid, but I cannot tell you why.  It took me several months to decide what kind of braid.  This is a 16-tama braid called Hira Kara, which Claudia Wollny demonstrated in a 3-color placement that she calls a snake braid.  Although it does resemble snake skin, there is something about the color placement and design that seemed to go well with my little Portuguese Man of War.   Sometimes there is no reason, there is just a strong sense of this is it.

It now hangs on the wall in my weaving studio.

IMG_1484

Lace, Large and Small

The “Lace, Not Lace” exhibition opened at Hunterdon Museum on Sunday afternoon.  There were crowds there….a line to get in the museum, a line to buy the catalog, a line to get into the room with the full size, bobbin lace carriage made of copper wire, and quite a traffic jam at the stairs.  All the lines were worth it.

IMG_1523

The Urchins were, of course, the largest scale pieces in this exhibit.  But there were other large pieces inside.  This piece by Pierre Fouche is a mixture of bobbin lace and macrame.  The shadows were fascinating, even though it’s now hard to tell the piece apart from its reflection on the wall.

IMG_1538

This might be the tiniest piece.  Three little vehicles–a catboat, a yellow cab, and an airplane, all done in needle lace– suspended by thread across a corner, casting larger than real shadows on the two walls.  Dorie Millerson has a lot of miniature needle lace items that often cast HUGE shadows.

IMG_1529

Here are a couple of other lace pieces done on a typically small scale.  First is a piece by Dagmar Beckel-Machyckova, a series of bobbin lace dwellings, called “Habitats of Hypocrisy.”

IMG_1528

Lenka Suchanek has two pieces in this show that are very different.  The other piece is an elaborate silver wire neckpiece embellished with garnet beads.  While it is extragavant and exquisite, this piece has such beautiful form, it was the one I had to capture.

IMG_1527

This piece is so elegant and mysteriously UNdecipherable.  In the catalog, Veronika Irvine gives her math equation that helped her design this piece.  It’s pretty daunting–like a moebius on steroids.  She marvels that 17th and 18th c. lace display “an astounding mathematical complexity, although made by an entirely illiterate workforce.” Her website give more information.

IMG_1539

And here is the piece shown on all the promotion materials for this exhibit:  Lieve Jerger ‘s “Carriage of Lost Love, 1977-2018.”  It was housed in its own room, where the shadows cast on the walls and ceiling by this bobbin lace construction of copper wire was lit from within.  A staff member of the museum stood at the entrance to limit the number of people entering at one time.  It allowed all of us to see this work and enjoy the shadows cast all around us.

IMG_1533

IMG_1532

IMG_1531

IMG_1530

At the end of opening we were led outside to hear Choi and Shine talk about designing and creating the large Urchins.  Each one is crocheted from one long length of cord, and Jin Choi told us about her design challenges in creating these orbs.

IMG_1545

At the end of the talk, we were all invited to enjoy live music and dinner from two food trucks, while we waited for the lighting at dusk.

IMG_1546

The view from the museum across the spillway.

IMG_1540

Dusk at last!  Beautiful!

IMG_1549

And then it was fully dark, on a night that included a 2-days-short-of-full moon.

IMG_1550

IMG_1551

IMG_1553

The “Urchins” will only be on display for two weeks, so if you want to see them, better get on the road right now! The rest of the exhibition will continue through January 6, 2019.

Three good friends joined me for this adventure, and sharing something like this is definitely multiplied by enjoying it with like-minded compatriots!  We sat in a cafe along the river to wait for dusk to arrive and the lighting of the “Urchins.”  It was a memorable excursion that we’ll remember for decades to come.

In other life news, I got this card in the mail from a friend on the West Coast.  It just makes my day every time I see it!  I think I’ll frame it so it can be a ‘memo to self’ that it’s not always about the outcome as much as it is about the dream and the journey.

IMG_E1508

Lastly, I need to show you my grandchildren!  First, two wonderful photos of Tori.  In this photo, she’s a magical princess in a fairytale land created by a local photographer who has documented the arrival of the twins.

IMG_1509

And to balance– here is ‘real life’ Tori, helping her Daddy with some yard work.  She loves to help outside, so he bought her some hearing protection.  He’s such a thoughtful daddy.

IMG_1522

This week the twins visited the pediatrician for their first vaccinations.  Emme needed some support from little Rhett so she grabbed his hand….or maybe she wanted his cute binky holder.  I’m going with the former.

IMG_E1515

And a little frosting on the cake for last week! — Bob has put a beautiful finish on my new Jensen wheel.  It spins like a dream.

IMG_1513

And my good friend, Susan, has cut fabric off her loom that she wove for me!  She is now making me a tote bag and napkin that was a guild project a couple of years back.  I don’t care how long I have to wait!  The fabric is gorgeous, so I don’t mind waiting a bit longer for the tote bag and napkin.  Lucky, lucky me.

IMG_1518

Life is full of so many wonderful textiles, isn’t it?  Lace is only one wonderful piece of it.


Flapping in the Breeze

Isn’t August the month when almost everyone goes on vacation? …when almost everyone takes some time off to relax and recharge?  I’m feeling pretty overwhelmed this month, like I’m hanging on to a frayed cord that is snapping in a gale.

But most of what is happening these days is good news.  If I weren’t so slow at accomplishing the things I am driven to do, I’d be thrilled at what’s coming down the pike.

Here is the postcard for the upcoming exhibition of fiber art at the Eclipse Mill Gallery in North Adams, Massachusetts.  I had no idea that my tapestry would be included on the card.  What a happy surprise!

NAFA_Evite

I joined this group when it was formed by Betty Vera this spring, but I have not yet met the other members.  This weekend I am going to one of the monthly meetings and am looking forward to getting to know the other artists.  I think Betty Vera and I are the only weavers in this group (not entirely certain about that), so I am interested in learning more of what the other artists do.

A few weeks back I was catching up on reading the various journals and magazines I miss when I am away for the winter.  In an issue of  “The Journal for Weavers, Spinners, and Dyers” (from the UK guild), I saw an advertisement for an iphone case made of Harris Tweed.  I became single minded about obtaining one of these.  A google search led me to Amazon.  Yeah, Amazon.  There are more, if you’re tempted too.  I just love it!

IMG-0489

My two small tapestries are now mounted.  It feels so good to finish things.  I wish it happened more often.  I think I’ll call this one “Primary Source.”   I hope some of you get my signature.

IMG-1415

And here is the other, “Blown Off Course.”

IMG-1413

I think it needs a braid, and with that in mind, I am sampling.  My first attempt is too thick, but I like the design.  I will try it again as soon as I finish this one.  Next time I’ll put fewer strands on each tama. And next time I’ll take a better photo! Now you know what a mess I work in when I’m on a role.

IMG-1416

My generous friend Clare is still letting me use her taka dai.  Really!  After this I think I’d better let her play with it again, since it’s her toy.  This time I am trying a 2/2 twill.  With these experiences under my belt I hope to work up to double weave braids in my class with Rodrick in the fall.

IMG-1405

And here is a close up so you can see the colors better.  I like it!

IMG-1407

So, why am I doing all of this?  I haven’t touched kumihimo in about 15 years.  Well….. I only recently learned that an American kumihimo society has been formed.  It piqued my interest to get back to this.  I’d like to use the flat braids from the taka dai as embellishments on clothing and handbags.  As of yet, no fabric with which to implement these ideas!  Isn’t that always the way? —  at least for me! —  to put the carriage before the horse.  It’s thrilling to be enthusiastic though!  Clare and Julia and I are investigating other silks for these braids…that is, other than the pre-cut fine silks you buy in packages.  We want to find the same fineness on cones so we can choose our warp lengths.  Hopefully we’ll have a source soon.

And I’ve been thinking of adding other braids to my tapestries.  In fact, for my ‘real’ Portuguese Man of War tapestry, that currently only exists in my dreams, I plant to use a number of braids, along with other handwork techniques for embellishment.  In my mind this piece is a tour do force.  No cartoon yet …..because I actually don’t know if I can capture something so wonderfully ephemeral down on real materials, like paper or warp and weft.

So August marches on like a house on fire.  I hope I can keep up….


September around the Corner

Imagine my excitement when I saw a recent post on facebook that some large scale lace I admired from images on the internet is coming to the US! — Not only to the US, but within driving distance for me!

These were the images that piqued my interest in large scale lace installations in the environment.

This is a large crocheted piece based on a traditional Dutch head bonnet.  Delicate lace made on a huge scale to interact in the environment.  Hanging over a canal, in Amsterdam, it reflects on the water beneath, whether ruffled by wind or calm and still.  It casts shadows day and night on its surroundings.  When I saw this online I dearly wished I could see it in situ.  There is an excellent description of how this piece was made and assembled.

It has two sister pieces called the Urchins, and these will be part of the exhibition at the Hunterdon Museum in Clinton, NJ, that opens in late September.  These two urchins will hang over the Toshiko Takaezu Terrace at the museum, which overlooks the waterfall on the South Branch of the Raritan River.  It will be their first trip to the US.  They will only be on view during the first two weeks of this exhibition.  Inside the museum will be many other pieces of lace, including bobbin lace and needle lace, done on large scale.  I can’t wait to see them!

So, the big decision is….. do I go for the opening?  The pluses of that would be getting to hear two lectures on the lace exhibit — one by the curator Devon Thein, and another by the creators of the Urchins, Jin Choi and Thomas Shine.  Afterward, at dusk, the Urchins will be lit.  Those are big pluses.  The downside?  Well, I never fully enjoy the artwork at an opening.  It’s crowded, I can’t fully see the pieces on display, it’s noisy….it’s a party.  The likelihood of me getting to this exhibit twice is pretty slim.  I have to choose.  What would you do?

My friend Clare is letting me use her taka dai once again, so I have put on a warp for a 2/2 twill design out of Rodrick Owen’s book.  I dressed the taka on Thursday and will spend some time at her house tomorrow weaving.  I almost live there now….not sure what her partner thinks of always finding me in their sunroom.  Here’s a look at the first braid in progress.  I’ll take photos tomorrow of my twill attempt.

IMG-1104

With luck, my next  post will have photos of the finished mounting of the little Portuguese Man of War tapestry and maybe a new flat braid from the taka dai.  Oh yeah, and the last of those lace blankets I’ve knitted for my three tiny grandchildren.  Don’t you want to see them?  (the grandchildren, that is, not the blanket)

This is just pulls my heartstrings! Rhett is holding Emme’s hand in his sleep.  I wonder if he did this in utero as well.

IMG-1391

And here is big sister Tori with little Rhett.  I just love being their YaYa.  I hope I get to see them in September.  They are growing up so quickly!

IMG-1397


Scroll to Top