
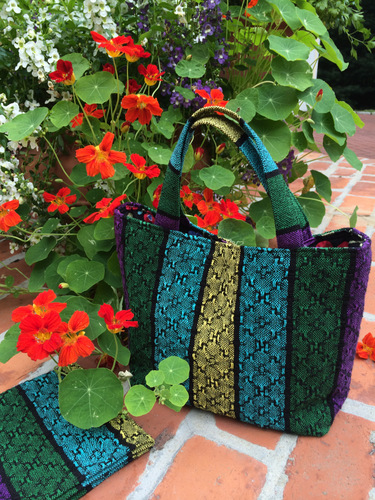
8-SHAFT HUCK LACE TOTE BAG
This fabric is based on a well-known huck lace pattern that is available in a number of places. It is included in the The Best of Weaver’s Huck Lace, edited by Madelyn van der Hoogt, on page 12 in the pattern section (by Ruth Morrison), and in the project section starting on page 51. This pattern is also used as the end plate on the right-facing page at the beginning and end of the book.
You can also consult Madelyn van der Hoogt’s informative digital workshop on lace weaves which you can preview here: http://www.interweavestore.com/weaving-lace-with-madelyn-van-der-hoogt.
Here is my version of this project:
Warp: 16/2 linen (Bockens Lingarn) in five colors: 1 spool each, 125 grams
# 522 black
# 485 purple
# 4060 dark green
# 40 bright turquoise
# 2030 lemon yellow
The tote fabric requires about a yard of fabric, and each napkin requires ½ yard of fabric, so plan your warp length accordingly. I wove one yard for the tote and 2 ½ yards for five napkins. I put on a 5 yard warp to allow some sampling and loom waste.
Weft: 16/2 linen in #522 black, 2 spools (in addition to the one used for warp)
Sett: 20 epi, width in the reed about 17.5” (finished width about 16.5”)
Threading: There are 7 repeats of the huck pattern with 4 extra plain weave threads in black at each selvedge. I also threaded two threads together for the first thread at each selvedge. Total warp threads: 365 ends
Weaving: to balance at 20 epi
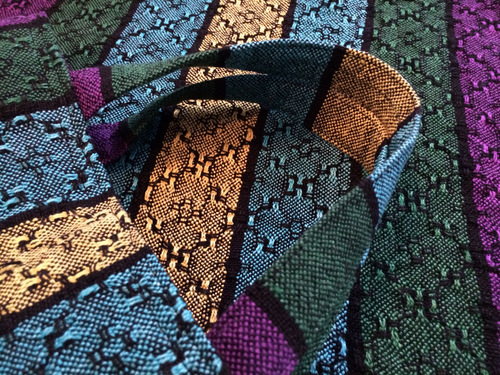
The full pattern repeat is 50 threads. Each color stripe is 45 threads with 5 black threads at the beginning of each pattern. I placed a stripe of five black threads at the beginning of each repeat to emphasize only one column of the flower motif, as in reality there are two columns of staggered flowers. (Unfortunately, all huck looks geometric until it is wet finished. So my flowers look like diamonds in the drawdown. Consult the detail photo at the end for what happens after wet finishing.) By having a small black stripe of 5 threads, I minimized the appearance of the staggered flowers so that one straight column of flowers would stand out. I chose to do this in order to better coordinate with the mug I was using as inspiration for the tote. At finer setts the staggered floral motif shows up well, but not at the sett I needed for fabric that would be sturdy enough for a tote bag.
Finishing: Off the loom, I machine washed the entire length of fabric in the washing machine on ‘normal’ setting, warm water. After smoothing the fabric by hand, I let the fabric air dry and then steam pressed it before serging the edges between all the cuts.
Huck Lace Lunch tote final as woven (this link will bring up the pdf file)
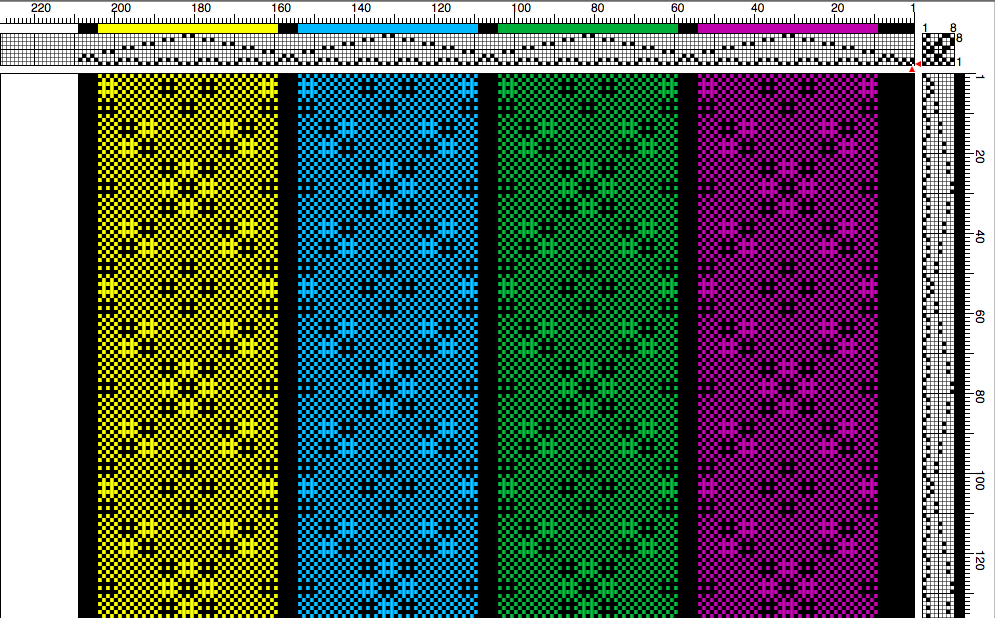
In this drawdown I have also included 4 extra plain weave threads at each end of the warp. You might add even more. Huck lace gives a lovely scalloped edge to fabric when it is not bordered by plain weave; however, at such a loose sett of 20 epi I found that the scallops look rather clumsy. They are lovely at finer setts, but for this project I wish I had used a plain weave border, so I’ve included that here.
The drawdown should be followed until the end of the yellow stripe, then worked in reverse color order back through the blue, green, and purple.
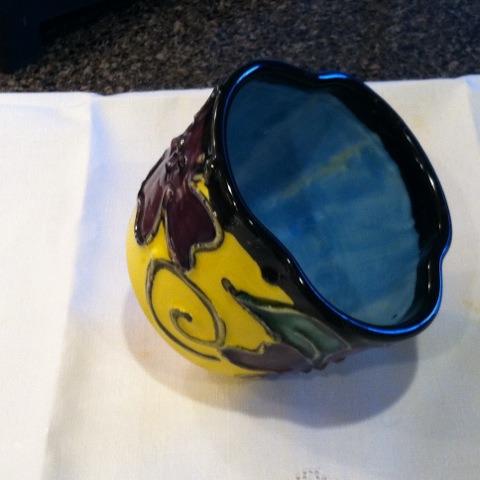
The mug that inspired the tote bag:
SEWING THE TOTE BAG
Materials Needed:
Tote bag fabric: 15” x 27” plus extra for straps if using this fabric
Lining fabric: 15” x 27” plus more for pockets and possible straps
Pockets from lining: 2 pieces, 7” x 15”
Light Weight fusible interfacing: 14” x 22”
Fusible Fleece: 14” x 22”
Cotton webbing straps if you don’t wish to use handwoven or lining fabric for this
- Cut pieces to size.
- Fuse the light weight interfacing to the wrong side of your handwoven tote fabric, centering the interfacing so that there is ½” margin on each long end, and 2 ½” margins at the short ends.
- Fuse the fleece to the wrong side of your lining fabric, centering the fleece as you did with interfacing on the main fabric.
- Sew the pockets: place right sides together and sew around pieces leaving one short edge open. Turn right sides out and press, pressing under ½” seam allowance that did not get sewn. Top stitch around all 4 sides, which will close and finish the edge that was left open for turning. Place the pocket on the right side of the lining fabric about 4” down from the raw edge of one of the short sides. Sew along the outer edges and bottom of the pocket, attaching it to the lining.
- Then top stitch a pocket divider, either by sewing directly down the center of your pocket, or by sewing 1/3 in the distance on the long side. I opted for the 2nd choice so that one pocket would be larger than the other.
- Fold the lining (with attached pocket) in half along the long edge, right sides together, and sew the side seams.
- Make a flat bottom for the lining as follows: with the wrong side of lining facing out, position one side seam so that it is in the center of the fabric, and so that the end of the seam forms a triangle at the bottom of the tote:
 Measure 2 ½” up from the point and draw a sewing line across the bag that should be 4” across. Sew across this line. Repeat this on the other side seam.
8. Repeat this process of folding the long edges of the main fabric in half (right side together) and sewing the side seam. Then repeat the process for making a flat bottom for the main fabric.
9. Put the lining inside the bag, with the right side of the lining facing inward and the right side of the main fabric facing outward. Turn the triangle flaps on both lining and main fabric so that they face into the bottom of the bag.
10. Fold down the top edges of the lining and main fabric toward the inside of the bag, and so that each fabric is now folded along the edge of either the interfacing or the fleece. Match the edges and pin.
11. Make your handles. If you are using the handwoven fabric your handles will only be about 16” long. Take the hand fabric and press ½” in on the long sides. Fold in half and top stitch along the pressed edge and then around the entire handle to finish.
12. Insert the handles into the pinned top edge of the tote bag so that each end of each handle is about 1/3 in from the end of the bag. The finished bag is about 13” wide. Divided in thirds (4 1/3”), you would place your handles to center on 4” and 8 ½” roughly. Pin the handles in place with at least 1 ½” down in the seam. Top stitch around the top of the bag.
FOR NAPKINS:
I wove 18” of huck lace pattern with 2” of plain weave at the end of each napkin. I wove two picks of a contrasting color of weft in plain weave between each napkin. I turned under a hem at each end so that the plain weave was not showing on the face of the napkin, and hemmed the napkins by hand with black thread.
Thank you so much for your kindness in publishing your beautiful pattern! I remembered when the photos first came out. You did a thorough and wonderful job on the pattern – well done!!
Thank you for taking the time to look, Anne!
Thank you for sharing in such detail your pattern and tote directions. I’m sure the recipient will be thrilled.
Thanks so much Brenda. I really love your tote and your directions are great. Don’t know where the summer is going, busy doing I don’t know what. Haven’t done anything since I saw you, miss the motivation of having friends nearby to discuss projects etc. I’ll blame it on summer. Sorry I missed you at the tapestry exhibit. Looks like your having a good time sailing etc. talk to you soon.
Thank you SO much for this pattern! I just finished weaving my first overshot attempt on my 4 harness loom and wanted to make a tote bag. I used your pattern and it turned out beautifully!! Wish I could share a photo of it with you.
I’d love to see your tote bag, Mary! You can always email me privately.
Thank you for the detailed weaving instructions. Very helpful. Excited to start.